How to Make House Numbers Glow in the Dark: 8 Effective Ways That Actually Work
How to make house numbers glow in the dark starts with choosing materials that absorb light and release it slowly at night, like photoluminescent paints or numbers made from glow-in-the-dark filament. You can also improve visibility using solar-powered or LED lighting to keep your address readable all night. The most effective glow lasts up to 8-10 hours, depending on the product’s quality and exposure to sunlight during the day. Begin by assessing your home’s light exposure and pick a durable, weather-resistant material designed for outdoor use to ensure lasting glow and visibility.
Key Takeaways
- Glow duration varies by material, ranging from a few hours to 8-10 hours under good light exposure.
- Photo-luminescent numbers made with materials like glow-in-the-dark PLA filament work without electricity or batteries.
- Durable vinyl and brass numbers with glow coatings can withstand weather and last up to 6 years outdoors.
- Applying glow paint or adhesive numbers in high-contrast colors improves night visibility and complies with local codes.
- Solar-powered or LED lights placed above or below house numbers increase visibility beyond natural glow times.
- Choose fonts like Century Gothic or Neutra for readable, modern-looking house numbers that glow well at night.
1. How Glow in the Dark House Numbers Work and Glow Duration

Glow in the dark house numbers use phosphorescence, a process where materials soak up light energy in daylight and then emit it slowly as visible light during nighttime without needing power or batteries. This process happens because phosphorescent pigments have molecules that absorb energy when light hits them, storing it and releasing it over time. Unlike fluorescent materials that stop glowing right after the light source is gone, phosphorescent ones continue to shine for several hours, perfect for making house numbers visible in the dark.
Common materials used for glow in the dark house numbers include photo-luminescent PLA, glow-in-the-dark paints, and engineered vinyl films infused with phosphorescent pigments. Photo-luminescent PLA is often used in 3D printing durable numbers that glow brightly overnight. It is weather-resistant, which helps it maintain performance outdoors. Glow paint can be applied to existing numbers or surfaces, offering flexibility but sometimes requiring regular reapplication due to fading from exposure to weather. Engineered vinyl offers an adhesive backing and is suitable for flat mounting surfaces, combining ease of installation with lasting glow capabilities.
The glow duration typically ranges from 4 to 10 hours after a full charge of bright light, depending on the exact material and environmental conditions. For example, photo-luminescent PLA numbers can glow up to 8-10 hours if exposed to bright sunlight or strong artificial lighting for several hours during the day. Factors like how much light exposure the numbers get, the type of pigment used, temperature, and surface condition affect glow intensity and duration. In colder temperatures, some pigments may glow less brightly but could last longer, while dirt or moisture on the numbers can reduce their glow effectiveness.
For the best results, the house numbers need regular exposure to direct sunlight or strong outdoor lighting for at least 3 to 5 hours during the day to absorb enough energy. Thin or transparent coatings can also be applied to protect the glow surface without blocking light absorption. Numbers installed in shaded or heavily covered areas will glow less brightly and for shorter periods. Avoid physical damage like scratches or weather wear, as these can lower the glow time significantly. Proper selection of material based on your climate and lighting conditions ensures that the numbers remain visible through most of the night without any additional power source.
2. Best Materials and Products to Make Numbers Glow Outdoors
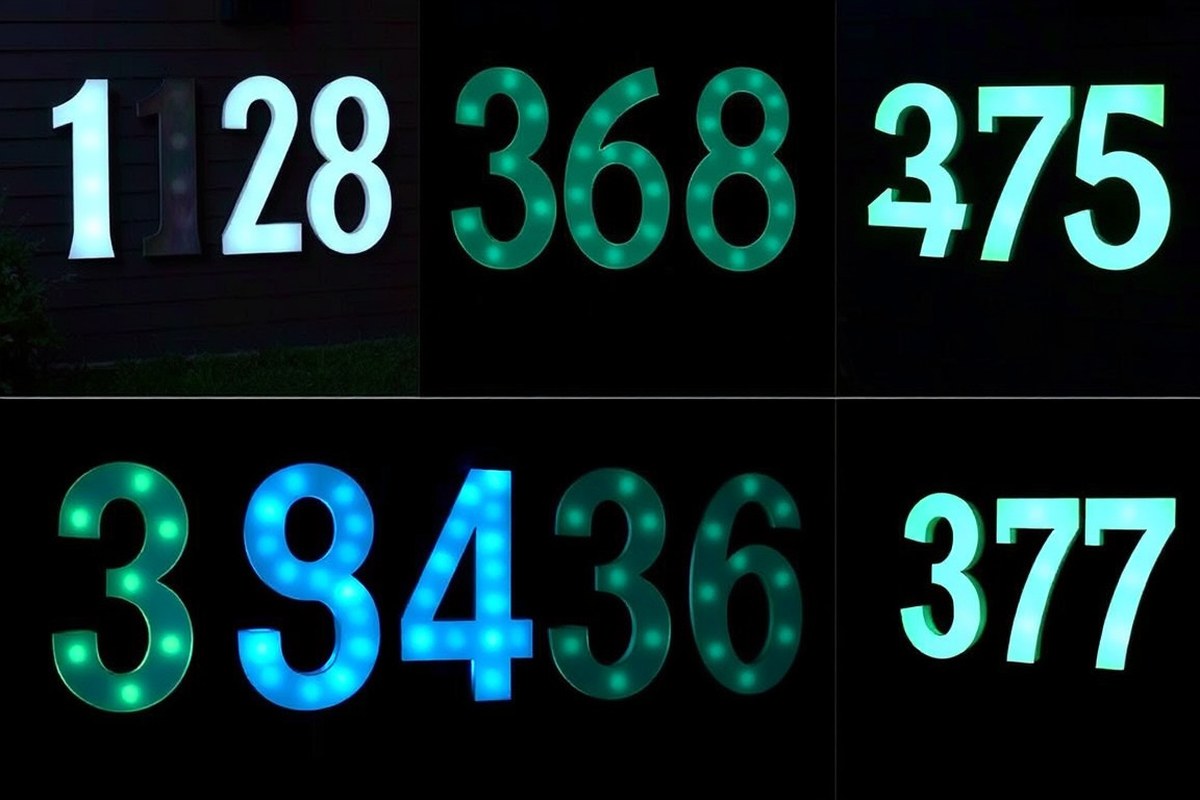
Choosing the right material for glow in the dark house numbers affects both how well they shine at night and how long they last outdoors. Glow paint offers a balance of affordability and ease of application, but it tends to require reapplication every year or two due to weather exposure. Vinyl glow decals provide simple installation via adhesive backing and resist fading better than paint, though they can peel in high heat or moisture. Custom 3D printed numbers, especially when made from durable PLA plastic infused with glow pigments, offer a unique, tactile look with long-lasting glow and physical presence, but they typically cost more upfront. Reflective paint doesn’t glow on its own but shines brightly when hit by car headlights or porch lights, improving nighttime address visibility without any power source.
| Material | Durability | Glow Brightness | Weather Resistance | Maintenance | Approximate Cost |
|---|---|---|---|---|---|
| Glow Paint | Medium (1-2 years outdoor use) | Moderate (lasts 2-4 hours after dark) | Affected by rain and UV; fades over time | Reapply annually or every other year | $10-$20 per small bottle |
| Vinyl Glow Decals | High (up to 3 years outdoors) | Low to moderate (depends on pigment) | Good, but may peel in extreme heat | Replace every 2-3 years as needed | $15-$30 per set |
| 3D Printed PLA Numbers | High (PLA resists weather well) | High (glow pigment embedded) | Good; best if sealed with outdoor coating | Low; occasional cleaning | $30-$70 per customized number |
| Reflective Paint | High (several years with proper seal) | No glow, shines when illuminated | Excellent; withstands rain and sun well | Touch up sealant every few years | $20-$40 per bottle |
Applying glow paint or reflective coatings usually requires a clean surface and sometimes a primer layer to ensure adhesion and longevity. Vinyl decals come with adhesive backings that make installation simple but require a smooth surface. Custom 3D printed numbers can be ordered from specialty suppliers, then attached using screws or heavy-duty adhesive. Sealing the numbers with a weatherproof clear coat will extend their lifespan, especially on painted or printed surfaces. Reflective paint works best on flat or slightly curved surfaces for maximum light return from headlights or porch lights.
Use a clear UV-resistant sealant over glow paint or 3D printed numbers to protect them from fading and peeling under prolonged sun exposure.
3. Step-by-Step DIY Guide to Applying Glow in the Dark Numbers
Creating glow in the dark house numbers at home requires a few tools and careful preparation to ensure lasting visibility. Taking the right steps lifts your house number’s night-time visibility, which helps visitors and emergency responders locate your home quickly. It involves prepping the mounting surface, applying glow paint or attaching glow numbers, and allowing adequate drying time.
Essential Tools and Materials
Start by gathering the tools and materials needed for the project. You’ll need quality glow-in-the-dark paint or pre-glowing numbers designed for outdoor use. Other essential supplies include sandpaper to prepare the surface, painter’s tape to mask areas, a cleaning cloth, and a mild detergent. A drill and screws or strong outdoor adhesive help with mounting numbers if applying separately. Finally, gloves and a respirator mask protect you during paint application. Having the right tools ensures strong adhesion and vibrant glow without damage or premature fading.
Preparing the Surface Properly
A clean, smooth surface helps the glow paint or numbers stick well and glow brightly. Clean the house number area thoroughly using warm soapy water and a cloth, removing dust, dirt, and grease. Rinse and let dry completely. Sand rough or glossy surfaces lightly with medium-grit sandpaper (around 120 grit) to give the paint a slightly rough texture to grip.
Avoid painting on peeling paint or dirty surfaces, which cause poor adhesion and uneven glow. Mask around the area with painter’s tape to protect walls or siding from accidental paint.
Applying Glow Paint or Mounting Numbers
Follow the steps below to apply glow paint or attach glow in the dark numbers properly. This sequence helps you work efficiently without rushing:
- Shake the glow paint thoroughly for at least one minute to mix the glow particles evenly.
- Apply the first coat of glow paint evenly using a small foam brush or sponge, covering the entire number surface. Let it dry as per instructions on the paint label, usually 30 to 60 minutes.
- Apply a second coat for a stronger, longer-lasting glow, then allow it to dry fully, which can take up to 24 hours for best results.
- Before mounting pre-glowing numbers, mark the drill points on the surface with a pencil and use a level to keep them aligned correctly.
- Drill pilot holes carefully, then fix the numbers onto the surface using screws or outdoor adhesive specified for your siding type.
- Remove painter’s tape immediately after applying paint or mounting to avoid peeling fresh paint.
Applying multiple paint coats amplifies brightness and duration. Using screws improves durability, especially in high wind or rain areas. Outdoor adhesive is a faster option but may need reapplication every 1 to 2 years.
Drying and Testing the Glow Effect
After painting, allow full curing time in a dry, dust-free environment to prevent spots and enable maximum glow brightness. Most glow paints require 24 hours to cure completely before exposure to outdoor conditions. The surface temperature ideally should be between 60°F and 85°F for best drying.
Once cured, charge the glow by exposing the numbers to bright light for 10 to 15 minutes, such as direct sunlight or a strong LED flashlight. Then test the glow in darkness. A good result is a clear, even glow visible from at least 20 feet, making your home easy to spot at night. When the glow looks uneven, apply another thin coat of paint and then repeat the drying and charging steps.
Maintaining a clean surface free from dirt buildup keeps the glow bright longer. Reapply coats every couple of years to restore fading.
4. Solar-Powered and LED Lighting Options to improve Glow Visibility
Solar-powered LED lights offer an energy-efficient way to make your house numbers glow without wiring or high electricity bills. These lights charge during the day and automatically illuminate at night, providing clear visibility that can last through dusk until dawn. Installing a solar-powered address sign is usually simple: stake it in the ground or mount it near your numbers, making it ideal for homes where running electrical wires is difficult.
LED lighting options can perform better than passive glow materials, especially in areas with little ambient light. Motion-activated lights add a layer of energy savings and security by only lighting up when someone approaches. However, their intermittent illumination may not work well if you want constant visibility or if the sensor misses some angles.
To decide which light type works best for your home, consider the style and location. Backlit LEDs place light behind the numbers for a soft glow that is easy on the eyes and effective in low-light settings. Front-lit LEDs shine directly onto the numbers, creating high contrast that’s easier to read from the street, even in fog or rain. Dual-lit combines both for maximum visibility, though it uses slightly more energy.
Wired options with LED fixtures offer reliable, continuous lighting and can integrate with home automation systems but require professional installation and higher upfront costs. Solar and motion-activated lights offer simpler setups and operate independently of your electrical system. The best choice balances installation complexity, energy efficiency, and the amount of light needed in the space.
| Design Type | Visibility Description | Energy Consumption |
|---|---|---|
| Backlit | A gentle light helps you spot the numbers clearly after dark. | Uses LED lights that save energy |
| Front Lit | Bright light makes numbers stand out | Uses LED lights that save energy |
| Dual Lit | These lights consistently provide the clearest view day and night. | Uses LED lights that save energy |
For installation, mounted solar-powered address plaques like the MAXvolador model provide waterproofing and multiple color modes, allowing you to customize brightness and visibility. Place solar units in direct sunlight areas to ensure full charging capacity. Motion sensors should be aimed to cover the approach path to your home, but be mindful they may not activate for every passerby.
Energy-efficient LEDs last upwards of 25,000 hours and operate effectively in cold temperatures, making them a durable outdoor lighting solution. Costs for solar-powered LED systems typically range from $20 to $60, depending on features, while wired LED fixtures may run $100 or more plus installation. Match the lighting style to your home’s façade and outdoor layout to maximize effectiveness while keeping energy use low.
5. Choosing the Right Glow Method Based on Location and Home Style
Choosing the right glow method for your house numbers depends mainly on your home’s style, local climate, and how visible you want the numbers to be at night. Balance aesthetics and function by considering materials and illumination types that complement your architecture and withstand weather conditions.
Matching Glow Styles to Home Architecture
Traditional homes with Colonial or Craftsman styles look best with subtle, warm glow methods such as backlit numbers or glow-in-the-dark paint with a soft tint. In contrast, modern or minimalist homes can handle sharper, cooler LED lights or brushed metal numbers coated with photoluminescent materials for a sleek, bright effect.
Consider the scale and color palette of your home when selecting glow types. Large contemporary homes benefit from bold lighting like solar-powered LEDs, while small cottages pair well with understated painted glow numbers that maintain charm without overpowering the facade.
Climate Considerations for Glow Solutions
Wet or rainy climates require glow methods with durable, water-resistant coatings and secure mounting to prevent moisture damage. Powder-coated metal numbers with integrated LEDs enclosed in waterproof casings provide bright, reliable glow year-round in rain-prone areas.
In colder climates, avoid glue or paints that become brittle below 40°F (4°C). Use numbers designed for freeze-thaw cycles, like acrylic numbers with internal photoluminescent layers, or solar LED units with batteries rated for subzero temperatures to maintain consistent illumination.
Visibility Needs Versus Design Preferences
Prioritize visibility by choosing glow methods with longer glow duration or supplemental lighting if you live on a dark street or have guests frequently arriving after dusk. Glow-in-the-dark paint offers 8 to 12 hours of glow after full sunlight exposure but may need topping with solar LED spotlights for maximum clarity.
When balancing aesthetics and visibility, select numbers whose light intensity complements surrounding lighting rather than causing glare. Matte finishes and diffused light work well for preserving your home’s curb appeal while improving readability.
Decision Rules Checklist for Selecting Glow Methods
Use this checklist to find the best glow solution for your house numbers:
- Check your home’s architectural style: traditional or modern.
- Assess local climate: rainy, humid, cold, or mild.
- Determine power access: solar, wired electric, or none.
- Estimate desired visibility: subtle glow or bright illumination.
- Match color and finish of numbers to home exterior.
- Consider maintenance effort and durability needs.
- Balance cost: $20-$100 for glow paint, $50-$200 for solar/LED numbers.
Following these rules will narrow down practical options and help you pick a solution that harmonizes design with performance.
Tips for Pairing Glow Types with Environments
Solar-powered LED numbers excel in sunny environments but may underperform in shaded or overcast areas without supplemental lighting. Glow-in-the-dark paint suits all climates but requires daylight to recharge and performs best in regions with steady sun exposure.
For homes near busy roads or streetlights, avoid overly bright lighting that could cause confusion or glare. Instead, go for diffused photoluminescent coatings to ensure your house numbers stand out without harsh highlights.
Test your chosen glow method at night before final installation to confirm visibility and appearance meet your expectations.
6. Maintaining Glow in the Dark Numbers for Long-Lasting Visibility
Keeping your glow in the dark house numbers bright and intact requires routine cleaning, regular testing, and prompt repairs. Consistent maintenance helps prevent fading and peeling caused by weather and dirt buildup, which can reduce visibility at night. Following a clear checklist ensures you know exactly when and how to preserve that glow.
Regular Cleaning Schedule for Clear Glow
Cleaning glow in the dark numbers every two to three months keeps dirt, dust, and grime from blocking the light absorption needed for a strong glow. Use a soft cloth dampened with mild soapy water to gently wipe the numbers. Avoid harsh chemicals or abrasive tools that can damage the glow material or protective coatings.
For locations with heavy pollen, pollution, or bird droppings, increase cleaning frequency to monthly during active seasons like spring and fall. After severe storms, checking and cleaning the numbers promptly helps avoid long-term buildup or stains.
Protecting Against Fading and Peeling
UV rays and weather exposure gradually degrade glow materials. Applying a clear, UV-resistant sealant once a year extends the life of the glow layer and prevents peeling. Look for water-based sealants specifically designed for outdoor plastics or paints, costing between $10 and $25 per small container at hardware stores.
Before sealing, inspect numbers for chips or lifting edges and sand lightly with fine-grit sandpaper if needed to promote adhesion. Resealing takes about 30 minutes, and drying times vary from 1 to 4 hours depending on the product.
Testing Glow Strength and Visibility
Check the glow intensity once every two months to make sure numbers remain visible at night. Charge them by exposing to sunlight or bright artificial light for at least 30 minutes, then observe in a dark area. Numbers should shine brightly for several hours; if the glow appears weak or uneven, it may be time for a touch-up upgrade.
Testing at consistent times and lighting conditions provides a reliable measure of glowing performance. Keep a flashlight handy to compare visible contrast between the glow numbers and their surroundings.
Simple Repairs and Touch-Ups
Small cracks, chips, or fading spots on glow numbers can be fixed without full replacement. Use a glow in the dark paint pen or refill kit to carefully apply glow material only over the damaged areas. This costs about $8 to $15 for a pen, making it affordable to maintain brightness.
For peeled edges, gently lift the area, apply a waterproof adhesive, and press down until set. Replace missing screws or mounts promptly to keep numbers firmly attached to the house.
Seasonal Maintenance Checklist
Following a seasonal routine ensures ongoing visibility through weather changes and wear:
- Spring: Deep clean to remove pollen and dirt, inspect for winter damage, reseal if needed.
- Summer: Test glow strength monthly, clean after dust storms or heavy rains.
- Fall: Clear fallen leaves and debris, reseal to prep for harsher weather.
- Winter: Check for ice or snow buildup that blocks glow, repair any damage from cold exposure.
- After storms: Clean off mud or debris, inspect attachment points, and do touch-ups.
This schedule also helps catch common issues before they worsen, saving time and money on full replacements.
7. Common Mistakes and How to Fix Glow Number Problems
Glow in the dark house numbers sometimes fail to glow at night due to common mistakes during installation or maintenance. Often, these problems occur when the numbers are placed in areas that don’t receive enough sunlight or artificial light to charge the glow material. Numbers installed on shaded walls, under eaves, or behind bushes won’t store enough energy to glow well later, making visibility poor.
Poor placement not only limits glow but also reduces visibility because the numbers might be too low, too small, or facing away from typical viewing angles. Choosing a flat, unobstructed, and brightly sunlit spot maximizes glow effectiveness. Position the numbers between 4 and 6 feet from the ground to make them easily readable from the street or driveway.
Mistakes that hurt material adhesion include applying glow paint or adhesive decals on dirty, wet, or rough surfaces. Dust, grease, or mildew prevents proper bonding, causing the numbers to peel or chip early. Durability also suffers when the surface isn’t prepped by sanding or priming if needed. Applying glow coatings in temperatures below 50°F can also prevent curing, leading to a patchy glow.
To fix faded or uneven glowing surfaces, the best approach is to clean the existing number gently with soap and water and lightly sand the surface to remove loose paint or dirt. Then reapply a thin, even coat of glow paint or replace the decal. Allow the glow layer at least 12 hours to cure under direct sunlight for the best charge and brightness. Using multiple thin coats rather than one thick one prevents drips and uneven glow.
- Install numbers where they get 4+ hours of direct sun daily to ensure proper charging.
- Clean and dry surfaces thoroughly before application to improve adhesion and durability.
- Sand smooth metal or wood surfaces before applying glow paint for better grip.
- Position numbers 4 to 6 feet high, facing the main street or driveway viewing angle.
- Avoid applying glow coatings in temperatures under 50°F to ensure proper curing.
- Use two or three thin paint layers instead of a heavy coat for even glow coverage.
- Reapply faded coatings every 1 to 2 years depending on local weather exposure.
A before-and-after example is a homeowner who first placed glow numbers beneath a large tree with little sunlight. At night, the numbers barely glowed, making them hard to see. After relocating the numbers to a sunny front wall 5 feet above the ground and cleaning the surface before repainting, the numbers glowed brightly and were visible from the street all night long. This fix took less than $30 for paint and minor wall patching and added just a couple hours of work but greatly improved curb appeal and safety.
8. Legal Requirements and Safety Tips for Illuminated House Numbers
Local regulations often set specific requirements for the size and illumination of house numbers to ensure they are legible from the street, especially at night. For example, many municipalities require numbers to be at least 4 inches tall, made from contrasting colors, and clearly visible from the road. Some areas also mandate that numbers be externally lit or use glow-in-the-dark materials that remain visible without external power. Checking with your city or county building department before installation helps avoid fines and ensures compliance with local fire codes or zoning laws.
Meeting these visibility standards is important for emergency responders who rely on quickly identifying addresses during urgent situations. The numbers should be clearly readable from the street or driveway entrance in low-light conditions. Installing glow-in-the-dark house numbers or adding low-wattage LED or solar-powered lights can ensure visibility without excessive electrical costs or complicated wiring. Emergency services typically recommend illumination that can be seen from at least 50 feet away to avoid delays. Placement at eye level or above 5 feet also improves visibility.
Safe installation practices protect both your home and anyone working on the setup. When wiring illuminated numbers or adding electric lighting, always turn off the power at the breaker before starting. Use outdoor-rated electrical components to withstand weather exposure. Secure wires properly to avoid tripping hazards or damage from wind and animals. If you’re unsure about electrical work, hiring a licensed electrician is the safest option. For glow-in-the-dark numbers that don’t require electricity, ensure the surface is clean and dry before applying to maximize adhesion and glow duration.
- Confirm number size and placement requirements with local building codes.
- Use reflective or glow-in-the-dark materials visible from at least 50 feet.
- Choose weatherproof, outdoor-rated lighting fixtures or materials.
- Install lighting with power off and avoid exposed wiring.
- Mount numbers at heights between 5 and 7 feet for optimal viewing.
- Regularly check illumination or glow effectiveness, especially after weather changes.
- Consult a licensed electrician for any permanent electrical installations.
To maintain visibility year-round, consider how local climate affects materials. For example, excessive moisture or snow can reduce glow intensity or block lights, so placing numbers under an eave or using protective covers can help. In rural areas with limited porch lighting, brighter or larger numbers may be necessary to meet safety expectations. Proper visibility supports not just aesthetics but safety by guiding emergency personnel and delivery drivers to your home quickly.
Always verify local codes before installation to avoid redoing work and ensure emergency responders can find your home without delay.
Step-by-Step Action Plan to Make Your House Numbers Glow at Night
Follow these practical steps to get your house numbers glowing clearly and reliably in the dark.
- Before you start: Choose the glow in the dark method that fits your home style and location, paint, stickers, or solar lights will each have different prep needs.
- Day 1: Clean the surface where you’ll apply the numbers thoroughly with soap and water; the glow material will stick better and last longer.
- Day 2: Apply the glow in the dark paint or adhesive numbers following the product instructions carefully, making sure the layer is even and covers the entire number well.
- Day 3: Let the glow materials cure fully; test the glow after resting your eyes for 10 minutes in darkness to confirm it charges from sunlight or ambient light.
- Week 1: Assess the glow visibility from the street at different angles and distances; add solar-powered LED lights if additional brightness is needed.
- Month 1: Check for any fading or peeling. Touch up paint or replace adhesive numbers as needed to keep visibility strong.
- Ongoing: Wipe numbers monthly to remove dirt that can block light absorption and reduce glow effectiveness.
Frequently Asked Questions
Can Glow in the Dark House Numbers Work on All Wall Surfaces?
Yes, they can work on most surfaces, but smooth, dark backgrounds improve visibility and glow effectiveness.
Do Glow in the Dark House Numbers Fade in Sunlight over Time?
Yes, prolonged sun exposure can cause some materials to fade, so UV-resistant options last longer.
Can I Paint My Own House Numbers with Glow in the Dark Paint?
Yes, glow paint can be applied to numbers, but homemade results vary; professional materials glow more reliably.
Are Glow in the Dark Numbers Visible in Heavy Rain or Fog?
They remain visible in rain but may be harder to see in dense fog without additional lighting.
Should I Use Glow in the Dark Numbers Indoors as Well?
Indoor use is possible, but charge time differs; they typically need strong indoor lighting to glow well.
Can the Glow in the Dark Effect Be Recharged Quickly During the Night?
Recharge requires light exposure; a few minutes of bright light can recharge some types, but others need hours.
The Bottom Line
Glowing house numbers significantly improve nighttime visibility for visitors and emergency responders. Take the first step by selecting a glow method that suits your home’s exterior and local climate. After installation, maintain the glow by keeping numbers clean and monitoring wear so they remain clear and bright. Getting started today means safer and easier identification for anyone finding your house after dark.