What Is Window Perf? A Complete Guide with Benefits and Design Tips
What is window perf? It is a type of printable vinyl with tiny holes punched throughout, allowing visibility from one side while displaying graphics on the other. This design lets natural light in and maintains outward views, making it ideal for promotional and privacy purposes without fully blocking windows.
Window perf works by balancing solid vinyl areas with perforations, commonly in a 50/50 or 70/30 ratio, to control visibility and print quality. Starting with the right pattern ensures the best mix of graphic impact and see-through clarity for your needs.
Key Takeaways
- A 50/50 window perf has equal parts vinyl and holes, offering balanced light transmission and graphic visibility.
- Use a 70/30 pattern to boost color vibrancy and detail with fewer holes and more solid vinyl.
- Window perf allows one-way visibility, making it perfect for storefronts and vehicle rear windows.
- Choose perforation patterns based on your priority: more graphic detail or better see-through effect.
- Window perf can hide unsightly clutter or debris during renovations while still letting light in.
- While durable, all window perf has holes that reduce weather and UV protection compared to solid vinyl.
What Is Window Perf and How It Works
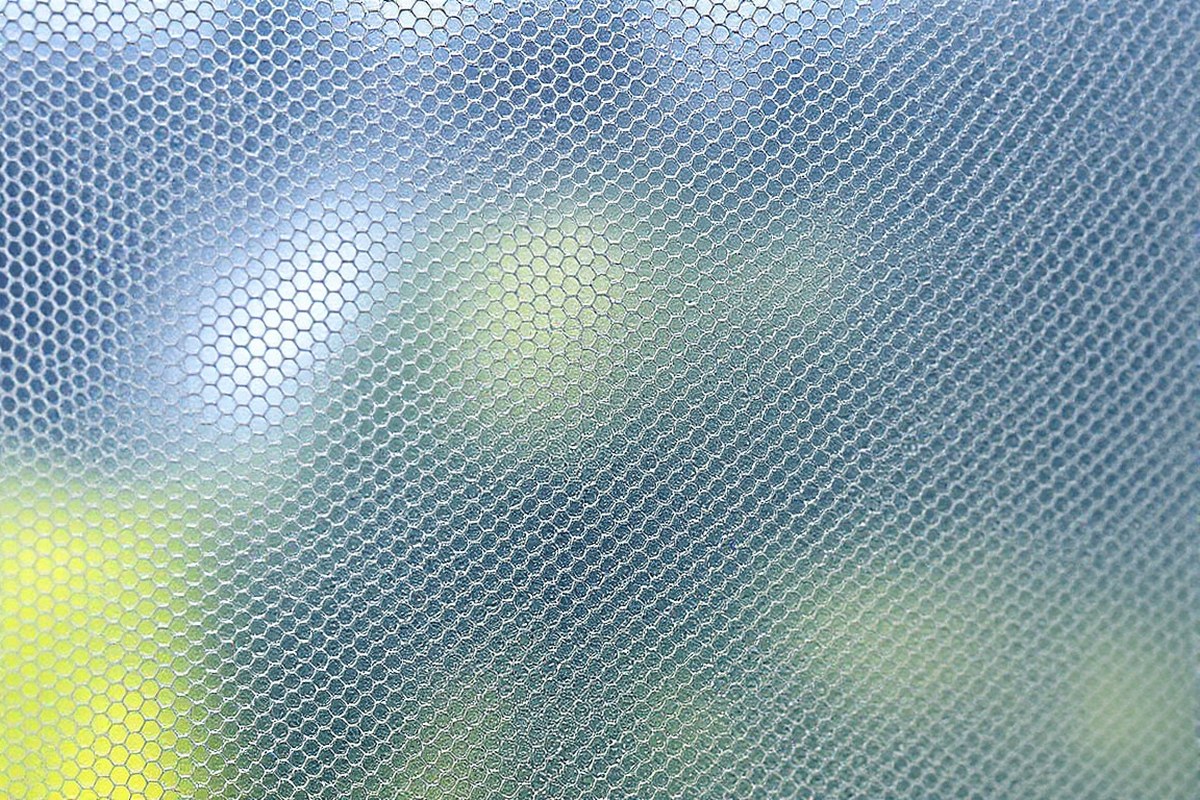
Window perf is a vinyl film featuring numerous tiny holes across its surface. These perforations allow vivid graphics to appear on one side while maintaining see-through visibility on the other. This design offers one-way vision, making it ideal for storefronts, vehicle windows, and other places needing eye-catching advertising with partial transparency.
The core idea behind window perf is the ratio between solid vinyl and the perforated holes. A common pattern is a 50/50 ratio, meaning that half of the surface consists of solid printable vinyl, while the other half is open holes. This balance creates clear and vibrant images for viewers outside the window, while people inside can still see out because their eyes focus on the brighter, less obstructed side.
For example, a 50% hole-to-vinyl pattern might feature 1.5 mm diameter holes spaced evenly every 1.5 mm. This evenly spaced perforation allows significant light and visibility through the window while still providing enough printable area for detailed graphics. There is also a 70/30 pattern, where only 30% of the surface is holes and 70% is solid vinyl. This pattern offers denser printed images but reduces visibility from the inside. You should choose between these based on your need to see out from the window versus how bold and clear you want your graphics to appear.
Window perf works because the human eye naturally focuses on the brighter, more illuminated side. When installed on a window, the printed side faces out, attracting attention with vivid colors. Inside, the darker holes allow the eye to peer through, offering visibility with some privacy. This effect is best when there is more light on the graphic side than the interior side. Printing on window perf uses standard vinyl printing techniques, often with latex printers, so you get vibrant, weather-resistant images suitable for outdoor use.
Laminating window perf requires care. Glossy laminates can make graphics appear sharper but tend to block visibility, negating the see-through benefit. The best option for maintaining clarity through the holes is an optically clear laminate. Skipping laminate altogether also supports maximum visibility but may reduce the material’s lifespan, especially on vehicles or exposed windows. Costs for window perf are similar to other specialized vinyls, but the value comes from combining advertising space with continued window function.
Common Perforation Patterns and Their Effects
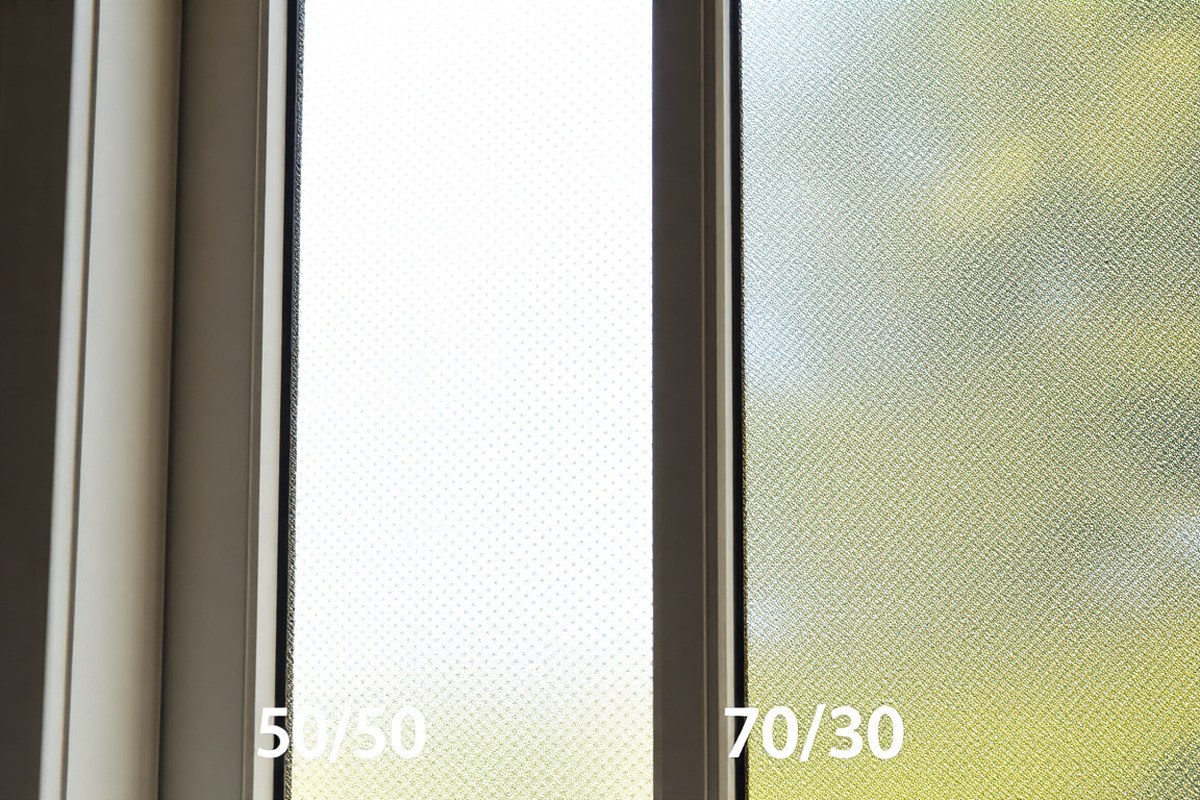
Common perforation patterns in window perf are typically distinguished by their perforation-to-solid ratios, most notably 50/50 and 70/30. These ratios refer to the percentage of open area (holes) versus the solid vinyl surface. The choice between these patterns affects how vibrant the printed image appears, how well those inside can see out, and the level of privacy provided.
The 50/50 pattern has equal parts hole and solid vinyl, which results in higher visibility from inside to outside but less surface area for printing vibrant colors. This pattern is best when maintaining a strong view from inside the window matters, such as in retail storefronts where staff need a clear view outdoors. On the other hand, the 70/30 pattern has a smaller open area (30%), offering more solid vinyl for printing images. This provides richer image vibrancy and better privacy but reduces transparency from the inside looking out.
Understanding the tradeoffs between visibility, image quality, and privacy helps you decide which pattern fits your needs. Vehicle wraps and storefronts that prioritize eye-catching graphics and privacy often benefit from 70/30. Business environments like gyms or medical offices that want moderate privacy without losing daylight tend to choose 50/50.
| Characteristic | 50/50 Pattern | 70/30 Pattern |
|---|---|---|
| Open Area (holes) | 50% | 30% |
| Solid Vinyl Area | 50% | 70% |
| Image Vibrancy | Moderate | High |
| Inside Visibility | Good | Reduced |
| Privacy Level | Moderate | High |
| Common Applications | Retail storefronts, offices requiring daylight | Vehicle wraps, gyms, spas, medical offices |
The perforation pattern affects print quality directly because the solid area holds the ink for the graphics. Using a 70/30 pattern, which has more solid surface, allows for richer, more vibrant prints. Consider pairing your print with an HP Latex printer and an optically clear lamination to ensure the strongest durability and visual appeal, especially on vehicle wraps where consistent sheen matters.
Choosing a perforation pattern should factor in your priorities. For displaying bright advertising while keeping some level of privacy, 70/30 is preferable. If employee or customer visibility is critical, as in a customer service window, 50/50 serves better. Note that despite the design, window perf still includes perforations that let in some light and air, so it should not replace dedicated heat-control films or sun blockers.
To maximize image vibrancy and protect your window perf graphic’s lifespan, combine a 70/30 perforation pattern with lamination and printing on a latex printer.
Where and How to Use Window Perf Effectively
Window perf is widely applied on retail storefronts, vehicle rear windows, and office glass. It works by allowing light and visibility from one side while showcasing vibrant graphics on the other. The benefits vary by location, balancing advertising impact with visibility and privacy needs.
Window Perf on Storefronts
Storefront glass often serves double duty as a marketing surface and a transparent barrier. Applying window perf here allows you to promote sales, display product images, or share business hours without blocking natural light inside. You get high image quality with fine details and vibrant colors, making your branding stand out even from a distance.
To maximize effectiveness, cover as much glass as possible while maintaining clear sightlines for safety and customer comfort. Use higher density perf, like 40/60 or 45/55, for sharper graphics. Ensure the design integrates with exterior lighting and foot traffic patterns for best results.
- Promotes branding and specials without sacrificing daylight
- Provides daytime privacy by obscuring interior view
- Allows one-way visibility from inside to outside
- Supports detailed, colorful images suited for storefront advertising
- Requires installation on clean, smooth glass for best adhesion
- May need removal or replacement with weather changes or promotions
Keep in mind that window perf does not work well if you need clear graphics visible from both inside and outside. It’s primarily a one-sided solution optimized for outdoor facing messaging.
Vehicle Applications of Window Perf
Rear windows of vehicles are common places for window perf. You can feature logos, contact info, or promotional messages that get attention while maintaining driver visibility from inside. The materials used must withstand weather, road debris, and temperature changes up to around 140°F (60°C) on hot days.
Performance depends on proper perforation ratios and durable adhesives tailored for vinyl automotive graphics. Choose patterns that balance graphic impact with adequate see-through ability to avoid compromising safety or violating regulations. Graphics will generally appear darker on vehicles due to tinted windows and interior shadows.
Installation requires cleaning the glass thoroughly and applying the film without bubbles or misalignment. Professional installation costs typically range from $100 to $400 depending on window size and complexity.
Office and Interior Uses
Window perf inside offices or on interior glass partitions combines privacy with creative branding or decorative effects. It allows light transmission while limiting direct sightlines between workstations or conference rooms. This can improve employee comfort and confidentiality without the need for blinds or curtains.
Graphic options include logos, mission statements, or soft patterns that complement workplace design. Window perf can also reduce glare while maintaining an open feel.
- Improves office privacy without blocking daylight
- Adds professional branding or decorative elements inside
- Reduces glare on computer screens and work areas
- Easy to replace for changing seasonal graphics or messages
- Protects glass from scratches and minor impacts
One limitation is that graphics are typically designed for viewing from one side only, so plan installation locations accordingly. Interior window perf may cost between $5 and $15 per square foot, including installation.
Benefits and Limitations of Perforated Window Vinyl
Window perforated vinyl offers clear advantages for advertising and visibility. Its main benefit lies in creating high-impact graphics on the outside glass while preserving one-way privacy; people outside see the printed design, but those inside retain a view out. This makes it ideal for storefronts, vehicles, and offices where you want to promote a brand without sacrificing natural light or visibility. The pattern of tiny holes, typically about 1 mm in diameter with a 50/50 or 60/40 open-to-solid ratio, allows daylight to pass through while displaying images boldly on the other side.
The cost of window perf varies depending on the quality and printing method, generally ranging from $5 to $10 per square foot including installation for custom graphics. It tends to be more expensive than simple clear or frosted vinyl films but adds value by combining advertising and privacy. Because it is not a solid film, it also helps moderate interior temperatures by diffusing light, although not as effectively as specialized heat-control films meant for solar blocking.
On the other hand, perforated vinyl has some limitations. Durability can be an issue if the printing is done with inkjet technology. Such prints are prone to fading under prolonged sun exposure and scratching on the holes’ edges due to the thin material substrate. Over time, this reduces the graphic’s clarity and impact, especially on south or west-facing windows. UV-resistant solvent and eco-solvent inks provide better longevity, making the initial investment worthwhile for longer campaigns.
Compared to solid adhesive vinyl, window perf sacrifices full opacity for visibility and light transmission. Solid vinyl completely blocks the view both ways and improve privacy but can make interiors darker and feel closed off. Solid vinyl is also more resistant to weather and usually lasts longer, useful where permanence outweighs transparency. Heat-control films focus on energy efficiency, blocking UV rays and reducing heat; these films do not display graphics and cost less per square foot but serve a different function. Combining heat-control films with window perf requires expert installation and increases costs.
Choosing window perforated vinyl depends on the goal. Perforated vinyl works well for eye-catching external advertising that still lets occupants see out, especially when you use durable printing and expect it to last about 3 to 5 years. Solid vinyl or a specialized film suits better when complete privacy or reducing solar heat is your main goal. For budget-sensitive projects or short-term promotions, lower-cost materials with simple printing may suffice, but expect quicker fading and replacement.
Design Tips to improve Window Perf Graphics
Designing effective graphics for window perf requires careful attention to visibility, color contrast, and clarity to overcome the visual challenges caused by perforations. Improving readability and image impact starts with selecting the right colors and fonts, then adapting your design to the specific perforation pattern so your message remains clear from both inside and outside views.
Choosing Colors and Contrast
Color contrast significantly influences how well window perf graphics stand out. Using bold, saturated colors ensures your design doesn’t get lost around the tiny holes in the vinyl. Dark hues paired with light backgrounds, or vice versa, create sharp contrasts that improve legibility at typical viewing distances of 3 to 10 feet. Avoid pastel or muted shades because they tend to blend into the perforated pattern and reduce visual impact.
Since black vinyl is commonly used as the backing, bright colors like white, yellow, red, and blue pop the most. Keep in mind that window perf reduces ink adhesion and can slightly dull printed colors, so increasing color saturation by 10 to 20 percent during design can help compensate for this loss. Consider how direct sunlight and reflections may affect visibility at different times of day and choose colors accordingly to maintain strong contrast under changing conditions.
Font and Detail Considerations
Fonts for window perf graphics should be clean and simple. Sans-serif fonts like Arial, Helvetica, and Futura with thick strokes of at least 14 points are best for readability. Fine details, thin lines, or intricate scripts risk becoming illegible due to the pattern of the perforation interrupting the ink coverage. Avoid small text or tight spacing that makes letters hard to distinguish.
Limit the number of font styles and weights to one or two per design to keep the message distinct and easy to read. When including logos or images, choose bold, simple shapes rather than highly detailed or photo-realistic graphics, because complex visuals lose sharpness through the holes. Test proofs at actual size to confirm clarity before final printing.
Adjusting for Perforation Patterns
Different perforation patterns affect image clarity and must influence your design choices. A common 1/8″ (3 mm) hole pattern with 50% vinyl coverage offers a good balance between visibility and transparency but requires slightly bolder elements to avoid breaking up important design details. For patterns with larger holes or lower coverage percentages, simplify designs further and increase spacing between key visual elements.
Carefully position critical text and graphics away from areas where natural window obstructions like door handles and mullions could overlap. Aligning important messaging within solid blocks of vinyl maximizes legibility.
Always check your design with a physical sample of the specific window perf material to see how the pattern interacts with colors and details before running a full production batch.
Installation and Maintenance Best Practices
Proper installation and maintenance of window perf are key to keeping the graphics sharp and extending the vinyl’s lifespan. Following exact steps during application and caring for the vinyl regularly help avoid common mistakes like bubbling or fading. Using a structured approach ensures professional results and durability.
Preparation and Surface Cleaning
Thoroughly preparing the window surface before applying the vinyl improves adhesion and appearance. Clean the glass with a mild, non-abrasive cleaner and a lint-free cloth to remove dirt, dust, grease, and residues. Avoid cleaning products with ammonia or solvents because they can damage the vinyl or reduce adhesive strength.
Make sure the surface is completely dry before installation. Check for chips, cracks, or irregularities on the glass that might cause air pockets under the vinyl. In environments with heavy pollution or residue, rinse and wipe the window multiple times to achieve a smooth, clean base.
Applying the Perforated Vinyl
Follow these steps for a smooth, bubble-free installation of window perf:
- Measure the window area precisely and cut the vinyl slightly larger than needed to allow trimming.
- Position the vinyl on the exterior or interior surface depending on design and UV exposure. Exterior application exposes the vinyl to weather but offers clearer graphics; interior protects the vinyl longer.
- Peel a small section of the backing from one end to anchor the vinyl in place without full removal.
- Squeegee from the anchored end outward using a felt-edge squeegee to press the vinyl onto the glass, working slowly to prevent bubbles.
- Gradually peel the backing while continuing to squeegee away air pockets and wrinkles.
- Trim excess vinyl carefully with a sharp utility knife once fully applied.
- Inspect the surface for small bubbles; use a pin to puncture trapped air then smooth with the squeegee.
Allow the vinyl to cure on the window for at least 24 hours before cleaning or exposing it to heavy weather. For curved or heavily textured glass, slightly warm the vinyl with a heat gun while applying to improve flexibility. Avoid overstretching to prevent tears or adhesive failure.
Post-Installation Care and Cleaning
Maintaining window perf helps preserve clarity and color vibrancy. Clean vinyl by gently wiping with water and a mild soap solution or a window cleaner free of ammonia. Use a soft cloth or sponge in straight motions; avoid abrasive scrubbers, steel wool, or harsh chemicals.
Inspect the graphics regularly, especially if installed on vehicle windows or storefronts exposed to weather extremes. Remove dirt build-up quickly to prevent surface damage or fading. Avoid power washers or high-pressure hoses, as strong water jets can lift edges and shorten the vinyl’s lifespan.
Plan to replace the window perf every 3 to 5 years depending on exposure and wear. Laminates applied during printing can help extend service life by reducing scratches and UV damage, but routine gentle cleaning remains important for best results.
Lamination and Printing Options for Window Perf
Printing on window perf typically uses either latex or solvent-based printers, each with distinct effects on durability and image quality. Latex printing offers vibrant colors, faster drying times, and is environmentally friendlier since it emits fewer odors and volatile organic compounds (VOCs). It adheres well to vinyl and resists fading, making it a common choice for indoor and short-term outdoor graphics. Solvent printing, including eco-solvent and mild solvent variants, generally provides superior adhesion and scratch resistance. This method creates more durable prints suited to long-term outdoor use but requires longer curing times, sometimes up to 24 hours, and proper ventilation during application.
Lamination plays a key role in protecting window perf graphics from UV rays, scratches, and weather exposure, thereby extending the lifespan of the installed vinyl. Choosing whether to laminate depends on factors like the expected duration of the installation, exposure to harsh elements, and the level of foot or vehicle traffic near the graphic. Clear, optically transparent laminates are preferred for window perf to maintain visibility through the perforations. However, layering a laminate over window perf can cause a slight haze, which may reduce see-through clarity, especially when wet. This tradeoff means laminating is best reserved for projects requiring added protection against fading or physical wear, rather than for short-term promotions.
When selecting laminate types, cast vinyl laminates usually deliver the best results due to their flexibility, UV resistance, and conformability to curved surfaces. Calendered laminates are pricier and less flexible but can still be effective for flat window graphics where durability matters. For installations with heavy sun exposure or frequent cleaning, laminates rated for high UV resistance and scratch protection are essential to prevent graphic degradation and maintain sharpness over time. Laminates generally add $2 to $5 per square foot to project costs, depending on quality and finish options like matte or gloss.
The process to laminate window perf involves first printing the graphic and allowing it to dry or cure fully. Then, the laminate is carefully applied using a laminator or by hand with a squeegee to eliminate air bubbles and wrinkles. Professionals recommend using a heat-assisted laminator set between 100 and 120 degrees Fahrenheit to ensure the laminate conforms smoothly without damaging the perforated film or printed ink. Avoid laminates that are too thick, as these can stiffen the vinyl and reduce adherence to glass surfaces. The ideal laminate balances protection with optical clarity, enabling the graphic’s colors to pop without compromising the see-through effect critical to window perf.
Factors Affecting Longevity and Cost of Window Perf
Window perf typically lasts between 3 to 5 years outdoors, but this depends on several factors including the type of material, ink used, environmental exposure, and installation quality. Durability suffers most from prolonged sunlight, temperature extremes, and harsh weather conditions. Vinyl backing with UV inhibitors and high-quality solvent or UV-cured inks help resist fading and cracking. You can expect shorter life spans in hot, sunny locations or areas with heavy pollution and moisture.
Pricing for window perf ranges widely, generally from $8 to $20 per square foot installed. Primary cost factors include material grade, print and lamination quality, hole pattern density, size of the graphic, and installation complexity. Perforation density affects airflow and visibility but also influences material cost and print coverage. Laminating with a UV-protective film adds to upfront cost but extends lifespan, improving overall value.
Considering value versus cost means balancing lifespan with visual impact. Lower-priced options may need replacement every 2 to 3 years in tough environments, increasing total costs over time. Investing in premium materials and lamination can extend life to 5 years or longer, minimizing maintenance and reprint frequency. Evaluating your location’s climate and the graphic’s purpose helps decide which trade-offs suit your project budget and goals.
| Environment | Material Type | Expected Lifespan (years) | Key Durability Concerns |
|---|---|---|---|
| Urban, Moderate Climate | Standard Perforated Vinyl, Solvent Ink | 3, 4 | UV fading, air pollution |
| Hot, Sunny, Dry | High-Grade Vinyl, UV-Cured Ink + Lamination | 4, 5+ | UV degradation, temperature shifts |
| Coastal, Humid | Marine-Grade Vinyl, Solvent Ink + Lamination | 3, 5 | Moisture, salt corrosion |
| Cold, Seasonal | Standard Vinyl, Eco-Solvent Ink | 3, 4 | Cracking, freeze/thaw cycles |
Cost factors affecting window perf also include hole size percentage (smaller holes mean more printable area but less airflow), vinyl thickness, and whether the graphic needs custom cutting or special adhesives. Installation fees vary by location and complexity; edge sealing slows moisture damage but adds cost. Selecting a material matched to your site conditions and usage frequency minimizes risk of premature failure.
Tip: Always order test samples of vinyl and inks from your supplier and expose them to your actual environment for a few weeks before committing to large runs.
Your First Week: A Quick-Start Plan for Using Window Perf
Follow these steps to get your window perforated vinyl project off the ground and ensure it delivers the intended impact.
- Day 1: Identify the specific window or vehicle surface for your window perf installation. Check for cleanliness and any damage so you can plan surface prep accordingly.
- Day 2: Choose the appropriate perforation pattern based on desired visibility and graphic clarity. Verify the pattern allows sufficient see-through for inside viewing or privacy needs.
- Day 3: Finalize your graphic design emphasizing high contrast and avoiding small text over perforations. Preview proofs to confirm the design translates well on perforated vinyl.
- Day 4: Select a reliable printer and laminate option suited to your budget and expected weather exposure. Verify the lamination improve durability without reducing optical performance.
- Day 5: Prepare the installation surface by cleaning with an appropriate solution and removing all dust and residues. Confirm a fully dry surface before application.
- Day 6: Apply the window perf vinyl carefully, using standard installation tools and techniques to avoid air bubbles and creases. Check that the vinyl adheres uniformly and see-through areas perform as expected.
- Day 7: Perform a light maintenance clean with a soft cloth and mild detergent to maintain clarity and longevity. Monitor for any signs of peeling or fading during the first week.
Frequently Asked Questions
What Is Window Perf Made Of?
Window perf is made of printable vinyl with a pattern of small punches or holes across the surface. This allows the material to show a graphic on one side while letting light and partial views pass through from the other side.
Can Window Perf Completely Block the View Through a Window?
No, window perf provides big visual impact without fully blocking the window. It has about a 50/50 ratio of printable material to holes, preserving some see-through ability.
Is Window Perf Suitable for Vehicle Windows?
Yes, window perf is commonly applied to rear side and back windows on vehicles to display graphics while maintaining driver visibility from the inside.
Does Window Perf Reduce Heat Inside a Building?
Window perf can soften light and reduce glare but is not designed to control heat like dedicated heat-control films.
Can Window Perf Hide Unsightly Views During Renovations?
Yes, window perf is effective for hiding clutter or debris visible during remodeling while still allowing light inside.
Where Is Window Perf Usually Installed in Storefronts?
It’s often placed on large glass windows facing outdoors to provide advertising or branding without fully blocking the customer’s view from inside.
Before You Go
Window perf offers a versatile way to display eye-catching graphics while maintaining visibility from inside. Approaching your project with a clear plan and careful material choice ensures your graphics last and perform well. Start by selecting the right material and pattern for your location and your message; that’s your key first step to get the most from window perf.