What Is High Tack Transfer Tape? A Complete Guide for Perfect Application
What is high tack transfer tape? It’s a specially designed adhesive tape with strong initial grip that securely holds vinyl or delicate materials during application. This tape provides firm adhesion to smooth and porous surfaces like wood veneers and vinyl without slipping. To get the best bond, wait 15 to 20 minutes before peeling the tape away from your project.
Key Takeaways
- High tack transfer tape usually has a strong initial tack of 50+ ounces for reliable material hold.
- Choose tapes 0.002 to 0.005 inches thick for a balance of flexibility and adhesion.
- Wait 15, 20 minutes after application to ensure optimal vinyl adherence before removing the tape.
- High tack tapes like 3M 9415 are ideal for irregular surfaces and feature easy-peel liners.
- Reuse transfer tape 2 to 5 times before it loses effectiveness.
- High tack tape works well with wood veneers, ORACAL calendared vinyl films, and other porous or smooth materials.
What Is High Tack Transfer Tape and How Does It Work?

High tack transfer tape is an adhesive application tape designed to lift and transfer vinyl or other materials cleanly, especially when dealing with textured, thicker, or specialty vinyl types like shimmer, glitter, or metallic finishes. It uses a high tack rubber adhesive that bonds quickly and strongly to the vinyl surface, grabbing onto small or intricate details without letting them shift or fall apart during transfer.
The adhesive on high tack transfer tape creates a strong bond with minimal pressure, which means you can pick up delicate lettering or textured vinyl without pressing too hard. This fast, firm “grab” is essential for transferring vinyl designs that include small, fine cuts or uneven surfaces. Tapes with lower tack levels don’t provide this strength and can result in parts of your vinyl not sticking to the tape or shifting during application, causing messy results. For example, TeckWrap Craft’s High Tack Transfer Tape is praised for its performance with specialty, textured vinyl, ensuring every detail moves where you want it.
Physically, high tack transfer tape usually features a paper or clear film carrier coated with a rubber-based adhesive known for its aggressive bonding properties. Some varieties, like 3M 9415, are 5-mil clear acrylic tapes with aggressive tack optimized for irregular surfaces. The tape might be slightly stiffer or less flexible compared to low tack tapes to provide better support for heavier vinyl. A strong bond forms almost immediately, requiring little pressure to adhere but caution when removing, as the high tack can sometimes pull up delicate vinyl or leave residue if misused.
Using high tack transfer tape involves placing the tape onto a sheet of vinyl material, pressing down firmly and evenly to ensure full contact, then peeling the backing off so that the vinyl lifts cleanly from its original surface. The adhesive clings to the vinyl, holding all parts together as you apply the design to your project surface. Waiting 15 to 20 minutes after positioning the tape before peeling it off helps optimize adhesion and reduces lifting or shifting.
The strong adhesive characteristics of high tack tape make it ideal for detailed or textured vinyl applications where precise and clean transfers are critical, but it’s less suitable for delicate or very thin films that could be damaged. Knowing the physical properties of the tape, thickness, carrier type, and adhesive chemistry, helps ensure it fits your specific project needs and provides reliable transfer without risking damage or residue buildup.
How to Apply High Tack Transfer Tape Step-By-Step for Best Results
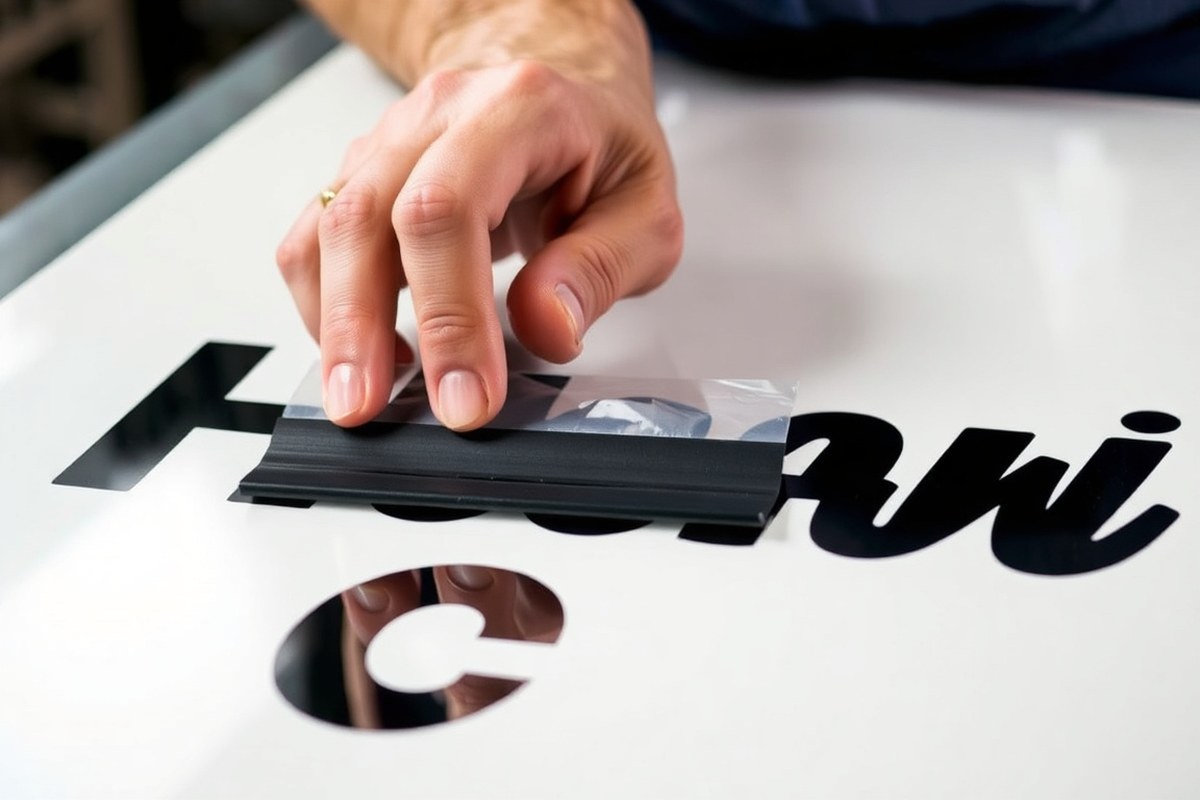
Applying high tack transfer tape correctly requires careful surface preparation, precise taping, firm burnishing, and slow removal to ensure the vinyl sticks without lifting or damage. Follow these step-by-step instructions to achieve a clean, professional transfer.
Step 1: Prepare and Clean the Surface
Start by thoroughly cleaning the surface where you’ll apply the vinyl. Dirt, dust, and oils reduce adhesion and can cause the vinyl to peel later. Use rubbing alcohol or a mild cleaner on a lint-free cloth, and let the area dry completely before proceeding. Avoid applying high tack tape on freshly painted or delicate glossy surfaces to prevent damage.
Step 2: Cut and Apply the Transfer Tape
Measure your design and cut transfer tape slightly larger than your vinyl graphic to cover it fully. Start by removing the backing paper from the vinyl, then carefully place the transfer tape on its sticky side. Align the tape smoothly to prevent wrinkles and air bubbles that might weaken the bond.
- Cut transfer tape about 1 inch larger all around your vinyl design.
- Slowly peel the vinyl backing paper from the adhesive side.
- Place the transfer tape sticky side down onto the vinyl design.
- Align and smooth the tape onto the vinyl to prevent bubbles.
Cut transfer tape larger than your design to avoid missing edges during transfer and reduce wrinkles.
Step 3: Burnish the Tape Onto the Vinyl
Take a squeegee or a stiff card like a credit card to press the transfer tape down onto the vinyl. Use firm, steady strokes from the center toward the edges to attach the vinyl securely and push out any air pockets. A solid burnish helps lift the vinyl smoothly off the backing without stretching or warping.
- Hold the vinyl and tape flat on a hard surface.
- Use a squeegee or credit card to apply firm pressure over the entire transfer tape area.
- Rub repeatedly in overlapping strokes, focusing on edges and corners.
- Check for any air bubbles and smooth them out with additional pressure.
Firm burnishing is key; insufficient pressure can cause vinyl cuts to lift during transfer, while too much may stretch delicate vinyl.
Step 4: Peel the Backing and Transfer the Vinyl
After burnishing, slowly peel the vinyl’s backing paper off, leaving the design adhered to the transfer tape. Align the vinyl with your target surface and press into place. Use the squeegee again to firmly burnish the vinyl onto the surface to activate adhesion. Make sure the vinyl covers the intended area fully before proceeding to the tape removal.
- Carefully peel the vinyl backing paper away from the transfer tape at a slow, steady pace.
- Position the tape and vinyl over your cleaned surface.
- Press down gently to set the vinyl in place.
- Use a squeegee to press the vinyl firmly onto the surface, working from center outwards.
A slow peel of the vinyl backing paper helps prevent pulling or stretching the vinyl, particularly with intricate designs.
Step 5: Remove the Tape Carefully
Peel the transfer tape away slowly at a 45-degree angle to leave the vinyl firmly on the surface. Removing the tape too quickly or at a steep angle risks lifting parts of the vinyl design, especially with high tack tape. Pause and re-burnish if any vinyl edges start to lift during removal. Allow the vinyl to set on the surface under pressure for at least 5 minutes before starting the peel.
- Wait 5 minutes after applying vinyl before removing the transfer tape.
- Hold the tape edge and pull back slowly at a 45-degree angle.
- Move steadily and stop if any vinyl lifts.
- Re-burnish with a squeegee if lifting occurs, then continue peeling.
Remove the transfer tape slowly and steadily to keep all vinyl pieces in place and avoid damage to the surface or design.
Differences Between High Tack and Low Tack Transfer Tapes
High tack and low tack transfer tapes differ mainly in the strength of their adhesive bonds. High tack tapes offer a stronger, more permanent grip, while low tack tapes provide a gentler, temporary hold that reduces damage risk. Choosing the right one depends on the surface type, the project’s duration, and how easily you need to remove the tape without residue or damage.
Adhesive Strength and Bond Type
High tack transfer tape features an aggressive adhesive designed for a fast and firm bond. It sticks strongly to various surfaces and is intended for permanent or long-term uses. However, this strength means it can be difficult to remove and may leave residue.
Low tack transfer tape uses a weaker adhesive that allows for easy removal without damaging surfaces. It’s best for temporary applications where you want to avoid adhesive marks or surface tearing. This gentler bond won’t hold as long or as firmly but is safer on delicate materials.
Surface Compatibility and Risks
High tack tape works well on smooth, non-porous surfaces like glass, metal, and finished wood. Using it on delicate or textured materials, such as frosted films or freshly painted walls, risks damage like surface tearing or adhesive residue. For these sensitive surfaces, low tack tape is preferred because it removes cleanly and reduces “ghosting” marks.
Applying high tack tape improperly or leaving it on for long periods raises the likelihood of damaging painted or sensitive finishes. Low tack transfer tape’s less aggressive adhesive minimizes this risk and is safer for surfaces with larger contact areas or softer finishes.
Typical Applications and Examples
High tack transfer tape suits projects requiring strong, lasting adhesion, like mounting signs, bonding heavy vinyl, or industrial crafting where the bond must endure stress. For example, bonding a vinyl logo to a sealed wood surface benefits from high tack for durability.
Low tack tape is ideal for temporary masking, applying delicate wall graphics, or handling textured wraps. For example, when applying fresh paint coverage or fragile prints, low tack tape ensures the surface isn’t harmed on removal. Choosing between high and low tack depends on whether your priority is durability or ease of removal without surface damage. The table below compares key differences to help pick the right tape for your project:
| Feature | High Tack Transfer Tape | Low Tack Transfer Tape |
|---|---|---|
| Adhesive Strength | Very strong, permanent | Gentle, temporary |
| Ideal Surfaces | Smooth, non-porous, sealed wood, metal, glass | Delicate, textured, freshly painted, frosted films |
| Removal | Difficult, may leave residue or cause damage | Easy, clean release with minimal risk |
| Risk of Surface Damage | High if misused or on sensitive surfaces | Low, safe for delicate finishes |
| Typical Use | Permanent bonding, heavy-duty applications | Temporary masking, delicate graphics |
| Suitable Projects | Mounting vinyl logos, industrial crafting | Wall wraps, large digital prints, masking freshly painted surfaces |
Reviewing these features helps ensure you select the tape that balances adhesion strength with surface safety for your specific craft or woodworking project.
Common Uses and Projects Ideal for High Tack Transfer Tape
High tack transfer tape is especially useful for projects that require a strong, secure hold during application. It works well with vinyl graphics, including both indoor and outdoor signs that need to withstand sunlight and varying temperatures. When applying adhesive vinyl, strong transfer tape is necessary to lift and place the graphic without shifting or tearing, particularly with heavier or thicker materials.
Woodworking projects benefit from high tack tape when applying decals, inlays, or protective coverings on textured or uneven wood surfaces. The strong rubber adhesive can hold boards or coverings firmly in place, preventing slipping during assembly or finishing. For example, applying a vinyl stencil on a rough wood tabletop typically costs between $5 and $20 for one or two rolls of high tack tape, making it an affordable option for both hobbyists and professionals.
Project conditions also influence when to choose high tack transfer tape. It performs well on textured surfaces such as glitter vinyl or fabric-backed materials where a weaker tape might fail to maintain contact. High tack options like EnduraMASK or EnduraMASK MHT 130 are tailored for calendared vinyl films and are suitable when durability and flexibility are needed outdoors. Its heat resistance also makes it a good choice for heat transfer projects where temperature fluctuations occur, though be sure to verify the temperature limits of the specific tape brand used.
- Applying vinyl graphics and plotter-cut lettering on indoor and outdoor surfaces
- Securing textured or glitter vinyl that requires stronger adhesion
- Holding wooden boards or painted surfaces steady during crafting or finishing
- Using in heat transfer projects that involve moderate temperature exposure
- Installing decals on flexible, curved, or rough surfaces without shifting
- Temporary masking on automotive or industrial detailing where repositioning is necessary
- Projects needing transfer tape that can be reused 2, 5 times for cost efficiency
Choosing the right high tack tape depends on the type of material, surface texture, and environmental exposure expected for your project. Using too strong of a tape on delicate surfaces can risk damage during removal, so matching the adhesive strength to your vinyl or craft materials is important. High tack tapes are generally priced affordably and available in specialty lines designed explicitly for different vinyl films and woodworking needs. Using them properly improves accuracy and results in cleaner, longer-lasting applications.
Factors Affecting Adhesion and Bond Strength of High Tack Tape
Temperature plays a key role in the adhesion and bond strength of high tack transfer tape. Most adhesives perform best between 50°F and 90°F. When temperatures drop below this range, the adhesive can become firm and less sticky, reducing initial tack. Above 150°F, some tapes may begin to soften, weakening the bond and potentially causing residue or failure during heat exposure. For example, a tape rated for heat resistance up to 150°F can tolerate hot woodworking tools nearby but may degrade if left in a hot environment for hours.
Humidity and moisture also influence tape performance significantly. Excess moisture on wood or vinyl surfaces can prevent the adhesive from making full contact, leading to poor stickiness. Wood with high moisture content interferes with bond strength, so you should measure and ensure wood moisture is below 12% before applying tape. Using a moisture meter or allowing freshly cut or sanded wood to dry for several days helps avoid this issue in woodworking or outdoor signage projects.
Surface preparation is critical for optimizing adhesion. Cleaning the surface thoroughly with isopropyl alcohol removes oils, dust, and residues that block bonding. For wood and textured vinyl, lightly sanding or using a fine abrasive pad creates a smoother profile that increases contact area without damaging the material. Ensure the surface is dry before application. High tack tape relies on full contact pressure to reach maximum bond strength, which often develops over 24 hours. Pressing firmly for at least 30 seconds with a roller or finger improve initial grip.
Texture impacts how well the tape adheres because rough or porous surfaces reduce effective adhesive contact. High tack tape can fill small gaps, but very uneven surfaces require extra attention. In woodworking, applying tape to sanded and sealed wood gives much better results than raw, rough-cut wood. Vinyl installation over corrugated or textured substrates may need tape with thicker adhesive to fill gaps and maintain bond strength.
Adhesive thickness is another factor. Thicker adhesives hold better on textured or uneven surfaces but may leave residue or take longer to cure fully. Thinner adhesives provide clean removal and work well on smooth surfaces like machinery or glass. Choosing the right thickness depends on the material and project goals. If you need strong, aggressive tack for vinyl signs on wood, thicker adhesives help lock the tape in place.
Pressure during application activates the adhesive and improves the bond. Applying consistent firm pressure for 20 to 30 seconds using a roller or burnishing tool pushes the adhesive into microscopic surface pores and overcomes surface irregularities. Light pressure can cause poor adhesion, leading to edge lifting or tape failure. In projects like vinyl graphics or woodworking, where precision is key, avoiding air bubbles by pressing evenly is essential for a clean bond.
Always allow the tape to set and cure for at least 24 hours after application before exposing it to moisture or heavy stress to achieve maximum bond strength.
Common Mistakes When Using High Tack Transfer Tape and How to Fix Them
Vinyl not transferring properly often results from choosing the wrong type of transfer tape or applying it incorrectly. High tack transfer tape is designed for strong adhesion, which works well on textured surfaces like untreated wood but can cause issues on delicate vinyl or smooth prints. Using high tack tape on sensitive materials may lift or damage the vinyl during transfer, so selecting a tape with appropriate tack is essential.
Proper press time also affects transfer quality. The adhesive needs enough time to bond with the vinyl and with the final surface. Pressing too briefly or without enough pressure can cause incomplete transfer, leaving parts of the vinyl behind. A squeegee or scraper tool helps apply consistent pressure and improves contact. Applying firm, even pressure for about 30 seconds works well for most projects.
Surface contamination is another common problem. Dust, oils, or moisture on the surface reduce adhesion and increase the likelihood of bubbles or lifting. Always clean and dry the surface thoroughly before applying the tape. Use isopropyl alcohol or soap and water, and let it dry completely for best results.
- Confirm tape tack level suits your vinyl and substrate
- Clean and dry surfaces before application
- Use a squeegee to apply even pressure for at least 30 seconds
- Test on a small area to check for residue or damage
- Avoid high tack tape on delicate or large format prints
- Remove tape slowly at a sharp angle to minimize residue
- Use adhesive remover or rubbing alcohol to clean leftover residue
If tape leaves residue or causes bubbles, the tack may be too strong or the surface wasn’t prepared properly. Switching to a low or medium tack tape usually resolves residue issues. Slow removal of the tape at a 45-degree angle helps prevent surface pull-up or edge lifting. For stubborn residue, use a mild adhesive remover, but always test on a hidden area to ensure it does not damage the vinyl or substrate.
Preventing damage to prints or surfaces involves matching tape strength with material and applying careful technique. When handling large or delicate digital prints, replace high tack tape with a low tack option to avoid marks or deformation. Following these steps ensures clean transfers with minimal risk of damaging your materials during vinyl projects.
How to Choose the Right High Tack Transfer Tape for Your Project
Selecting the right high tack transfer tape depends on the type of vinyl you’re using, the surface texture you’re applying it to, and the environmental conditions. Choosing a tape with the correct adhesive strength, size, and thickness ensures the vinyl transfers cleanly without damage or distortion. Consider the project scale and surface sensitivity to avoid common application problems.
Brand and Product Comparisons
Different brands offer transfer tapes designed for specific vinyl types and surface textures. Some tapes specialize in holding textured or specialty vinyl securely, while others work best with smooth surfaces. For delicate or sensitive surfaces, pick a tape that balances strong adhesion without causing damage.
For example, tapes marketed for decal application on automotive paint usually have a high initial tack rating of 50+ ounces, making them excellent for smooth, non-porous surfaces. On the other hand, tapes labeled for “rough or uneven surfaces” are formulated to grip textured materials and specialty vinyl effectively. Checking the product descriptions and reviews can help you identify tapes designed for your exact needs.
| Type of Surface | Recommended Tape Tack Level | Suitable Vinyl Type | Typical Use Cases |
|---|---|---|---|
| Smooth Surfaces (Glass, Plastic, Metal) | High initial tack (50+ oz) | Standard adhesive vinyl | Sign making, vehicle decals, home decor |
| Textured Surfaces (Wood grain, Stucco) | Very high tack, specialty adhesive | Textured or specialty vinyl | Woodworking, outdoor signage, craft projects |
| Delicate Surfaces (Painted walls, Paper) | Medium to high tack | Removable vinyl | Short-term decals, indoor crafts |
This table highlights the importance of matching tape tack to the surface and vinyl type to achieve the best application results.
Adhesive Strength and Temperature Ratings
Tack level directly affects the tape’s ability to pick up and hold vinyl without lifting or shifting. Labels stating “high initial tack” typically mean a tack strength greater than 50 ounces. This ensures the tape grabs vinyl quickly and firmly, particularly important for detailed or large-scale graphics.
Temperature resistance matters if your project involves outdoor applications or exposure to heat. Choose tapes with adhesive designed to maintain hold between 40°F and 160°F, as lower resistance can cause the tape to lose adhesion or become too sticky. Always interpret the manufacturer’s temperature ratings to match your local climate or project conditions. Use a decision rule: select a tape with at least a 50-ounce tack rating for smooth surfaces and standard vinyl, a stronger tack for textured surfaces, and moderate tack for delicate or painted surfaces to prevent damage during removal.
Size and Thickness Options
The width and thickness of transfer tape affect the ease of handling and the accuracy of vinyl placement. Narrow tapes, around 2 to 6 inches wide, are ideal for small, detailed projects to give you precise control. Larger projects, like vehicle wraps or large signage, benefit from wider tapes, up to 12 inches or more, to cover more area quickly.
Thickness ranges from around 3 mils (thousandths of an inch) to 7 mils. Thicker tapes offer better rigidity and reduce the chance of stretching or distortion during transfer. However, thicker tapes can be harder to work with on very intricate designs.
Pick a tape size and thickness based on your project’s scale and detail level. For example, use a 4-inch-wide, 3-mil tape for a small craft decal on a smooth surface, and a 12-inch-wide, 6-mil tape for transferring textured vinyl on large wooden signs.
Can High Tack Transfer Tape Damage Surfaces? Safety and Removal Tips
High tack transfer tape offers strong adhesion, but it can risk damaging delicate surfaces like fresh paint, wallpaper, or veneers when removed. This happens because the adhesive bonds tightly and might pull paint or finish off, especially if the paint hasn’t fully cured. To protect such surfaces, choose low tack tapes or specialized painters’ tapes that balance adhesion and clean removal.
Removing high tack transfer tape safely requires a careful approach. Begin by peeling back the tape slowly at a low angle (about 45 degrees) to reduce the chance of peeling paint or lifting finishes. If the tape resists or feels stuck, warming it gently with a hairdryer or heat gun (set on low and held about 6 inches away) softens the adhesive, making removal easier. Avoid using sharp objects to lift the tape to prevent scratching.
Test the heat on a hidden area first to make sure warmth won’t damage the surface or finish.
Adhesive residue left behind from high tack tape can be sticky and unattractive. Removing it without harming the surface depends on the material. Use a gentle adhesive remover, such as isopropyl alcohol or citrus-based cleaners, applied sparingly with a soft cloth. For painted surfaces, start with a mild soap and water mix before moving to stronger solvents. Always test the cleaning agent on an inconspicuous spot first.
- Use low tack painter’s tape for fresh paint or delicate surfaces to avoid damage.
- Peel tape back slowly at a 45-degree angle to minimize surface stress.
- Apply gentle heat before removal to soften adhesive for easier peeling.
- Try mild soap and water when cleaning adhesive residue before stronger solvents.
- Test any heat or cleaning product on a small hidden area first.
- Use soft cloths or plastic scrapers to avoid scratching during residue cleanup.
- Allow painted surfaces to cure fully, typically 2 weeks, before applying high tack tape.
High tack tapes like 3M 9415 or Avery FT111 cost between $0.50 and $1.00 per yard for a 1-inch width and can hold up to 65 pounds per inch, which explains their firm grip on surfaces. Despite their strength, their strong bond makes residue removal and surface damage more likely if used on sensitive materials. Protect your project by matching tape choice to surface toughness and following safe removal and cleanup steps.
Step-by-Step Action Plan for Using High Tack Transfer Tape
Follow these steps to ensure a strong, clean transfer of your vinyl or decal projects with high tack transfer tape.
- Before you start: Clean your workspace and the surface where you’ll apply the tape to remove dust or oils. A properly cleaned surface ensures better adhesion.
- Preparation phase: Cut a piece of high tack transfer tape slightly larger than your vinyl. Peel the backing carefully without touching the sticky side to keep it clean.
- Application phase: Lay the tape with the adhesive surface onto your vinyl or decal. Press down firmly using a squeegee or a credit card, smoothing out any air bubbles. Once the vinyl completely adheres to the tape, you can proceed with the transfer.
- Transfer phase: Lift the tape with the vinyl attached and position it carefully on the target surface. Press firmly again with a squeegee to bond the vinyl in place.
- Finishing phase: Slowly peel the transfer tape back at a sharp angle, keeping the vinyl adhered to the surface. Apply extra pressure and repeat the process when the tape lifts some of the vinyl.
- After application: Avoid touching or washing the area for at least 24 hours to allow the adhesive to set fully and achieve maximum bond strength.
Frequently Asked Questions
Can High Tack Transfer Tape Be Reused?
Yes, transfer tape can usually be reused 2 to 5 times before its adhesive properties weaken. Reusing it helps reduce waste but make sure the tape still sticks firmly to avoid transfer issues.
What Thickness Is Typical for High Tack Transfer Tape?
High tack transfer tapes often range around 5 mils thick, like 3M 9415. Thickness affects durability and conformability to uneven surfaces.
Are High Tack Transfer Tapes Suitable for Textured Vinyl?
Yes, high tack tapes work well with specialty textured vinyl like glitter or shimmer types. They provide the grip needed for a clean transfer on uneven surfaces.
Can High Tack Transfer Tape Damage Delicate Surfaces?
High tack tape can sometimes damage delicate or high gloss surfaces, so choose low tack tapes for those to avoid peeling finishes.
What Is the Difference Between Rubber and Acrylic Adhesives in Transfer Tapes?
Rubber adhesives offer strong initial tack on irregular surfaces, acrylic adhesives provide longer-term bond and weather resistance. Choose based on project conditions.
Is There a High Tack Tape Formulated for ORACAL Vinyl Films?
Yes, EnduraMASK high tack and EnduraMASK MHT 130 are formulated specifically for ORACAL calendared vinyl films to ensure proper adhesion.
Before You Go
High tack transfer tape provides the strong grip required for precise placement of vinyl and decals on a variety of surfaces. The key to success is proper surface preparation and careful application pressure paired with the right tape choice for your project’s surface. Start your next vinyl project by testing the tape on a small area to gauge adhesion and remove any guesswork upfront.