How to Make a Bathroom Sign with Cricut: Complete Step-by-Step Guide
Knowing how to make a bathroom sign with Cricut lets you create personalized, stylish signs quickly and affordably. Use Cricut Design Space to pick or customize your design, then cut vinyl to fit your chosen sign surface. Starting with the right materials and a clear design size will help your project turn out crisp and professional.
Key Takeaways
- Measure your sign area first and match your design size in Cricut Design Space for best fit and clarity.
- Choose smart vinyl to cut without a mat when using Cricut Maker 3 for faster, easier workflow.
- Weed carefully under bright light like a Cricut Bright 360 Lamp to remove excess vinyl without damaging details.
- Prepare your sign surface by cleaning it thoroughly before applying vinyl to ensure long-lasting adhesion.
- Apply vinyl with a vinyl scraper tool to avoid bubbles and wrinkle-free results on your bathroom sign.
- Use transfer tape to move intricate vinyl designs cleanly from the backing to your sign surface.
How to Make a Bathroom Sign with Cricut in Simple Steps
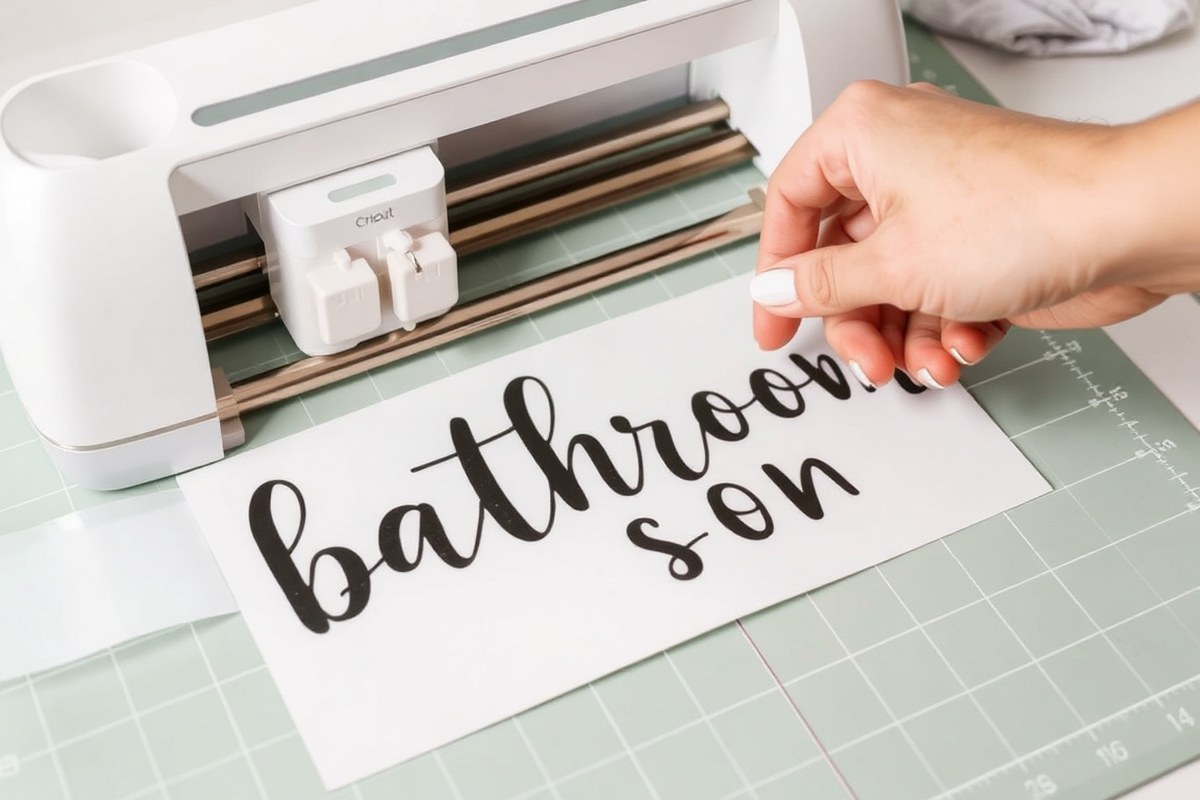
Creating a bathroom sign with your Cricut involves several clear steps, from selecting a design to applying the finished vinyl decal or heat transfer material. Each step is important to ensure the design fits your sign size, cuts precisely, and adheres well, resulting in a professional-looking finished product. The process takes time and patience, especially during weeding, but careful following of these steps helps avoid common issues like poor adhesion or incomplete cuts.
- Choose and size your design. Start by searching the Cricut Design Space library for bathroom-related images, try terms like “funny bathroom” or “bathroom sign” to find a style you like. If you want custom text like “Please Seat Yourself,” create your own phrase and adjust letter spacing as needed in the software. Size your design to fit your sign’s dimensions, for example, a sign about 23 by 15 inches works well with a design sized around 11.5 by 20 inches, the maximum width most Cricut machines can handle at once.
- Prepare your machine and materials. Place your chosen vinyl (permanent vinyl is preferable for wall or wood signs) on the cutting mat, smoothing out any wrinkles. Confirm your Cricut’s blade is sharp and selected settings match the vinyl type. Using the Cricut Explore Air 2 or Maker 3 ensures precise cuts, with the Maker 3 offering faster cutting speeds, especially for smart materials.
- Cut the design. Send the design to your Cricut machine via the Design Space app, it’s convenient to use your phone rather than a laptop. Start the cutting process and watch for the blinking logo light, which indicates the machine is working. Avoid rushing this step; intricate designs may take longer to cut cleanly.
- Weed the vinyl. Once cutting finishes, remove the vinyl from the mat carefully. Use bright light like the Cricut Bright 360 Lamp to clearly see cut lines, then peel away the excess vinyl around your design. Intricate designs require patience; if difficulty arises, try reverse weeding by applying transfer tape first, then removing vinyl from the tape if needed.
- Apply transfer tape. Cut a piece of transfer tape slightly larger than your vinyl design and place it sticky side down on top. Burnish the tape firmly with a scraper tool, then peel off the vinyl backing carefully. This transfers the design from the vinyl liner to the tape for easy placement on your sign surface.
- Position and adhere the design. Align the transfer tape with your prepared sign surface. Slowly press down and use a scraper tool to secure the vinyl onto the sign. Peel the transfer tape away at a sharp angle, leaving your design adhered. Permanent vinyl sticks best to smooth, clean surfaces like wood or framed signs.
Materials and Tools Needed for Bathroom Signs
Creating a bathroom sign with your Cricut starts by gathering the right materials and tools. For vinyl designs, you’ll mainly need adhesive vinyl suitable for indoor use. Popular choices include permanent vinyl for durability and removable vinyl if you plan to change the design often. Heat transfer vinyl (HTV) comes into play if your sign features fabric elements like canvas or cloth baskets. Each type requires different application methods, so having both on hand can expand your creative options.
The base of your sign sets the tone and durability. Wood sign blanks are a favorite because they offer a sturdy, attractive surface. Hobby Lobby often offers these blanks at about 40% off, making it affordable to stock up. You can also use scrap wood, blank canvas panels, acrylic sheets, or even recycled materials like painted cardboard depending on your project size and style.
- A Cricut machine capable of cutting vinyl and HTV (Maker 3 or Explore Air 2 recommended)
- Permanent and removable adhesive vinyl rolls in your chosen colors
- Heat transfer vinyl for fabric elements, paired with an EasyPress or household iron
- Wood sign blanks, canvas, or acrylic sheets as your base
- Transfer tape to move vinyl designs without distortion
- A weeding tool set to cleanly remove small vinyl pieces
- Scissors and a scraper tool for cutting and smoothing vinyl
Transfer tape is essential for ensuring your vinyl design applies smoothly and without bubbles. A good scraper tool or a plastic card can flatten vinyl onto your sign base effectively. Weeding tools, such as fine picks, help you remove tiny vinyl bits that don’t belong without tearing your design. Although some tools are optional, they speed up your workflow and help your final product look professional.
For HTV projects, a heat press or Cricut EasyPress offers even heat distribution essential for strong adhesion. Set the EasyPress according to your HTV brand’s recommended temperature (usually around 315 to 350°F) and press for 15 to 30 seconds. If you’re using a household iron, apply firm pressure and avoid moving it around to prevent vinyl shifting or wrinkles.
Always test a small scrap of your vinyl on your chosen base to check adhesion and heat settings before starting the full project.
Buying vinyl in bulk rolls can reduce costs per project, but consider smaller sample packs if you’re experimenting with colors or types. For your wood sign, sanding the surface lightly ensures better vinyl stickiness and a smoother final appearance. Also, clean your sign base with a damp cloth before application to remove dust or oils that reduce vinyl adhesion. These steps help your bathroom sign last through humidity and regular cleaning.
Choosing and Preparing Your Design in Cricut Design Space
Start by locating bathroom sign designs that work well with Cricut’s cutting capabilities, then use Design Space tools to resize and customize them to fit your blank. Resizing and prepping your file before cutting ensures accurate, clean cuts and a legible final sign.
Finding Free and Paid SVG Bathroom Sign Files
Look for SVG files specifically created for Cricut cutting to avoid issues with detail or unrealistic designs. Design files designed for cutting usually have clear, solid lines and avoid tiny or complex elements that cause frustration during weeding. Sources like Cricut Access offer thousands of images; some are free, while others come with a membership fee.
Free SVGs are often available from crafting communities and collaborative projects such as “Free Porch Sign SVG” collabs, which occasionally include bathroom designs. Etsy also offers affordable paid options that vary in style and complexity, but not all files are optimized for Cricut cutting, so preview the designs carefully before purchasing.
Resizing Designs to Fit Your Sign Dimensions
Your sign blank size dictates the design dimensions, so precise resizing is essential for a balanced look. Slightly enlarging intricate designs to at least 11×17 inches or more improves cut accuracy and makes weeding easier, especially for tiny text or delicate details. Remember, Design Space lets you size SVGs up or down by dragging corner handles or entering exact measurements in the size toolbar.
Adjusting the size before cutting also helps the design stay readable and prevents it from looking cramped on smaller signs. When using a non-standard sized sign, customize the SVG to fit instead of forcing the design to match, which can distort letters or shapes.
- Open Cricut Design Space and upload or select your SVG file.
- Click on the design and locate the size input boxes at the top toolbar.
- Enter the exact width and height matching or slightly smaller than your sign blank.
- Check proportions by enabling the lock icon to maintain aspect ratio or unlock it to stretch.
- Zoom in and review details for overly small or crowded elements.
- Adjust size again if necessary to improve cutability and readability.
- Save your project to avoid redoing adjustments.
Customizing Text and Elements for Personalization
Use the text tool in Design Space to add or modify words, making your bathroom sign more personal or better matching your style. Choose simple, bold fonts with clean lines to improve readability from a distance. Avoid fonts with thin strokes or excessive flourishes that won’t cut or weed easily.
Layering text and design elements is simple in Design Space, letting you change colors, move pieces, or add shapes to highlight your message. Use “Attach” to hold layers together, ensuring they cut in the intended positions relative to each other. To use multiple vinyl colors, separate elements by colour so you can cut them on different mats. Before cutting, preview each layer in the “Make It” screen to confirm everything is set up correctly.
Using Print Then Cut for Multi-Color or Complex Signs
Print Then Cut in Design Space allows you to print a full-color design on your home printer, then cut around the edges with your Cricut. This method is best for bathroom signs with multiple colors or fine details that are difficult to weed from vinyl.
To use Print Then Cut, upload your design as a flattened printable image or create it entirely within Design Space. Set the image type to “Print Then Cut” and size it to your sign dimensions. After printing on compatible printable material, place it on your cutting mat and follow the prompts for Cricut to cut precisely around the printed shape.
This option adds time and requires a good quality inkjet printer and printable vinyl or cardstock. It works well for laminated or coated signs since the printed design is less fragile than vinyl cuts.
Cutting and Weeding Vinyl for Intricate Bathroom Sign Designs
Accurate cutting and careful weeding are essential for making clean and detailed bathroom signs with your Cricut. Correct cut settings prevent tearing while precise weeding removes excess vinyl without damaging fine parts. Adjust your settings and use the right tools to handle both adhesive and heat transfer vinyl effectively.
Setting Up Cut Settings for Adhesive and Heat Transfer Vinyl
Selecting the right cut settings on your Cricut machine depends on the type and thickness of vinyl you’re using. Adhesive vinyl typically requires a lighter cut because it has a thinner backing than heat transfer vinyl (HTV), which needs more pressure and a slightly deeper blade setting. Always perform a test cut before starting your full project to avoid wasting materials. To set your machine for vinyl cutting:
- Load your vinyl onto a Cricut StandardGrip cutting mat with the shiny liner side down.
- In Cricut Design Space, choose your vinyl type from the materials list. Use “Vinyl” for adhesive or “Iron-On” for HTV.
- Adjust the pressure setting if your machine allows it, opting for “More” pressure for thicker HTV or “Default” for standard adhesive vinyl.
- Set the blade type to a fine-point blade, which cuts cleanly and preserves fine details.
- Run a test cut on a small corner or scrap piece of vinyl to ensure the blade cuts through the vinyl but not the backing.
- When a cut isn’t clean, increase the pressure slightly or run the cut a second time.
- Once satisfied, load your full design and start the cut.
Using the correct settings saves time and prevents damage when dealing with intricate bathroom sign designs.
Tools and Lighting Tips for Weeding Intricate Cuts
Weeding small letters and detailed shapes is easier with proper tools and good lighting. A fine weeder tool helps you dig into tiny cut areas and pull unwanted vinyl pieces cleanly. Tweezers can assist with lifting delicate or narrow vinyl parts without bending or stretching them.
Consider using a Cricut BrightPad placed under the vinyl. Its even backlighting illuminates cut lines, making it simpler to identify exactly where to weed. This reduces mistakes, especially on tightly spaced or tiny elements of bathroom signs.
Other tools to have on hand include a craft knife for precise trimming and a scraper tool to press down vinyl edges post-weeding. Work slowly and focus on one small section at a time rather than trying to weed large areas all at once.
Common Weeding Challenges and How to Fix Them
Peeling vinyl too aggressively can lift parts meant to stay on the design. Vinyl might not come off cleanly; try warming it slightly with a hairdryer to soften the adhesive before weeding. This is useful especially with harder or thicker vinyl types.
Smart vinyl is not recommended for large, detailed signs because it can be more difficult to weed intricate parts. Encounter stubborn bits? Press down the transfer tape thoroughly and lift corners slowly using a weeder to separate the vinyl from the backing neatly.
Tiny holes or islands inside letters can be tricky. Use a pin or fine needle to loosen these areas before lifting with tweezers. Avoid rushing, as patience ensures your bathroom sign keeps its crisp lines and clean look.
Preparing and Choosing the Best Surfaces for Bathroom Signs
Choosing the right surface for your bathroom sign shapes how well your vinyl will stick and how your final sign holds up in a moist environment. Wood blanks, canvases, and glass frames are among the popular choices, each offering unique benefits and prep work. Wood offers a sturdy base but requires careful priming and sealing to ensure good vinyl adhesion. Canvas is lightweight and ready to decorate, though certain textures can make sticking difficult without proper treatment. Glass frames provide a smooth, durable surface that vinyl clings to easily but demand thorough cleaning beforehand.
Proper preparation involves cleaning, smoothing, and sometimes sealing your surface. This step ensures the adhesive vinyl stays put, especially in a bathroom where humidity could cause peeling. Below is a comparison table highlighting key features and prep needs for wood, canvas, and glass surfaces:
| Surface | Adhesion Quality | Preparation Needed | Durability | Typical Cost |
|---|---|---|---|---|
| Wood Blanks | Good, better with heat activated vinyl | Sand smooth, wipe clean, apply primer/sealant | High when sealed properly | $5 to $15 per blank |
| Canvas | Moderate, varies with texture | Light cleaning, consider acrylic spray to smooth surface | Moderate, sensitive to moisture | $7 to $20 each |
| Glass Frames | Excellent on clean surface | Clean thoroughly with rubbing alcohol, dry fully | Very high, waterproof | $10 to $25 depending on size |
Wood blanks often require sanding to remove rough spots, which helps vinyl lay down flat without air bubbles. Use a fine-grit sandpaper and wipe the dust away with a damp cloth. After drying, apply a primer or clear acrylic sealer to provide a smooth, somewhat glossy surface, improving vinyl stickiness. Let it dry for at least 24 hours before applying vinyl. For heat-transfer vinyl on wood, pressing for around 40 seconds helps the vinyl adhere, producing a smooth and durable finish.
Canvases may catch some vinyl edges due to their texture. Spraying a light coat of acrylic sealer will fill fabric pores and create a better bond. Avoid heavy sprays that make the canvas too stiff. Allow it to cure fully before vinyl application.
Glass requires the least prep but must be spotless. Use rubbing alcohol to remove oils and contaminants. Any dust or fingerprint can cause the vinyl to lift. After cleaning, let the glass air dry completely. Vinyl will adhere quickly on this slick surface, making it a good choice for long-lasting bathroom signs.
Test-stick a small piece of vinyl before applying your design to make sure the surface is ready and the adhesion is strong enough.
How to Apply Vinyl and Heat Transfer Vinyl for Lasting Bathroom Signs
Properly applying adhesive vinyl and heat transfer vinyl (HTV) is key to making bathroom signs that last. Using transfer tape correctly and setting the right temperature and time on your Cricut EasyPress help ensure clean designs that stick well without peeling or bubbles.
Applying Adhesive Vinyl Using Transfer Tape
Transfer tape is a clear, sticky sheet that helps move vinyl designs from the backing paper to your sign surface. Using it correctly keeps your vinyl aligned and prevents stretching or gaps. Start by gently rubbing the transfer tape onto the vinyl, then carefully lift it with the design attached.
- Cut a piece of transfer tape the same size as your vinyl design.
- Peel the backing off the transfer tape and stick it on the vinyl design, smoothing it with a scraper tool or credit card to remove air pockets.
- Carefully lift the tape with the stuck vinyl from its backing paper.
- Position the vinyl with transfer tape over your prepared surface, making sure it’s straight and centered.
- Press the transfer tape down firmly, smoothing from the center outward to avoid bubbles.
- Slowly peel the transfer tape away at a sharp angle, leaving the vinyl on the surface.
- When the vinyl lifts with the tape, lay it back down and press more firmly.
Check for any powdery or dusty surfaces on your wood sign and clean it with a lint roller before applying vinyl. This helps the vinyl stick better.
Using Cricut EasyPress for Heat Transfer Vinyl on Wood and Fabric
Heat transfer vinyl needs heat and pressure to bond properly to wood or fabric. The Cricut EasyPress is designed to deliver consistent temperatures for this process. For wood signs, use 305°F and press for about 30 seconds with firm pressure. For fabric, 315°F for 15 seconds works well, depending on the fabric type.
Place a protective sheet, like butcher paper or a Teflon sheet, over the HTV to avoid scorching and to keep the heat even. After pressing, let the vinyl cool before peeling off the carrier sheet to avoid lifting or curling.
Tips for Positioning and Avoiding Air Bubbles
Start by placing your transfer tape with vinyl or your HTV-covered design loosely so you can reposition if needed. Use a ruler or straight edge to line up your design symmetrically on the sign.
Apply steady, moderate pressure with a scraper or the EasyPress during transfer. Slow, smooth movements minimize bubbles. Spot bubbles under adhesive vinyl? Try pushing them outward with a scraper. For HTV, bubbles often smooth out after heat application.
Avoid pressing down too hard initially to prevent stretching the vinyl. Work from the middle of large designs toward the edges to ensure even application.
Common Mistakes and How to Fix Them When Making Bathroom Signs
Common mistakes during the cutting, weeding, and application processes can affect the quality and durability of your bathroom sign. One frequent issue during cutting is setting the wrong blade depth or material setting, which can cause vinyl to tear or not cut through cleanly. Double-check the material setting in Cricut Design Space before starting the cut. For standard adhesive vinyl, use the “Vinyl” setting and clean, sharp blades to get smooth cuts without biting into the backing paper.
Weeding errors often happen when intricate designs have closely spaced letters or fine details. Removing parts accidentally or struggling to pull the vinyl off calls for a finer weeding tool and plenty of light. Take your time peeling away the excess vinyl, starting from the corner and pulling slowly at a low angle. A small piece coming up by mistake can be fixed with vinyl scraps and careful gluing, or by recutting that area if necessary.
Applying the vinyl involves avoiding bubbles, wrinkles, and alignment mistakes. Check that the surface is clean, dry, and free of dust before transferring. Use a lint-free cloth and rubbing alcohol to prep the surface. Apply the transfer tape smoothly, and press the vinyl down firmly with a scraper or credit card while slowly peeling away the transfer tape at a 45-degree angle.
- Verify blade sharpness and material setting before cutting
- Weed designs slowly with proper tools under bright light
- Clean and dry the surface thoroughly before applying
- Use firm pressure with a scraper and peel transfer tape at an angle
- Fix lifting edges with a small dab of strong craft glue
- Check alignment with a ruler or masking tape guides before final placement
- Allow vinyl to set for at least 24 hours for best adhesion
Before finalizing your sign, inspect every letter and edge to ensure there are no lifted corners or missed spots. Press down any edges that seem loose using firm, steady pressure. Bubbles can be fixed by gently pricking them with a pin and smoothing out the air underneath. For bathroom signs, using waterproof vinyl or adding a light sealant can extend the sign’s life in damp environments. Planning for these steps reduces frustration and ensures your décor looks professional and lasts longer.
Safety Tips and Best Practices When Using Cricut and Heat Press
Handling your Cricut machine and EasyPress heat press requires careful attention to safety to prevent injuries and keep your tools in good condition. Start by setting up a dedicated workspace that is clean, well-lit, and free of clutter. This reduces the chance of accidents, especially when working with sharp blades and hot surfaces. A sturdy table at comfortable waist height helps you maintain control and avoid strain during long crafting sessions.
Before you begin cutting, check that your Cricut blade is sharp and properly installed. A dull blade increases the risk of slipping, which can cause injury or damage your materials. Replace blades every few projects, depending on how often you use them, to maintain clean cuts. Always handle blades carefully, storing them securely when not in use, preferably in a protective case. The blade housing should never be touched directly by fingers to avoid cuts.
Operating the EasyPress requires extra caution. The heat plate surface can reach temperatures over 350°F (177°C), so avoid touching it during and shortly after use. Always place the heat press on a heat-resistant mat, and keep your fingers away from the edges when pressing down. When doing multiple applications, let the EasyPress cool between uses as recommended in the instructions, usually just a few minutes, to prevent overheating. Using heat-resistant gloves can add protection, especially for beginners handling large or detailed designs.
Maintain your Cricut machine by regularly cleaning the cutting mat and scraping off leftover bits of vinyl and debris. This keeps the mat sticky and improves cutting accuracy. Also, keep the housing and screen free from dust. For the EasyPress, wipe the heat plate with a soft cloth after cooling to prevent buildup. Avoid using abrasives or liquids that could damage electronics.
Be sure to follow a safety checklist that includes unplugging devices when changing blades, never leaving the heat press unattended while on, and keeping pets and children away from your crafting area. Having a fire extinguisher nearby is wise since heat tools pose a fire risk if left in contact with flammable materials. Finally, keep your workspace organized by storing tools and materials in designated boxes or drawers, minimizing accidents caused by accidental contact with sharp or hot parts.
Never touch the EasyPress heat plate directly; use a heat-resistant mat and allow it to cool before cleaning or moving it.
Step-by-Step Action Plan for Making Your Bathroom Sign
Follow this plan to create your custom bathroom sign with your Cricut machine and vinyl materials. Track progress by checking each step’s result before moving forward.
- Before you start: Gather all materials and tools like vinyl, transfer tape, cutting mat, scraper, and your preferred surface. Confirm you have a clean workspace and Cricut Design Space ready.
- Day 1: Choose or upload your bathroom sign design in Cricut Design Space, then size it to fit your surface. Preview the design to ensure the details are clear and readable.
- Day 2: Cut the vinyl or heat transfer vinyl using the Cricut machine settings for your material. Verify the cut lines are clean and complete before removing the mat.
- Day 3: Weed away excess vinyl carefully, especially around intricate parts. Check the design remains intact and free of unintended gaps.
- Day 4: Prepare your surface by cleaning and drying it completely to ensure good adhesion. The surface should look clean and feel smooth to the touch.
- Day 5: Apply transfer tape over the vinyl, then place the design onto your surface using firm pressure and a scraper tool. Lift the transfer tape slowly to confirm the vinyl sticks properly.
- Day 6: For heat transfer vinyl on fabric surfaces, use your Cricut heat press or iron according to the material instructions. Confirm the vinyl has bonded properly by gently testing edges after cooling.
- Day 7: Inspect your finished sign for any loose edges or bubbles. Fix minor imperfections by reheating or smoothing before final placement.
Frequently Asked Questions
Can I Use Cricut Vinyl on Bathroom Mirrors?
Yes, permanent vinyl works well on mirrors, but clean the surface first for better adhesion and longer-lasting results.
How Do I Resize Designs for Different Bathroom Sign Sizes?
Resize your design in Cricut Design Space to fit your sign blank before cutting, keeping proportions for a balanced look.
What’s the Best Way to Add Humor to a Bathroom Sign?
Use funny phrases or images from Cricut’s bathroom sign library to create a playful design that suits your style.
Can I Use HTV on Wood Bathroom Signs?
Yes, heat transfer vinyl can be used on sealed wood with a heat press or EasyPress, giving a durable finish.
How Do I Prevent Vinyl from Peeling on Bathroom Signs?
Apply vinyl smoothly and press firmly; sealing with a clear coat can protect the vinyl from moisture in bathrooms.
Are Wooden Signs Better Than Acrylic for Bathroom Décor?
Wood offers a rustic look and accepts vinyl well, while acrylic is modern and easier to clean; choose based on your style.
Wrapping Up
Creating a bathroom sign with your Cricut machine becomes easier when you follow a clear plan and check each step carefully. Start with a simple design and focus on clean cuts and careful application for best results. Your next step is to pick your surface and test a small vinyl piece on it to see how well it adheres before doing the full sign.