
How to Make a Reverse Stencil: Simple Steps for Crisp, Professional Results
Reverse stenciling creates designs by painting around a stencil instead of inside it, leaving the background color inside the cutouts. To make a reverse stencil, start by securing the stencil to your surface, apply paint evenly around the edges, then remove the stencil carefully once the paint sets. This technique works best when the paint is slightly tacky, helping metals and additional layers adhere better.
Key Takeaways
- Secure your stencil firmly to prevent paint from seeping underneath during application.
- Allow paint to dry until tacky, usually around 15 minutes, before applying special finishes like metallic leaf.
- Use natural bristle brushes for pouncing paint or applying leaf to avoid damaging stencil edges.
- Pick acrylic paint for quick-drying surfaces, drying in 1-2 hours before removing stencils.
- Oil-based paints require longer drying times, 3-4 hours before stencil removal, to keep crisp lines.
- Reverse stencil techniques protect delicate surfaces like glass from daily wear as paint applies on opposite side.
What Is Reverse Stenciling and How Does It Work?
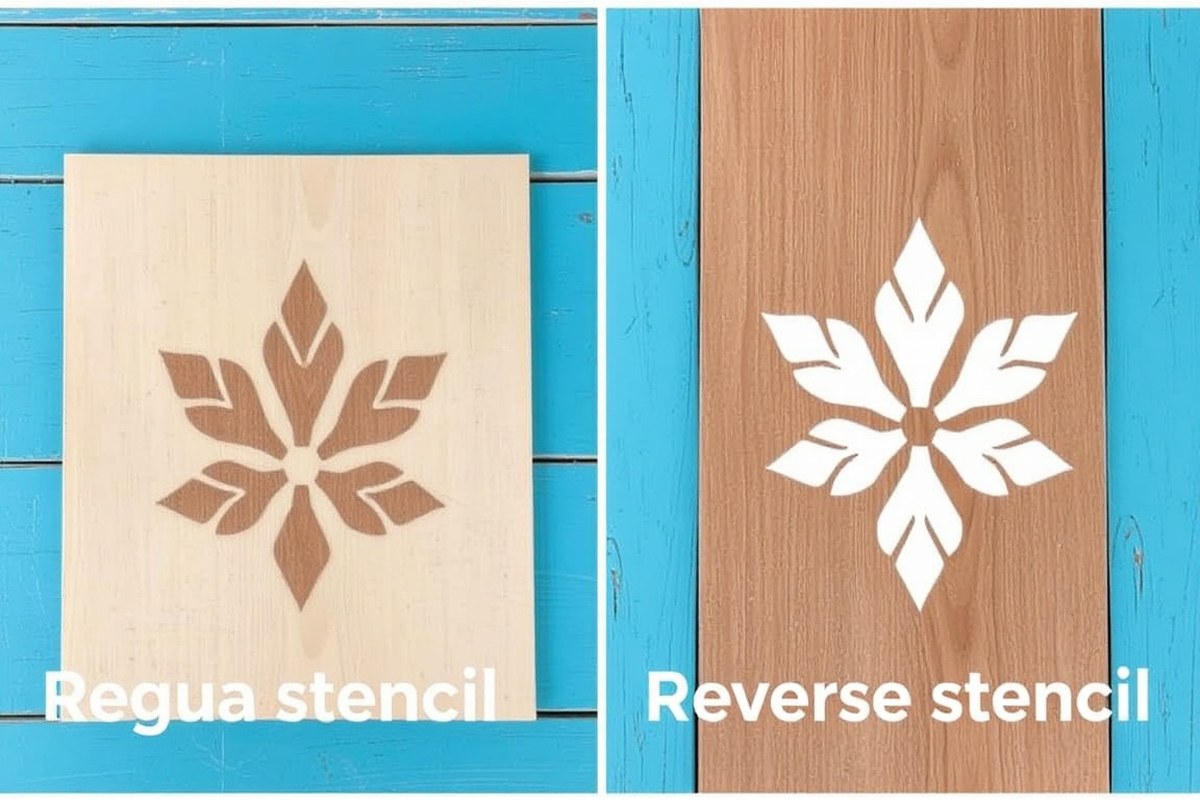
Reverse stenciling is a method where the paint is applied only outside the shapes cut into your stencil, leaving the design’s cut-out areas the same color as your background or base surface. This means the painted surface forms the negative space, highlighting the original material or color within the stencil’s shapes. Unlike traditional stenciling, where paint is applied through the stencil to fill in the design, reverse stenciling paints everything around it, showcasing the design by revealing the base beneath.
You create a reverse stencil by first painting your surface in the color you want the design to appear. After that dries, place a vinyl stencil or any cut-out stencil on top. Instead of brushing paint into the stencil openings, you paint the area around the stencil. When you remove the stencil, the shapes and letters remain in the original base color, surrounded by the fresh paint you’ve added. This technique is particularly effective for crisp lettering and detailed designs because the edges of the base color remain sharp and distinct without bleeding paint inside the shapes.
An example would be painting a wooden board black first and letting it dry for an hour or two. Then place a stencil with your words or design and paint white over the surrounding areas. After peeling the stencil away, the letters remain black, creating a striking contrast with the white background. This method works well on wood, glass, and canvas, with glass offering an extra level of protection since the side painted on the reverse is shielded from daily wear.
Reverse stenciling also allows for combining techniques. You might start with a standard stencil to add word art, then use the reverse stencil method to highlight or frame those words by painting outward from them. This layering creates dimension and more visual interest compared to using just one style.
The paint needs to be dried well to avoid smudging, especially on porous surfaces. Acrylic paints should dry at least one to two hours before removing your stencil. Oil-based paints require longer, three to four hours is ideal to prevent smearing or peeling. Applying the paint around the stencil usually takes less time than filling the design directly because you work in the negative space rather than the detailed shapes. However, care is needed to ensure the edges stay neat and the paint doesn’t seep under the stencil’s edges, which can blur the lines.
Choosing the Right Materials and Tools for Reverse Stencils

To create effective reverse stencils, choosing the right materials and tools is essential because they directly influence the sharpness and durability of your design. Start with stencil vinyl, a flexible and easy-to-cut material that holds crisp edges well and sticks firmly to surfaces. For cutting, a craft knife or a cutting machine like a Cricut works best. A cutting machine offers precision and speed, especially for intricate designs, but a sharp craft knife can also produce clean cuts if you take your time. Use a light grip cutting mat to protect surfaces and ensure blades cut smoothly.
Paint choice plays a significant role in the quality of your reverse stencil results. Stenciling paint specifically formulated for clean adhesion is better than regular acrylic paint. It tends to hold edges without bleeding, which is important for reverse stenciling to keep negative space sharp. When working on wood, applying a stencil adhesive spray helps prevent paint bleed and keeps the stencil in place while you work.
- Stencil vinyl or adhesive stencil film for creating the stencil base
- Cutting tools: Cricut machine or hobby craft knife with a fresh blade
- Light grip cutting mat to protect your work surface and aid precise cuts
- Stencil adhesive spray for securing stencils especially on porous surfaces like wood
- Stenciling paint designed for clean lines rather than regular acrylic paint
- Paint applicators such as pouncing brushes or foam rollers for even coverage
- Protective gloves and apron to keep clean while working with paints and adhesives
Choosing stencil vinyl means your designs can be easily placed and repositioned on various surfaces, from canvas to glass. For cutting, fresh blades help you slice through vinyl without jagged edges, which is essential for intricate patterns. Since reverse stenciling works by painting the background and leaving the design visible by masking, clean edges from your stencil dramatically improve the final look.
Keep blades sharp and replace them often, dull blades cause rough, incomplete cuts that ruin stencil edges.
Stenciling paint typically costs a few dollars more per bottle than standard acrylics but saves time when trying to avoid touch-ups. It dries within 15 to 30 minutes depending on thickness and surface type, letting you progress through layers efficiently. Avoid heavily textured surfaces for your first projects to maintain easier stencil adhesion and clean paint lines.
Preparing Your Surface for a Successful Reverse Stencil
Preparing your surface is key to ensure paint sticks well and your reverse stencil design shows clean, sharp edges. Different surfaces like wood, glass, and fabric have unique prep steps that affect results. Proper cleaning, smoothing, and applying a compatible base coat lay the foundation for a professional-looking project.
Cleaning and Sanding the Surface
Remove dirt, oils, or residues that can stop paint from bonding properly. For wood, lightly sanding creates a smooth, even surface and opens the pores to hold paint better. Glass requires thorough cleaning to strip off dust, fingerprints, or grease, while fabric needs to be washable and free of stiffeners or sizing. Follow these steps to prep your surface before stenciling:
- Wipe wood, glass, or fabric with a damp cloth to remove loose debris.
- For glass, use a glass cleaner or rubbing alcohol and a lint-free microfiber cloth to clean thoroughly.
- Lightly sand wooden surfaces with fine-grit sandpaper (220 grit) to smooth rough areas.
- Brush off sanding dust with a dry cloth or tack cloth.
- Wash fabric in warm water without fabric softener for best paint adhesion, then let dry.
- Ensure the surface is completely dry before painting.
Clean, smooth surfaces prevent paint from bleeding under the stencil or flaking off after drying, which can ruin your design.
Choosing and Applying the Base Coat
Pick a base color that complements your reverse stencil design. Typically, a lighter base color allows darker stencil paint to stand out, but you can invert this for contrast depending on your vision. Use paint compatible with your surface: acrylic or latex for wood and fabric, glass paint or enamel for glass surfaces.
Applying the base coat evenly is essential for clean edges and color consistency. Thick paint or uneven coats can cause the stencil to lift or smudge. Here’s how to apply the base coat:
- Select a base paint formulated for your surface type (e.g., fabric paint for fabric, enamel for glass).
- Apply a thin, even coat using a brush, roller, or spray depending on surface and paint type.
- Use smooth, long strokes to avoid brush marks and keep the surface level.
- Allow the paint to fully dry, this usually takes at least 1 hour for acrylic on wood or fabric.
- For opaque coverage, apply a second thin coat if needed and let dry again.
A smooth, dry base ensures your reverse stencil paint adheres sharply and your final design looks polished.
Drying Times Before Applying Stencils
Drying time varies by surface and paint type but is critical before placing your stencil. A tacky or wet base can cause the stencil to stick, lifting or smudging paint. On average, acrylic paint on wood or fabric should dry at least 1 to 2 hours before stenciling. Glass paint might dry faster, often within 30 minutes, but check your paint’s label for exact times.
To test if the base layer is ready, gently touch an inconspicuous spot. It should feel dry to the touch without any transfer.
Patience during drying prevents mistakes that lead to clean-up or ruined designs. Consider painting base coats the day before starting your reverse stencil project for ample curing time.
Step-by-Step Process to Make a Reverse Stencil Design
Creating a reverse stencil design involves cutting your stencil, applying it securely, painting over it, and then removing it at the right moment to reveal a crisp, reversed image. Each step must be done carefully to avoid smudges and ensure the edges of your design stay sharp.
Cutting the Stencil with a Cricut or by Hand
Begin by choosing or creating your stencil design. For detailed patterns, use a cutting machine like a Cricut or Silhouette to ensure accuracy. In Cricut Design Space, selecting the “Reverse” option flips your design, which is necessary for making a reverse stencil. Without a cutting machine, you can carefully cut the stencil by hand using a craft knife and durable vinyl or stencil film.
Choose vinyl as your stencil material to ensure durability and easy removal. Vinyl usually costs between $10 and $20 for a 12″ x 12″ sheet, which is enough for several small projects.
Applying Stencil and Securing Edges
Once cut, position the stencil on your prepared surface carefully to avoid wrinkles or bubbles. Use transfer tape to move the stencil if it’s made from vinyl. This helps keep the design intact during placement. Press the stencil down firmly using a squeegee or a flat tool to secure all edges against the surface, preventing paint bleed under the stencil. For added hold, especially on wood or textured surfaces, apply a low-tack spray adhesive on the stencil’s backside to improve adhesion without damaging your project.
Painting over the Stencil Correctly
Apply your chosen paint or stain over the stencil. Use a dense sponge or a stencil brush to dab paint lightly, minimizing the risk of paint bleeding under the edges. Avoid heavy coats; instead, apply multiple thin layers. You can apply paint directly to the back of the stencil for a soft, diffused effect on paper crafts.
Choose a paint suitable for your surface, for example, acrylic paint for wood or fabric paint for textiles. The paint color should contrast well with the background to make your reversed design stand out clearly.
Timing and Removing the Stencil for Crisp Edges
Monitor drying time carefully. Remove the stencil before the paint dries completely but after it sets enough not to smear. This timing varies based on paint type and environment; typically, this means waiting 5 to 15 minutes in a warm, dry setting. Removing the stencil too early might smear the paint, while removing it too late can cause peeling or jagged edges.
Pull the stencil off slowly and smoothly in the same direction. Inspect the edges quickly to ensure no paint has bled or stuck to the stencil. Allow the paint to dry completely before you start removing the stencil to avoid smudging or damage. For stubborn stencils embedded in wood, use a gentle solvent like rubbing alcohol or Goo Gone to assist removal.
- Design your pattern and select “Reverse” in Cricut Design Space to flip the image.
- Cut the stencil from vinyl using your Cricut or cut by hand with a craft knife.
- Apply transfer tape to the stencil and position it securely on your surface.
- Press down firmly to seal all edges of the stencil against the surface.
- Lightly apply paint over the stencil with a sponge or brush in thin layers.
- Wait 5-15 minutes for paint to set but not fully dry.
- Remove the stencil carefully in the same direction to avoid smearing.
- Touch up the design if needed after paint is completely dry.
How to Avoid Common Mistakes and Fix Them
Paint bleeds under your stencil mostly because of too much paint or insufficient adhesion of the stencil to your surface. When the stencil moves or lifts during painting, paint might leak under the edges, spoiling clean lines. To prevent bleeding, avoid overloading your brush or roller; use a light layer of paint that builds up instead of one thick coat. Applying a repositionable adhesive spray to the back of your stencil helps hold it flat and steady, especially on uneven or textured surfaces.
Uneven paint coverage happens when your paint is too thick, too thin, or applied inconsistently. Thin paints may require multiple light coats rather than a single heavy one. A sponge or fine foam roller works well for reverse stenciling because it distributes paint evenly without soaking the stencil. Patience is key: wait for each layer to dry about 10, 15 minutes before adding another to prevent bleeding and ensure clean edges.
Rips or sticking of the stencil usually occur if the stencil material is too delicate or if paint builds up in the small stencil spaces. Always handle stencils gently, especially when removing them once the paint dries partially but is still tacky. To avoid sticking, try using a barrier like a thin layer of clear acrylic spray on your stencil before use; this adds durability and reduces paint adhesion on the stencil itself.
- Use a small amount of paint and apply with light dabbing motions rather than brushing hard.
- Secure the stencil firmly with spray adhesive or painter’s tape on all edges.
- Allow the base paint layer to dry completely before applying your reverse stencil.
- Dry the paint between layers for 10, 15 minutes to avoid smudging or bleeding.
- Work with smooth, non-porous surfaces when possible for cleaner results.
- Clean your stencil gently after each use to prevent paint buildup and tears.
- Use a sponge or foam roller instead of a brush for better control over paint application.
Apply paint in light layers and remove the stencil while the paint is still slightly tacky to prevent ripping or sticking.
Noticing paint bleed after removing the stencil means you should gently wipe excess paint with a damp cloth or fix edges with a fine angled brush after it dries. Fixing coverage spots can be as simple as gently touching up with a small brush or sponge, but avoid heavy reapplication that could blur lines. Proper stencil maintenance and careful technique combine to minimize these common problems and help you create crisp, clean reverse stencil designs every time.
Paint Types and Drying Times for Different Surfaces
Choosing the right paint type is key to achieving clean, crisp results with reverse stenciling. Fast-drying paints help reduce smudging when removing the stencil, but drying times vary depending on the surface you work on. Wood, glass, and fabric each interact differently with paint, affecting drying speed and durability.
Acrylic paints dry quickly on wood, typically within 20 to 30 minutes at room temperature. They adhere well and can be sealed easily after fully curing, which takes up to 24 hours. For glass, enamel paints are preferred for their adhesion and finish, though they dry slower, generally 1 to 2 hours before you can handle the piece and up to 72 hours to cure fully. Fabric paints designed for textiles need 2 to 4 hours to dry to the touch and usually require heat-setting to last through washing.
Removing the stencil at the right time ensures sharp edges without lifting the paint. On wood with acrylic paint, the stencil can be lifted after about 30 minutes but before the paint fully cures. On glass with enamel paint, wait at least 1 hour until the paint is dry to the touch. For fabric, wait until the paint feels dry but still flexible, often 2 to 4 hours. Removing the stencil too early risks smudging; too late risks peeling dried paint from the surface.
| Surface | Recommended Paint Type | Drying Time Before Removing Stencil | Full Curing Time |
|---|---|---|---|
| Wood | Acrylic paint | 20, 30 minutes | 24 hours |
| Glass | Enamel paint | 1, 2 hours | 48, 72 hours |
| Fabric | Fabric paint (heat-set) | 2, 4 hours | After heat setting |
Environmental factors like temperature and humidity affect drying and curing times. Higher humidity slows drying, so painting in a well-ventilated, low-humidity area yields better results. Cold temperatures also extend drying time, especially for enamel paints on glass. Using thin coats speeds drying and reduces the chance of paint lifting when you lift off the stencil.
For beginners, testing a small area first can help dial in timing for stencil removal based on your specific paint, surface, and conditions. Applying paint in thin, even layers and carefully lifting the stencil once the paint is dry to the touch avoids smears and sharpens your design’s edges. Proper drying and stencil removal times improve your project’s overall look and longevity.
Combining Standard and Reverse Stencil Techniques for Unique Effects
You can definitely mix reverse and positive stenciling to create layered, eye-catching designs. Start by choosing which part of your project will feature the reverse stencil, where you paint the background and leave the design shape unpainted. Then decide where you want the positive stencil, where the design itself is painted on top of the background. Combining both techniques adds depth and complexity to your work, especially if you pick contrasting colors that make each layer stand out clearly.
For color schemes, use a background color that contrasts well with your top layer. When the base is dark, select a lighter color for the positive stencil. When the background is light, opt for a darker shade for the reverse stencil design. This contrast is important because the design from the reverse stencil relies on the background showing through, while the positive stencil’s paint sits on top. For example, a black background with white or bright-colored stenciled letters works well, or a pastel background with bold, dark letters.
Layering paint without smudging requires patience and proper drying times. After applying the first layer, whether it’s the reverse stencil background or the positive stencil design, allow the paint to dry completely. Acrylic paints generally need at least 30 minutes to an hour to dry to the touch, depending on the thickness of the application and room temperature. Use a hairdryer on a low heat setting to speed this up if you’re short on time, but be careful not to blow wet paint around.
Apply paint for reverse stencils with a pouncing tool or sponge using light, controlled dabs to avoid bleeding under the stencil edges. For positive stencils, a similar technique works well, but you can also use a small brush for sharper lines. Adding a black layer beneath the reverse stencil works well with products like Flat Black Stencil Creme, which offer strong coverage and fill open areas to make the design stand out. Make sure to pounce evenly and rinse your stencil between layers to prevent buildup and smudges.
One method is to paint your reverse stencil background first and wait until it fully dries, overnight works best if possible. Once dry, position your positive stencil on top, aligning it carefully. Paint this layer lightly in layers so you avoid smudging the underlying design. Plan multiple colors by letting each color dry completely before applying the next, and clean the stencil between color changes.
Cost-wise, you can keep it affordable by using standard acrylic paints and sponges, which run around $3 to $7 per bottle and a few dollars for a pack of sponges or stencil brushes. Specialized stencil creams like Flat Black Stencil Creme might cost slightly more, around $8 to $12 per jar, but they offer better coverage and reduce mistakes. Expect to spend around $20 total for paints and tools if starting from scratch, making layered stenciling a reasonably budget-friendly technique.
Good results show clear, sharp contrast between the reverse and positive elements without color bleeding or smudges. Edges of the stenciled areas should be crisp and clean. Colors blending unintentionally usually happen because of wet paint layering or too much paint on your brush or stencil tool. Clean your stencils regularly during the process and keep paint layers thin to avoid smearing.
Sealing, Finishing, and Caring for Reverse Stencil Projects
Protecting your reverse stencil project with a sealant helps keep the paint from chipping and fading. Adding distressing after sealing can create a vintage look that adds character. Proper care ensures the stencil art lasts longer and stays vibrant.
Choosing the Right Sealant
Selecting a good sealant depends on the surface you used and the finish you want. For wood projects, a clear varnish or polyurethane protects against scratches and moisture while preserving colors. Water-based sealants dry faster, around 1 to 2 hours, and offer low odor, making them suitable for indoor crafts. Oil-based options take longer to cure but provide a tougher finish.
For painted reverse stencils on fabric, use a fabric medium or a spray-on acrylic sealer that remains flexible. Avoid sealants that can yellow or crack over time, especially outdoors. Matte, satin, or glossy finishes are available, so pick one that matches your style. Always test the sealant on a scrap piece first to check the effect and adhesion.
Techniques for Distressing Edges
Distressing adds a weathered touch that complements many rustic or shabby chic decor styles. You can carefully sand the edges of your stencil design or the entire surface with fine-grit sandpaper (220 grit works well) once the paint and sealant are fully dry, usually after 24 hours. Focus on raised areas and corners to mimic natural wear.
Use a damp cloth to wipe away dust between sanding passes. For more subtle aging, apply a dark wax or glaze in the crevices after distressing to highlight details. Some crafters prefer to distress before sealing to avoid removing too much protection. You can experiment with light tapping techniques using a sponge or dry brush to add texture before sealing as well.
Maintenance Tips for Longevity
Keep your reverse stencil project away from direct sunlight and extreme moisture to extend its life. Dust regularly with a soft, dry cloth to prevent dirt buildup that can dull the paint. Avoid harsh cleaners or abrasives that may damage the sealant or paint layer.
If your project is on furniture or frequently touched surfaces, reapply a clear sealant every 1 to 2 years to maintain protection. Store pieces indoors or covered when not in use to reduce exposure to environmental factors. Promptly fix any chips or scratches by lightly sanding and touching up with matching paint and sealant.
Apply the sealant in thin, even coats with a high-quality synthetic brush or spray for a smooth finish and minimal bubbles.
Follow these steps to seal and distress your reverse stencil project properly:
- Ensure the paint is completely dry, at least 24 hours after finishing the stencil.
- Choose an appropriate sealant based on your surface (varnish for wood, fabric medium for textiles, or acrylic spray for mixed materials).
- Apply the sealant evenly, using thin coats to avoid drips; wait the recommended drying time between coats (usually 1 to 4 hours).
- Optionally, lightly sand the areas where you want distressing with fine-grit sandpaper once sealant is dry.
- Wipe away sanding dust with a damp cloth and let dry completely.
- Apply a dark wax, glaze, or dry brush paint if desired to improve the distressed look.
- Allow all finishes to cure fully before handling or placing the item in use.
- Store or display your project in a suitable environment away from direct elements.
Best Surfaces and Projects for Reverse Stenciling
Reverse stenciling works best on smooth, flat surfaces where paint or metallic leaf can adhere evenly. Wood, glass, and metal sheets offer excellent results because they allow the stencil design to stand out sharply from the background. Fiberglass and ceramic tiles also perform well, though they may require special primers or sealants to ensure durability. Textured materials like brick or rough stucco present challenges because uneven surfaces trap paint under the stencil, causing blurry edges and making detailed designs difficult.
Projects benefiting most from reverse stenciling include large-scale wall art, decorative glass panels, wooden furniture accents, and metal signage. This technique highlights the background color or texture by masking the design area with the stencil, then applying metallic foil or contrasting paint to the uncovered spots. Reverse stenciling encourages creative effects, such as layering different metal leaf colors within one design or combining both traditional and reverse techniques for a unique look on large canvases over 4 by 4 feet.
- Smooth wood panels sealed with a clear primer for crisp edges
- Glass surfaces treated with a tacky adhesive designed for metal leaf
- Metal sheets cleaned of grease and rust before stenciling
- Painted drywall walls using stencils larger than 16 by 16 inches
- Furniture surfaces sanded smooth and finished with non-glossy paint
Use a soft, natural bristle brush to apply delicate layers of gold or silver leaf on tacky size through the stencil. Pressing firmly on the stencil with a lambswool pad spreads and burns in the leaf, optimizing adhesion and detail. Keep in mind that open spaces may appear if the leaf doesn’t completely cover the size; gently patting on additional leaf bits fixes these gaps. For rough or porous materials, expect the need for multiple layers or touch-ups.
Limitations include small or very intricate stencil patterns on uneven surfaces, where reverse stenciling may blur details or peel easily. High-moisture or outdoor projects also require specialized sealers to prevent early wear. Choosing the right surface and preparing it correctly ensures your reverse stencil design performs well and lasts long, turning a simple shape into a standout piece with clean contrast and elegant texture.
Step-by-Step Action Plan for Your First Reverse Stencil
Follow these steps to start your reverse stencil project and achieve sharp, professional results.
- Before you start: Choose your surface and clean it thoroughly to ensure paint adhesion. Test a small area to check for compatibility.
- Day 1: Prepare your stencil by cutting your design on stencil material. Confirm clean edges by inspecting under good light.
- Day 1: Position and secure the stencil on your surface with painter’s tape or stencil adhesive. Make sure it’s flat and firmly attached without wrinkles.
- Day 1: Apply your base coat paint if needed and let it dry completely; this shows through the cut-outs in reverse stenciling.
- Day 1: Paint over the entire area, covering both the stencil and uncovered surface, using a sponge or brush with light, even coats.
- After 30 minutes to an hour: Carefully remove the stencil while the top paint is still tacky but not wet. Clean any edges if necessary.
- After 24 hours: Apply a clear sealant designed for your paint and surface type to protect your design. Test adhesion by lightly scratching a hidden spot.
Frequently Asked Questions
Can You Use Reverse Stenciling on Glass Surfaces?
Yes, reverse stenciling works well on glass and the design is protected behind the glass, making it durable. This technique helps keep your artwork safe from scratches or wear over time.
How Do You Remove Paint Mistakes in Reverse Stenciling?
Small paint mistakes can be wiped off with a damp cloth before drying. Acting quickly prevents the paint from setting and ruining your project.
Is Reverse Stenciling Suitable for Fabric Projects?
Reverse stenciling can be done on fabric using fabric paint, but test first for bleeding. It works best on tightly woven fabrics for crisp designs.
What’s the Best Way to Clean Reusable Reverse Stencils?
Wash reverse stencils gently with warm soapy water after use and let them air dry. Avoid scrubbing too hard to prevent damage to delicate cutouts.
Can You Layer Colors with Reverse Stencils?
Layering colors is possible but requires letting each layer dry completely to avoid smudging. Using a fixative between layers protects the paint and improve color vibrancy.
How Long Should You Wait Before Sealing a Reverse Stencil Project?
Wait 24 hours for paint to dry completely before sealing to avoid smearing. Proper drying ensures a durable finish and better sealant adhesion.
The Bottom Line
Creating a reverse stencil lets you play with layers in a unique way and offers creative opportunities in your crafting projects. Start by selecting a simple design and surface to build your confidence. Then, try combining this technique with standard stenciling for even more personalized effects.

