
What Is a Banner Sign? A Complete Guide to Types, Uses, and Design
What is a banner sign? A banner sign is a large, flexible graphic display typically made of vinyl, mesh, or fabric, designed to convey messages or advertise events and promotions. These signs work by catching attention quickly with bold text and simple visuals, making them effective for both indoor and outdoor use. Starting with clear, legible text sized for your viewing distance ensures that your message will be noticed and understood.
Key Takeaways
- Choose vinyl banners for durability and vibrant color, mesh banners for windy outdoor locations, and fabric banners for a premium look.
- Select banner size based on where it will be viewed; larger sizes with bigger text are needed for longer distances.
- Use at least 10-inch tall letters on 4×8 ft banners for drivers moving at 65 mph to ensure readability within seconds.
- Common banner dimensions include 2 feet by 4 feet, 3 feet by 6 feet, and 4 feet by 8 feet, with the 4×8 size preferred for large outdoor promotions requiring significant visibility.
- Keep designs simple by limiting elements; avoid cramming more than two or three key points to maintain legibility.
- Add ½-inch metal grommets spaced every 2 feet along the top and bottom of mesh and fabric banners for secure mounting.
What Is a Banner Sign and How Does It Work?
A banner sign is a flexible, hangable type of sign typically made from materials like vinyl, mesh, or fabric. Unlike rigid signs that use solid materials such as metal or plastic, banner signs are lightweight and portable. They are designed for temporary or semi-permanent use, which allows you to display messages, promotions, or announcements for specific events or seasonal campaigns. Their flexibility means you can easily roll them up for storage or transport, which suits small business owners or event organizers needing quick setup and removal.
The key differences between banner signs and regular rigid signs revolve around material, durability, and intended lifespan. Banner signs use soft, pliable materials that can endure outdoor conditions for several months but often require replacement after repeated sun exposure, heavy rain, or wind. For example, a vinyl banner may last up to a year outdoors but will start fading or tearing if exposed to harsh weather for longer periods. In contrast, rigid signs are built to last years outdoors and provide a more permanent solution. Portability is another significant distinction; banners are easier to move and reposition, as you can hang them almost anywhere with ropes, grommets, or special stands, while rigid signs usually need fixed mounts or stands.
Banners serve well in various uses, including storefront promotions, grand openings, construction-site notifications, trade shows, community announcements, and political campaigns. Their adaptability makes them ideal when you want a cost-effective, short-term sign that grabs attention but doesn’t require long-term installation. For example, a 4-by-8-foot banner with letters at least 10 inches tall can be read by drivers traveling up to 65 mph within a three-second window, making it effective for roadside advertising during a limited campaign period.
The visual quality of a banner depends on proper print resolution and design. Print shops recommend resolutions of about 100 to 300 dots per inch (DPI) depending on the banner size, higher DPI for smaller banners where viewers are closer, and lower DPI for very large banners viewed at a distance. Without this adjustment, banners may appear blurry or pixelated, reducing their impact. Good banner design also involves high-contrast colors and clear typography to ensure messages are quickly understood by passing customers.
Using banner signs demands balancing costs and functionality. Vinyl banners typically cost between $5 and $10 per square foot, depending on print quality and customization. Their lower price compared to custom rigid signs makes them an attractive option for small businesses with limited marketing budgets or for event organizers needing multiple temporary signs. However, for permanent branding, a rigid sign is more appropriate because it withstands weather and wear over years without frequent replacement.
Common Materials and Types of Banner Signs
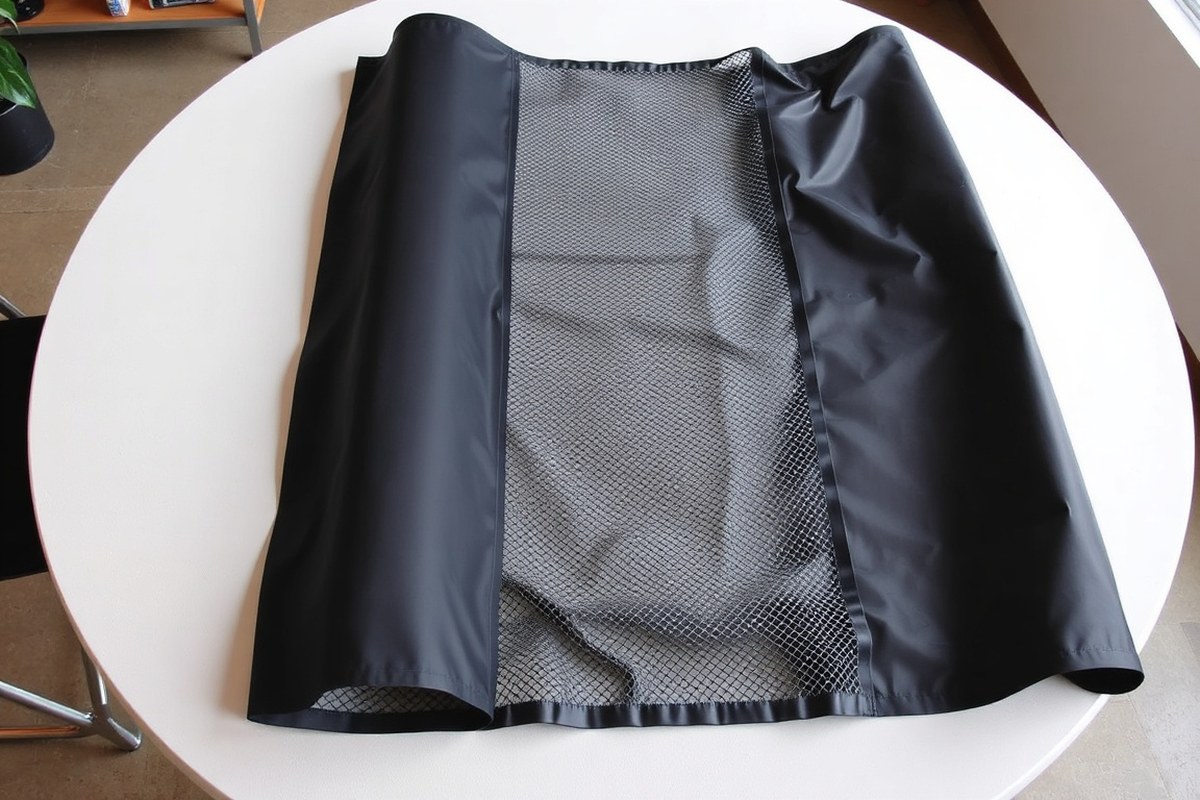
Banner signs typically come in three main materials: vinyl, mesh, and fabric. Each material offers specific features that suit different settings and needs. Choosing the right type helps ensure your banner lasts as long as needed and looks professional.
Vinyl Banners: Durable and Weather Resistant
Vinyl banners are the most common material for outdoor signs because they resist weather well and hold up to sun, rain, and wind. They usually come in weights like 13 oz scrim vinyl for standard use and 18 oz blockout vinyl when you want to prevent light from passing through. These banners are flexible yet tough, making them suitable for storefronts, road signs, and construction notices.
Typical vinyl banner sizes range from 2×4 feet for small indoor use to large formats like 8×20 feet for big building wraps. Vinyl banners are a cost-effective choice with an expected lifespan of several months up to a year outside, depending on exposure. For safety, back wall or drape vinyl banners need NFPA 701 fire-retardant certification, especially in indoor public spaces.
Mesh Banners: Wind-Resistant and Lightweight
Mesh banners feature a perforated surface that lets air flow through, reducing wind resistance better than solid vinyl. This makes them ideal for windy outdoor locations like construction sites and fences where a solid banner could act like a sail. Mesh is lighter and less prone to tearing in strong gusts.
These banners share similar sizing to vinyl but are usually chosen when wind is a concern. They use ½-inch metal grommets spaced 2 feet apart for secure hanging. Mesh banners typically don’t display colors as vibrantly as vinyl due to the holes, so they work best with bold, simple designs.
Fabric Banners: Soft Texture for Indoor Use
Fabric banners use polyester or canvas textiles, giving them a soft, elegant texture suitable for trade shows, conferences, and exhibitions. They provide higher print quality and a premium look compared to vinyl or mesh. Fabric material drapes naturally, so it typically hangs on frames or retractable stands instead of grommets.
These banners usually come in sizes like the retractable stand banner at 33×80 inches or portable frame displays around 79×32 inches. Fabric banners are lightweight and easy to fold and transport but generally not suitable for outdoor weather unless specially coated. They are perfect for indoor promotions where appearance is a priority.
| Banner Type | Material/Format Description | Typical Sizes | Best For | Key Feature |
|---|---|---|---|---|
| Vinyl Banner | Durable, large-format vinyl (13 oz or 18 oz blockout) | 2′×4′, 3′×6′, 4′×8′, up to 8′×20′ | Outdoor/Indoor events, storefronts, road signs, construction notices | Weather-resistant, versatile, affordable, fire-certification required indoors |
| Mesh Banner | Lightweight perforated vinyl surface | Similar to vinyl sizes; often large for outdoor use | Windy outdoor sites, construction areas, fences | Wind-resistant, lightweight, less vibrant print |
| Fabric Banner | Soft polyester textile or canvas | 33″×80″ retractable, ~79″×32″ portable frame | Indoor trade shows, conferences, exhibitions | Elegant look, premium print quality, lightweight |
Keep in mind that vinyl and mesh banners exposed to harsh sun or wind may fade or tear faster, so inspect and replace them every several months for best results.
How to Choose the Right Size for Your Banner Sign
Selecting the right banner size involves matching the banner’s dimensions and letter height to how far viewers will be from it. The right size improves readability and ensures your message reaches the intended audience clearly. Consider where the banner will hang, how viewers pass by, and what space you have available to maximize impact.
Standard Banner Sizes and Their Uses
Banner signs come in typical sizes that fit specific viewing distances and purposes. Small banners like 2 × 4 feet are suitable for indoor displays or tabletop settings with close viewers within 15 to 20 feet. Medium sizes such as 3 × 6 feet work well for storefronts or event entrances, readable from about 30 feet. Large banners from 4 × 8 to 8 × 20 feet serve outdoor events, roadsides, and building fronts, visible from 50 to 100 feet or more.
| Banner Size (ft) | Max Recommended Viewing Distance (ft) | Min Letter Height (in) | Best Use |
|---|---|---|---|
| 2 × 4 | 15, 20 | 1.5, 2 | Indoor tabletop, lobby, close-range display |
| 3 × 6 | ~30 | 3 | Storefront, sidewalk, event entrance |
| 4 × 8 | ~50 | 5 | Outdoor events, parking lot entrance |
| 6 × 12 | ~80 | 8 | Building facade, strip mall frontage |
| 8 × 20 | 100+ | 10+ | Highway signage, large event backdrops |
Choosing a size smaller than recommended for the viewing distance risks your message becoming unreadable, while too large a banner can overwhelm the space or increase cost unnecessarily.
Calculating Letter Height by Viewing Distance
Letter size directly affects readability from a distance. The general rule is 1 inch of letter height for every 10 feet of viewing distance. For example, a banner meant to be read from 30 feet should have letters at least 3 inches tall. This helps viewers quickly understand your message without straining. To ensure your banner fits your message and is easy to read, follow these steps:
- Measure the average distance between the banner and viewers’ eyes.
- Divide the viewing distance (in feet) by 10 to determine the minimum letter height (in inches).
- Calculate the total space your text will need using the letter height and length of your message.
- Add 2 to 4 inches of margin around your text to avoid cramped designs.
- Select a banner size that comfortably fits your text and margins.
- Use bold, clear fonts for better visibility.
- Test your design by printing sample letters at full size, if possible.
This approach avoids a common mistake: choosing a banner size based on fixed dimensions without accounting for how far the audience will be.
Special Sizes for Moving Vehicle Viewers
Banners viewed by drivers or fast-moving traffic need larger letters and more prominent sizing due to shorter reading times and distance variability. For these situations, minimum letter height increases to about 6 inches or more, with overall banner sizes starting around 4 × 8 feet. That size supports legibility from 50 feet, enough for drivers to recognize key message elements before moving on.
The Federal Highway Administration recommends even larger letters for road signs, up to 1 inch per 30 to 40 feet of viewing distance. This means a banner intended for highways or busy roadsides might require very large letters and correspondingly large banners, often 6 × 12 feet or 8 × 20 feet to ensure fast comprehension and safety.
When and Where to Use Banner Signs Effectively
Banner signs work best when you want to capture the attention of a local audience quickly and clearly. They are perfect for both temporary and permanent displays, helping businesses promote sales, events, or new locations. For outdoor use, choose banner sizes like 3×6 ft or 4×8 ft to ensure your message is readable from a distance, since smaller banners like 2×3 ft often get overlooked in busy street settings.
Retail stores benefit from banner signs when launching grand openings, seasonal sales, or new product lines. Restaurants can use banners to advertise daily specials or new menu items right outside. Trade shows and conferences find banner signs valuable for booth branding and directional guidance, often using square banners from 2×2 ft up to 5×5 ft as photo backdrops or floor markers. Event organizers rely on banners for festival announcements, registration points, or sponsor recognition, while community groups display banners for charity drives, church events, or sports team support.
Maximizing banner visibility depends heavily on placement. Hanging banners above eye level along busy walkways or near entrances captures the most attention. For outdoor events, mounting banners on fencing or building fronts allows them to be seen from multiple directions. Indoors, placing banners behind registration tables or at navigation points helps guide attendees effectively. Position your banner in locations where traffic naturally pauses, such as waiting areas or near concessions, to boost engagement.
- Place banners above crowds using cables or rods for clear visibility at large events.
- Use a 3×6 ft banner size for indoor events; it fits well above tables and is readable from up to 30 feet.
- At retail storefronts, secure larger 4×8 ft banners flat against walls for maximum impact.
- For sports or community events, 3×6 ft banners cover most standard announcements.
- Rotate banners seasonally or for different promotions to keep messaging fresh and relevant.
- Keep outdoor banners out of direct sun for more than 30 minutes during setup to prevent warping.
- Make sure banner lettering is at least 5 inches tall to be legible from typical viewing distances.
Effective banners fit the intended audience and setting, contributing to over 80 percent higher local recall compared to digital advertising, according to industry data. The time and cost to produce a banner depend on size and material, but many businesses find 3×6 ft vinyl banners priced affordably around $50 to $150. Planning your design and exact placement helps avoid wasted investment and ensures the banner supports your marketing goals. Poor placement or the wrong size often leads to missed opportunities and low engagement.
How to Hang, Mount, and Display Banner Signs
Hanging, mounting, and displaying banner signs involves selecting the right method based on your location, duration of use, and banner type. Accessories like grommets, zip ties, and stands are essential for secure installation. Proper steps and maintenance help keep your banner visible and in good condition for as long as you need it.
Using Grommets and Zip Ties for Installation
Grommets are metal-reinforced holes typically placed along the edges of banners to provide sturdy points for mounting. Zip ties or cords thread through these grommets to attach the banner to various structures like fences, poles, or walls. This method is straightforward and cost-effective, especially for temporary displays. Here’s a step-by-step guide for hanging a banner using grommets and zip ties:
- Locate the grommets on your banner; they are usually placed evenly every 12 to 24 inches along the edges.
- Align the banner where you want to hang it, ensuring it will be taut and visible.
- Use zip ties or nylon cords to thread through the grommets and around a fixed support such as a fence post or railing.
- Tighten the zip ties or cords to secure the banner firmly, avoiding sagging or flapping.
- Cut off any excess zip tie ends for a neater appearance and to prevent snagging.
- Check all attachment points for even tension and adjust if necessary.
- Inspect the installation periodically, especially outdoors, to tighten or reposition as needed.
Ensure zip ties are snug but not overly tight to prevent tearing the banner material around the grommets over time.
Mounting Banners on Poles and Stands
Poles and banner stands offer portability and ease of setup, ideal for trade shows, events, and indoor use. Retractable banner stands typically hold vertical banners designed to fit specific hardware, balancing visibility and portability. Table throws and pop-up displays complement banner stands for coordinated branding.
Mounting on poles involves sliding the pole through a hemmed pocket on the banner or using clips attached to grommets. Banner stands usually have frameworks that lock the banner in place automatically when extended. This setup is convenient because it requires minimal tools and can be set up or taken down quickly.
Permanent Versus Temporary Mounting Options
Banner signs work best as temporary or semi-permanent signage due to their flexible materials and ease of installation. While some banners can last for months or even years outdoors with UV-resistant inks and durable vinyl, permanent mounting outdoors is less common. Permanent installations usually involve rigid signs made of metal or plastic mounted with bolts or adhesives.
For longer-term or permanent signage, consider frames with banner pockets that allow easy banner replacement without removing the entire structure. Outdoor banners meant for extended display benefit from reinforced hems and UV-protected materials but still require routine inspection to avoid wear or damage from weather.
Temporary mounting is practical for events, sales, or seasonal advertising. In contrast, permanent mounts suit locations where signage regulations or building codes permit fixed fixtures. Always confirm local rules and ensure your mounting method does not cause damage to property.
Design Tips to Make Your Banner Sign Stand Out
Creating a banner sign that grabs attention and communicates clearly hinges on strong design principles focused on typography, color, image quality, and messaging. The main goal is to make your banner legible from the intended viewing distance while ensuring it engages your audience quickly.
Start with typography by following the 1-inch-per-10-feet rule: every inch of letter height allows comfortable readability from about ten feet. For example, if you expect viewers to stand 50 feet away, your letters should be at least 5 inches tall. Use simple, bold fonts without intricate details that get lost on large formats. Avoid cramming too many elements on small banners, placing three or more major design pieces on a 2×4 foot sign usually leads to clutter and unreadability.
Color choice plays a major role in visibility. High contrast between text and background improves clarity dramatically. Dark text on a light background or vice versa works best. Steer clear of colors that blend, such as red on orange or blue on green. Aim for color combinations that pop and maintain this contrast under different lighting conditions, especially outdoors.
Image resolution is critical to avoid a pixelated or blurry look. For banner printing, use images with a minimum of 150 dpi at full size, though 300 dpi provides crisper results if budget allows. Make sure your graphics and logos are high quality and visually simple enough to remain clear from various distances. Complex images with fine details often fail to communicate effectively on a banner.
- Use bold, sans-serif fonts with letter heights based on viewing distance
- Apply strong color contrast for text and background
- Limit the number of design elements to avoid clutter
- Ensure images have at least 150 dpi resolution at print size
- Keep messages concise, aim for fewer than 10 words
- Test readability from the farthest expected distance before finalizing
- Use simple graphics instead of complex visuals for clarity
Messaging must be concise and to the point, since viewers typically spend just seconds scanning a banner. Incorporate your brand or event name prominently but keep the overall text limited to essential information. Banners overloaded with text fail to engage or inform effectively.
Failing to adhere to these standards risks producing a banner sign that is ignored or misread. Letters too small or colors too similar lower readability. Overloaded layouts lose attention rather than capture it. These mistakes are costly since banners involve printing and material expenses, often between $50 and several hundred dollars depending on size and complexity.
A well-designed banner quickly communicates your message, ensuring your promotion or event stands out to your target audience without confusion or effort in reading. Careful attention to typography, color contrast, image quality, and message brevity translates into a powerful marketing tool.
Differences Between Retractable and Standard Banner Signs
Retractable banners are portable display signs that roll into a stand, making setup and storage quick and convenient. They typically come with a weighted base and upright support, allowing the graphic to pull up smoothly and lock into place. The most common retractable banner size is 33 inches wide by 81 inches tall, which is widely produced and fits within most standard stands.
This differs from standard banner signs, which are usually large, flat pieces of vinyl or fabric that hang or mount in place. Standard banners come in a wide range of sizes, such as 2×8 feet or 4×12 feet for fence applications, and larger backdrops like 8×8 feet or 8×10 feet for booth displays. These require extra hardware like grommets, ropes, or frames for hanging and usually take more time to set up and take down.
Choosing between retractable and standard banners depends largely on your event type and how often you’ll move or store the banner. Retractable banners excel in indoor trade shows, conferences, and retail promotions where you need a clean, professional look combined with portability. Standard banners suit outdoor use, large-scale advertisements, or permanent signage where size and durability are priorities. Here’s a detailed comparison to help you decide:
| Feature | Retractable Banner | Standard Banner |
|---|---|---|
| Typical Size | 33″ × 81″ | 2’×8′, 4’×8′, 4’×12′, 8’×8′, 8’×10′ |
| Portability | High, rolls into compact stand | Low, bulky and needs separate hardware for mounting |
| Setup Time | 1, 2 minutes | Up to 15 minutes or more, depending on mounting |
| Durability | Good for indoor use | Better for outdoor use, weather-resistant materials available |
| Cost Range | $80, $300 per unit (depends on quality and size) | $50, $400+ depending on size and material |
| Hardware Required | Integrated base and retractable mechanism | Separate grommets, ropes, or frames |
Use retractable banners when you need a display that is easy to transport and quick to set up. Their compact design makes them ideal if you attend multiple events or want something simple to carry in a vehicle. They also work well as modular visual walls; for instance, three adjacent 33″×81″ retractable banners can form a nearly 100-inch-wide freestanding backdrop without extra supports.
Standard banners work best when size and visibility matter more than portability. They hold up well outdoors and can be tailored to fit large fences or booth walls. However, mounting them usually requires more time and can need additional equipment, so plan accordingly if your event involves frequent setup and teardown.
Common Banner Sign Mistakes and How to Avoid Them
Common mistakes with banner signs often involve errors in design, installation, and material choice, all of which affect their legibility and durability. Poor design includes using fonts that are too small or complex, placing critical information too close to the edges, or choosing colors with low contrast. These issues make it hard for viewers to read from a distance or in various lighting conditions.
Fix legibility problems by selecting large, simple fonts and ensuring sufficient contrast between text and background colors. Leave at least 2 to 3 inches of margin space around text to prevent any trimming or visual clutter. Using free design templates with built-in bleeds and margins, such as those offered by Bigger Better Banner, can help avoid layout mistakes and improve message clarity.
Installation errors like inadequate fastening or hanging banners in high-wind areas without proper support can cause early wear or damage. Use reinforced grommets placed 12 to 18 inches apart and secure the banner tautly but without overstretching. In outdoor settings, add wind slits to reduce stress on the material and fasteners.
- Use fade-resistant vinyl or mesh materials to handle outdoor exposure better
- Roll banners carefully when storing to avoid creases and cracks
- Clean banners gently with soapy water and soft cloths to remove dirt without damage
- Avoid UV exposure by taking banners down when not in use for extended periods
- Check installation points regularly for loosening or wear and retighten as needed
Proper maintenance helps banners last longer and maintain clear messaging. Keep banners stored in a cool, dry area away from sunlight to stop warping and fading colors. Indoor banners should stay away from heat sources and direct light, as high temperatures can damage materials. Regular cleaning removes dirt and grime that can dull the appearance.
Failing to secure a banner properly can lead to tears or loss; always use all grommets and check tension regularly.
Your First Steps: Quick-Start Plan for Using Banner Signs
Start using banner signs effectively with this simple plan. Follow these steps to set up and optimize your banner for your business or event.
- Before you start: Decide the main message and call to action for your banner. Clear focus helps you measure success by how well viewers understand your offer.
- Day 1: Choose the appropriate banner type and material based on where it will be displayed (indoor or outdoor). Check local weather and conditions to ensure durability.
- Day 2: Select the right size for your display area, considering viewing distance. A properly sized banner will be readable without straining the eyes.
- Day 3: Design the banner using bold fonts, strong contrast, and minimal text. Take a photo or print a small mockup to test legibility.
- Day 4: Install or hang the banner securely using recommended mounting methods for your chosen location. Test stability by checking for movement or sagging.
- Week 1: Monitor how many people notice or interact with your banner through customer feedback or traffic counts. Adjust placement if visibility is low.
- After 2 weeks: Inspect the banner for wear or fading. Replace or repair as needed to maintain a professional look.
Frequently Asked Questions
How Do Banner Signs Differ from Traditional Rigid Signs?
Banner signs are made of flexible materials like vinyl or fabric, making them lightweight and portable, while rigid signs use solid materials for permanent or heavy-duty applications. This makes banners better for temporary or seasonal messages.
What Factors Affect the Durability of a Banner Sign?
Durability depends on material quality, weather exposure, and installation method. Vinyl banners last longer outdoors, especially with UV coating, while fabric banners suit indoor use better. Proper mounting prevents damage from wind and wear.
Can Banner Signs Be Reused for Different Events?
Yes, banners can be reused if stored carefully and designed with interchangeable messaging, like using printed sleeves or velcro attachments for additional graphics. This versatility reduces cost for recurring events or promotions.
What Legal Restrictions Might Apply to Banner Signs?
Local zoning laws and permits often regulate banner size, placement, and duration. Checking city or county rules before installation avoids fines or forced removal. Restrictions vary widely by location.
How Much Does It Typically Cost to Produce a Custom Banner Sign?
Pricing depends on size, material, print quality, and finishing options but expect a starting range of $50 to $200 for common banner sizes. Larger or specialty banners cost more. Getting multiple quotes helps.
Are Custom Designs or Templates Better for Banner Signs?
Custom designs offer branding consistency and uniqueness, while templates save time and cost. Choose custom design if brand identity is important; templates work well for general promotions with simple messaging.
The Bottom Line
A banner sign is a straightforward yet powerful tool to capture attention and communicate your message quickly. Choosing the right type, size, location, and design makes the difference between being overlooked and making an impact. Start with a clear message and proper installation to see how a well-made banner can boost your marketing efforts today.


