How to Make an Infinity Mirror Sign: A Complete DIY Guide with Pro Tips
How to make an infinity mirror sign starts with choosing the right materials, like semi-transparent two-way mirror sheets and LED lights. Assemble these carefully in a shadowbox frame, ensuring the tinted mirror side faces inward to reflect the lights indefinitely. Begin by gathering high-quality acrylic mirror sheets and LED strips suited to your sign’s size and shape for the best infinity effect.
Key Takeaways
- Select acrylic two-way mirrors with about 30% transparency for the optimal balance of reflection and light transmission.
- Use LED strips that evenly distribute light and fit your sign’s dimensions for a consistent infinity effect.
- Ensure the tinted side of the two-way mirror faces inward toward the back mirror for proper light reflection.
- Cut reflective film to match your glass size when using glass mirrors for improve reflection coverage.
- Choose a shadowbox frame deep enough to house the mirrors and LED lights without overcrowding for clean assembly.
- Allow adhesives and sealants to dry fully before inserting the mirror components to avoid shifting and damage.
What Materials and Tools Are Needed for Your Infinity Mirror Sign
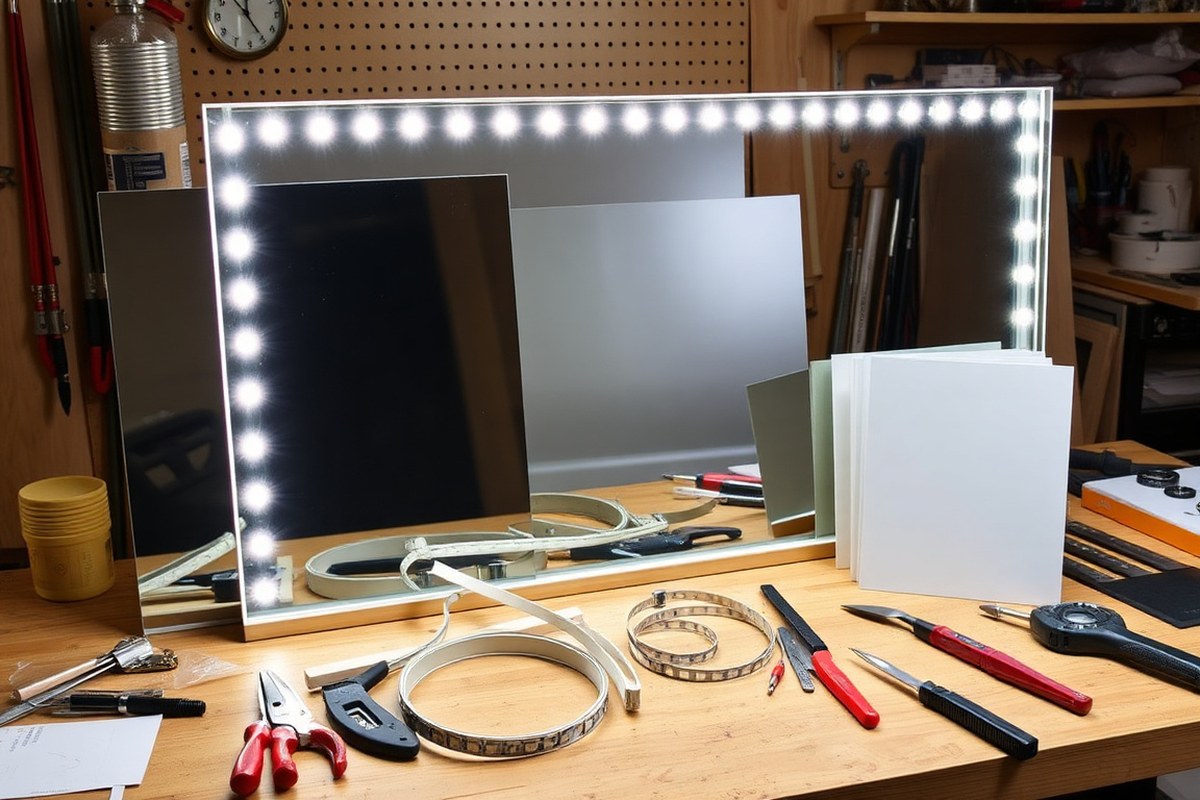
Creating an infinity mirror sign requires a specific set of materials and tools to ensure the effect works well and the construction is safe and straightforward. The core material is an acrylic two-way mirror sheet, which forms the front panel of your sign. These sheets typically measure around 12 x 12 inches and have about 30% transparency, allowing LED lights behind them to shine through and reflect infinitely. Opting for acrylic over glass makes the project safer and lighter without sacrificing the visual effect.
Behind the two-way mirror, you’ll need a fully reflective mirror, either glass or acrylic, that acts as the back panel. This mirror reflects the LED lights forward, contributing to the depth of the infinity effect. Getting a mirror sheet close in size to your two-way mirror ensures a neat, clean look and maximizes the visual impact.
LED strip lights are essential, as they create the glowing lights that appear to repeat endlessly. Choose LED strips that are flexible, waterproof if necessary, and come with adhesive backing for easy placement. White or RGB LEDs allow for customizable colors depending on your design goals. Make sure the LED strips match your power supply’s voltage, usually 12 volts.
- Two-way acrylic mirror sheet (12 x 12 inches, 30% transparency)
- Reflective mirror backing (glass or acrylic, same size as front)
- LED strip lights (adhesive-backed, 12V, color choice depends on preference)
- Power supply compatible with LED voltage
- Frame material (wood or plastic) to house mirrors and LEDs securely
- Strong adhesive or double-sided tape for attaching mirrors and LEDs
- Protective gloves and safety goggles
Basic tools to make the build easier include a measuring tape and a ruler for precise dimensions, a utility knife or acrylic cutter for trimming sheets if needed, and a soldering iron for connecting LED strips securely when customization is required. A drill or screwdriver helps build a sturdy frame or enclosure that neatly holds components in place. Using protective gloves limits fingerprints on reflective surfaces and shields your hands during cutting and assembly.
Using good quality materials like 0.04-inch thick acrylic mirrors avoids warping and improves longevity. When attaching LED strips, lay them evenly spaced around the frame’s interior to ensure uniform light distribution, preventing dim spots. Affixing the two-way mirror last keeps it free from glue residue or scratches from assembly. Following these steps will give your infinity mirror sign a striking, professional look and durability for display.
Choosing the Right Mirror and LED Lights for Your Sign
Choosing the right two-way mirror and LED lights is key to creating a compelling infinity mirror sign. A two-way mirror, also called a one-way mirror, is reflective on one side but transparent on the other. This allows light from the LEDs to pass through while reflecting off the regular mirror placed behind it, creating the endless tunnel effect. Standard mirrors, by contrast, reflect all light and would block this effect. For your sign, pick a two-way mirror with 1/8 inch thickness for sizes up to about 12 by 24 inches. If your design exceeds this size, a thicker 1/4 inch acrylic two-way mirror helps avoid warping and distortion.
Regarding transparency, the two-way mirror should balance reflection and see-through qualities to let the LED glow shine without dimming. Glass two-way mirrors offer a cleaner reflection but weigh more and cost more than acrylic. Acrylic mirrors are lighter and less prone to cracking. However, acrylic at 1/8 inch thickness can warp past 12 by 24 inches, causing a distortion in the infinity effect similar to a funhouse mirror.
For LED lights, strip LEDs are the standard choice around the perimeter of the mirror. White LEDs provide a clear and bright illusion, but RGB LED strips allow color-changing effects, adding visual interest. Your choice depends on your budget and the effect you want. LED strips come attached to wires for easy plug-and-play use. Ensure your power supply matches the LED voltage and length.
Some makers consider solar films or reflective films as alternatives to two-way mirrors, but these generally do not provide the clear, consistent transparency and reflection needed for a strong infinity effect. They tend to darken the display or distort the light paths, reducing the illusion’s depth. Use the following table to compare your options for mirrors and LED lights and guide your choices based on size, budget, and desired effect.
| Component | Type / Specifications | Pros | Cons | Ideal Use / Size Range |
|---|---|---|---|---|
| Two-Way Mirror | Glass, 1/8 inch thickness | Clear reflection, durable | Heavier, more expensive | Up to 12″ x 24″ or smaller signs |
| Two-Way Mirror | Acrylic, 1/8 inch thickness | Lightweight, less breakable | Warps past 12″ x 24″, slight distortion | Small signs under 12″ x 24″ |
| Two-Way Mirror | Acrylic, 1/4 inch thickness | Less warping up to 24″ x 48″ | More expensive than 1/8″ acrylic | Medium to large signs up to 24″ x 48″ |
| LED Lights | White LED strips | Bright, clear infinity effect | No color variation | Pure tunnel illusion, simpler designs |
| LED Lights | RGB LED strips | Color changing, dynamic effects | Costlier, requires controller | Customizable and colorful infinity signs |
| Mirror Alternatives | Solar or reflective films | Lower cost, easy to apply | Dimmed brightness, poor clarity | Not recommended for quality infinity effect |
To decide what to use, measure your planned sign size first. For signs smaller than 12 by 24 inches, an acrylic two-way mirror at 1/8 inch thickness works well balancing cost and weight. For bigger signs, invest in thicker acrylic or glass mirrors to avoid visual distortion. Picking LEDs comes down to whether you want static brightness or color-changing effects. Keep in mind the LED power needs so your sign lights up evenly and lasts longer.
Choose a two-way mirror specifically designed for infinity mirrors rather than cheaper film alternatives; otherwise, your sign’s glowing tunnel effect will be weak and uneven.
Step-by-Step Assembly Process for Your Infinity Mirror Sign
Assemble your infinity mirror sign in a clear, sequential way to ensure the best light effects and durability. Begin by preparing the mirror surfaces properly, then move on to constructing the frame with adequate depth for the LEDs. Finally, install and arrange the LED strips carefully inside the frame before sealing everything up tightly for a polished result.
Preparing Two-Way Mirror and Back Mirror
Start by ensuring both mirrors are clean and free of dust or fingerprints, using a microfiber cloth just before assembly. The two-way mirror must be positioned so the tinted side faces inward toward the standard mirror. This orientation lets light escape and reflect correctly, creating the infinity effect. Use compressed air to clear away any debris that might settle on the glass surfaces during handling.
The back mirror should be a standard mirror with no tint, placed at the rear of the frame. Check the dimensions carefully so it fits snugly but without stress, preventing warping or gaps that decrease the reflection quality.
Building and Modifying the Frame
Select a frame or shadow box with a minimum depth of 1 inch (2.5 cm), enough to house your LED strip comfortably. A removable interior frame or panel helps with the final assembly and maintenance.
Ensure the frame is solid and paint the interior black if your frame is light-colored. This absorbs stray light and improve the tunnel illusion without reflections interfering with your LEDs. The frame should be sturdy and allow the glass surfaces to be secure and flat to avoid distortions.
Installing LEDs and Wiring
LED strips go on the inner vertical walls of the frame, not on the mirror surfaces themselves. This placement creates an even glow that bounces between the mirrors. Lay the LED strips evenly spaced around the frame perimeter, avoiding clumping or gaps that spoil the continuous light effect.
If you have extra LED length, wrap and adhere it alongside the rear edge of the mirror or frame inside the shadow box. This avoids cutting the strips while maintaining illumination. Make sure all wiring is neatly routed and insulated to prevent shorts and keep a clean look.
Before sealing the frame, test your LED lights to ensure all diodes light on power-up. A snug, tight closure prevents dust and debris from settling inside and ensures all elements remain aligned over time.
- Clean each mirror with a microfiber cloth and use compressed air to remove dust particles.
- Place the two-way mirror with the tinted side facing inward.
- Fit the standard mirror snugly at the back of the frame.
- Choose or build a frame with at least 1 inch depth and paint the interior black.
- Adhere LED strips evenly around the inner frame walls, ensuring full coverage.
- Run wiring neatly to the power source and test the LED function before final assembly.
- Seal the frame with a tight closure to protect internal components and stabilize the structure.
Popular Size and Shape Options for Infinity Mirror Signs
Choosing the right size for your infinity mirror sign directly affects how clear and deep the endless reflection looks. Smaller sizes, such as 8 by 10 inches or around 10 by 12 inches, often produce a sharper infinity effect because the LED light bounces effectively between the mirrors without distortion. Larger mirrors can still work but may require higher quality glass to avoid warping or ghosting. Acrylic mirrors, while lighter and more affordable, tend to start bowing at sizes beyond 12 by 24 inches when using a 1/8-inch thickness, which can blur the infinity illusion. For the clearest visuals, stick to either glass mirrors or use acrylic below those size limits.
The shape of your infinity mirror also impacts both the look and the ease of assembly. Rectangles and squares are common since they fit standard frames and make it easier to align LEDs and mirrors straight. However, circles, hexagons, or other geometric shapes add a distinctive crystal-like appeal and can create unique visual effects. Irregular shapes might make it challenging to mount the LED strips evenly or build a stable frame, but do not rule them out if you want something eye-catching. For beginners, rectangular frames roughly 8 by 10 inches offer a balance of simplicity and a vivid infinity effect.
Mirror thickness plays a hidden but important role. Thicker glass or acrylic holds its shape better and resists bowing, which is important when going bigger than 12 by 24 inches. Standard 1/8-inch mirrors work well for smaller signs but may sag when larger, causing distortions that disrupt the infinity look. If you choose a thick glass mirror, expect a heavier sign that might need stronger mounting hardware like wall anchors or secure brackets. Acrylic, being lighter, can be easier to handle but requires careful selection to avoid warping at larger sizes. Always test fit your frame to the mirror and make sure the mirror surface remains flat under the weight of the LEDs and any backing you install.
In practice, pick a frame size that fits where you plan to display your sign, then source a mirror that matches or can be cut to fit that size. Home improvement stores often offer cutting services if you bring your chosen mirror. For complex shapes, custom framing is helpful. You might also try using two-way mirror film applied to a clear glass or acrylic base for flexible sizing options, this method can cut costs and reduce weight but requires precision for smooth application.
Mounting considerations vary with size and weight. Small to medium signs can often hang on nails or adhesive hooks. Larger panels need studs or toggle anchors and possibly a custom-built frame that holds the mirror and LEDs securely without stressing the glass. A well-framed infinity mirror sign prevents vibrations and keeps the layers aligned, maintaining the depth of the infinity effect. Paying attention to mirror thickness and shape early in your project saves time adjusting alignment later and ensures your finished sign delivers a crisp, endless glow.
How to Customize and Personalize Your Infinity Mirror Sign
Personalizing your infinity mirror sign lets you create a unique visual piece that reflects your style. You can add text, logos, shapes, colors, and even 3D effects using templates, layers, and lighting choices. Tailoring these elements improve the mirror’s illusion and makes your design stand out.
Adding LED Color Effects and Patterns
Using RGB LED strips gives you flexibility to change colors and lighting patterns, making your sign more dynamic. Choose colors that fit the mood or theme; cool tones like blues and purples often create a calming infinite tunnel effect, while warmer shades such as reds and oranges add energy. Advanced LED controllers can cycle through colors or pulse gradually for added interest.
You can also place patterned films or stencils on the inside surface between the mirrors. These break the reflection into repeating shapes, adding complexity to the tunnel effect. Applying patterned reflective film or lightly tinting the front glass produces subtle variations in light that amplify the infinite look.
- Use RGB LEDs for color versatility and pattern control
- Apply reflective film with stripes or geometric shapes for repeating patterns
- Match LED colors to frame paint or room decor for cohesive style
- Cycle lighting modes for dynamic visual appeal
- Use a dimmer or diffuser to soften overly harsh light
Darkening the inside edges of the frame with tape or paint prevents light leaks, focusing the light flow internally and intensifying the reflected tunnel.
Incorporating Text and Shapes
Adding letters or logos inside the infinity mirror works well if you use transparent or semi-transparent materials layered between the glass panes. Vinyl decals or cutouts let light pass partially while remaining visible in reflection, repeating infinitely in the mirror’s depth. Use clear adhesive vinyl for easy application and removal.
Templates for stencils or SVG cutouts can help create precise shapes or text. For example, print your design on translucent paper, then cut and place it inside the mirror frame. Adjust placement carefully so the patterns repeat smoothly in reflection without distortion.
Be careful not to block too much light with solid materials; this can reduce the mirror’s glowing depth effect.
Simple words or icons look best, as overly detailed images can become visually cluttered in the infinite reflections.
Using Additional Layers for Depth
To create a 3D effect, layer objects or additional glass panes inside the mirror setup. Partially reflective glass placed at different depths can cause shapes or lights to appear floating in a multi-layered tunnel. Use thin spacers of 1/8 inch to 1/4 inch between layers to control how close or far elements seem.
Small decorative objects like miniature sculptures or cutouts work well if adhered gently inside the frame. Transparent supports or wires can hold them in place without interrupting the light path. Painting the frame and support elements in solid dark colors minimizes distracting light leaks around 3D layers.
- Add a second partially reflective glass pane 0.125″ to 0.25″ behind the front glass
- Place lightweight objects or decals between layers for “floating” effects
- Use clear acrylic or glass supports to hold 3D elements without blocking light
- Dark-paint interior frame surfaces to prevent unwanted reflections or light loss
- Test layer spacing before final assembly to optimize depth illusion
Experimenting with these layering techniques can turn a simple infinity mirror sign into a compelling 3D light display that catches attention from multiple angles.
Common Mistakes to Avoid When Making an Infinity Mirror Sign
The most common cause of a poor or missing infinity effect is incorrect mirror placement. The two mirrors must face each other perfectly: the one in front should be a one-way mirror or a piece of two-way acrylic mirror film on glass, while the back mirror must be fully reflective. Align the mirrors precisely so the LEDs are evenly reflected, creating that endless tunnel look. Mirrors placed too far apart or tilted reduce the strength of the illusion. Keeping a 1 to 3 inch distance between the mirrors typically works well, but adjust based on your frame depth. You can fix misaligned mirrors by loosening the frame, repositioning the mirrors squarely, and securing them again tightly.
LED placement also plays a key role. The LED strip should be installed evenly around the inside perimeter between the two mirrors. Uneven spacing creates dark spots and breaks up the infinity effect. Use a flexible LED strip and measure carefully before sticking it inside the frame. Avoid overlapping the strip or bunching it in corners. Spots appearing dim might need better LED positioning for improved coverage. Running the strip on the back mirror, facing the one-way mirror, produces the most striking depth. Using separate LED bulbs requires placing them evenly every 1 to 2 inches and ensuring brightness is consistent.
Powering your infinity mirror without errors involves careful wiring and testing. Make sure the LED strip’s power supply matches the voltage and current requirements on the product label, usually 12 volts DC. Using a power supply that’s too weak or too strong risks flicker or damage. Connect wires securely with solder or insulated connectors, avoiding loose ends or shorts. Test the lights with the power connected before fully assembling; if LEDs fail to light or flicker, double-check polarity and wiring continuity. Label connections and use a multimeter if available to verify voltage at the LED terminals.
Projects that don’t look right after assembly shouldn’t be disassembled immediately. Recheck mirror alignment by gently loosening the frame and adjusting the panes so they sit perfectly parallel and flush. Inspect the LED strip for any missed sections or uneven installation. Swap in a fresh or fully charged power supply if flickering persists. For electrical mistakes like reversed polarity on LED wiring, disconnect power first, then swap wire positions. Testing early and often during assembly saves time and avoids needing to rerun wires or reposition mirrors later.
Areas with fluctuating humidity can damage electrical parts or cause condensation between the mirrors that blurs the effect. Keep your infinity mirror sign in a dry space away from bathrooms or kitchens. Regularly wipe the one-way mirror surface gently with a microfiber cloth to keep it clear, never spray liquids directly on it. This upkeep preserves the crisp infinity illusion.
Safety Tips and Power Considerations for DIY Infinity Mirror Signs
Using the right power supply is essential to keep your infinity mirror sign both safe and functional. Opt for low-voltage DC power adapters specifically designed for LED strips, commonly 12V or 5V, depending on your lights. Avoid using generic or high-voltage supplies, as they can cause overheating or damage the LEDs. A quality adapter typically costs between $10 and $20 and should come with clear wattage and voltage specifications. Match these specs to your LED strip’s requirements, which you can find on the packaging or product description.
Preventing overheating and electrical shorts starts with proper wiring and ventilation. Space LED strips evenly and avoid crowding them, which can trap heat. When soldering or connecting wires, make sure all joints are secure and insulated with heat shrink tubing or electrical tape. Check that wires do not touch any metal parts inside the mirror frame to reduce short-circuit risks. LEDs generally operate at low temperatures, but if the sign feels hot to touch after extended use, above 104°F (40°C), unplug it immediately and review your setup.
Personal safety also means working carefully with electrical components and power tools. Always unplug your power source before assembling or modifying the sign, and if you cut wires or use a soldering iron, wear safety glasses and work in a well-ventilated area. Use a dedicated workspace free of clutter and keep small children and pets away while working. Consider using a power strip with surge protection to safeguard against unexpected voltage spikes, especially if you plan to keep your infinity mirror on for long periods.
Mounting your infinity mirror properly reduces risks of damage and electrical hazards. Hang or place the sign on a stable, flat surface away from moisture, direct sunlight, and flammable materials like curtains or paper. If mounting on a wall, install secure hooks or anchors rated for the sign’s weight, generally between 5 and 15 pounds depending on size and materials. This prevents accidental falls that could damage wiring, break glass, or cause injury. For free-standing designs, use rubber feet or pads to avoid slippage and protect the surface underneath.
Use this checklist before powering up your infinity mirror sign: Confirm the power adapter matches the LED voltage and wattage; inspect all wiring for secure, insulated connections; ensure adequate ventilation around the LEDs; mount or place the sign in a stable, dry location; and keep flammable objects at least 12 inches away. Following these steps minimizes fire risk, system failures, and personal injury.
Keeping these safety and power considerations in mind will help your DIY infinity mirror sign shine brightly and last longer without creating hazards. Taking the time to check voltages, wire carefully, protect yourself, and mount securely prevents common problems that can otherwise ruin your project or home safety.
How to Clean, Maintain, and Display Your Infinity Mirror Sign
Cleaning your infinity mirror sign carefully and maintaining its LED lights keeps the effect clear and bright. Displaying it in the right spot avoids damage and highlights the infinity effect. Follow a simple routine to keep your sign looking its best and glowing consistently.
Cleaning Techniques for Mirrors and LEDs
Always use a soft, lint-free microfiber cloth to clean the two-way mirror inside the frame. Spray a small amount of glass cleaner onto the cloth, never directly onto the mirror, to prevent moisture from seeping inside and damaging the LED strip or frame. Gently wipe in circular motions to avoid scratching.
For the LED lights, dust them lightly with a dry, soft brush or microfiber cloth. Avoid using liquids on the LED strips, as moisture can cause malfunction or corrosion in the wiring. Regular light dusting prevents buildup that dims the brightness over time.
Use a compressed air canister to blow dust out of tight spaces without touching delicate components.
- Remove the mirror or open the frame backing carefully if possible to reach the two-way mirror.
- Use 70% isopropyl alcohol on a microfiber cloth for stubborn spots, but test on a small area first.
- Do not press hard on the two-way mirror surface; it is thinner than standard glass.
- Keep liquids away from all LED connections and wiring.
- Clean LEDs only when the sign is unplugged and cooled off.
- Allow cleaned surfaces to dry fully before reassembling or plugging in.
Routine Maintenance Tips
Check LED strips regularly for loose connections or signs of wear. If you notice flickering or dim areas, inspect the wiring and connectors and reseat or replace as needed. This prevents total light failure and keeps your sign bright.
Replacing LEDs every 2 to 3 years ensures peak brightness, especially with high-output strips like 16.4 ft white LED strips rated up to 1200 lumens. Battling dust and humidity in the display area also extends LED lifespan.
Make a habit of powering off and unplugging your infinity mirror sign when not in use to reduce heat buildup and save energy. Avoid bending or twisting the LED strips during cleaning or rearranging to prevent damage.
Optimal Display Locations and Mounting
Placement influences the visual impact and safety of your infinity mirror sign. Display it indoors, away from direct sunlight or extreme heat, which can degrade mirror coatings and fade LED brightness. Humid or damp locations increase corrosion risks to electronics.
Mount your sign at eye level or slightly above on a stable wall surface to maximize viewing angles and protect it from accidental bumps. Avoid areas near vents or air conditioners where dust and temperature fluctuations are common.
- Choose a dry, climate-controlled room without direct sunlight.
- Mount securely with wall anchors suited to your wall type (drywall, wood, concrete).
- Ensure access to a nearby power outlet or plan for cable routing.
- Keep away from high-traffic areas where it can be knocked or scratched.
- Consider adding a dimmer switch if the LED strip supports it for adjustable brightness.
Step-by-Step Action Plan
Follow this plan to build your infinity mirror sign efficiently and effectively. Each step builds on the previous one to ensure a smooth process.
- Day 1: Gather all materials and tools listed for your project. Having everything ready helps avoid interruptions during assembly.
- Day 2: Cut and prepare your chosen mirror and backing board based on your desired size and shape. Confirm measurements by fitting the pieces together before proceeding.
- Day 3: Install the LED lights evenly around the frame. Test the lights by powering them on to check for consistent brightness and correct wiring.
- Day 4: Assemble the mirror layers carefully, ensuring the two-way mirror and reflective surfaces align perfectly. Look through the mirror to see the infinity effect beginning to form.
- Day 5: Customize your sign with paint, vinyl lettering, or other decorative elements. Let each customization dry fully and inspect for a neat finish.
- Day 6: Mount or display your infinity mirror sign safely using the recommended hardware. Confirm stability by gently testing the mounted sign’s firmness.
- Day 7 and beyond: Regularly clean the mirror with a non-abrasive cloth and check the LED power connections. Address any issues promptly to maintain visual appeal and safety.
Frequently Asked Questions
How Long Does It Typically Take to Complete an Infinity Mirror Sign Project?
It usually takes several hours to a full day depending on your experience and the size of the sign. Plan extra time for precise cutting, wiring, and assembly to ensure a clean and safe final product.
Can You Use Other Types of Mirrors Besides Acrylic for an Infinity Mirror Sign?
Acrylic mirrors are best due to their lightweight, safety, and ease of cutting. Glass mirrors can break easily and are heavier, increasing risk and difficulty.
What Type of LED Lights Create the Best Infinity Effect?
LED strip lights with consistent spacing and brightness usually give the best continuous tunnel effect. Choose lights with warm or cool tones based on your décor preference.
Is It Necessary to Seal or Frame the Edges of the Infinity Mirror Sign?
Sealing edges prevents dust and moisture from entering, preserving the electronics and mirror surfaces. A frame also improve durability and appearance.
Can the Brightness of the LED Lights Be Adjusted After Assembly?
Yes, using LED strips with dimmable controllers lets you change brightness for different moods. This flexibility adds customization and extends battery or power adapter life.
What Power Sources Can Be Used for Infinity Mirror Signs?
Most use USB or AC power adapters for consistent power. Battery packs work but may limit runtime and require frequent replacements or recharging.
Final Thoughts
Creating your own infinity mirror sign combines creativity with hands-on skills, resulting in a striking piece for your space. Start with your materials and measurements, and move through each step carefully for the best effect. Try making a simple shape first to build confidence before attempting more complex designs. Once complete, enjoy the unique glow your handmade sign adds to your décor.