What Is Foam Board? A Complete Guide to Types, Uses, and Choosing Right
What is foam board? It’s a lightweight, flat panel made from a foam core sandwiched between two layers of paper or plastic. Foam board is rigid but easy to cut, making it ideal for mounting prints, creating scale models, and constructing displays.
The board’s thickness and type affect its strength and insulation properties. Start by choosing the correct thickness and finish depending on whether you’re framing artwork, building models, or insulating walls.
Key Takeaways
- Foam board typically has a foam core with paper or plastic surfaces for support and durability.
- Common thicknesses for foam board include 3mm (1/8”) and 5mm, balancing strength and easy handling.
- Foam board insulation comes in thicker panels, from 1/4 inch up to 2 inches, to provide thermal resistance.
- EPS foam board is less dense and cheaper, but has lower moisture resistance compared to XPS foam board.
- XPS foam board offers higher R-values and better moisture resistance, ideal for damp or commercial environments.
- Self-adhesive foam boards save time in mounting and display projects with peel-and-stick backing.
What Is Foam Board Made of and How Is It Constructed?
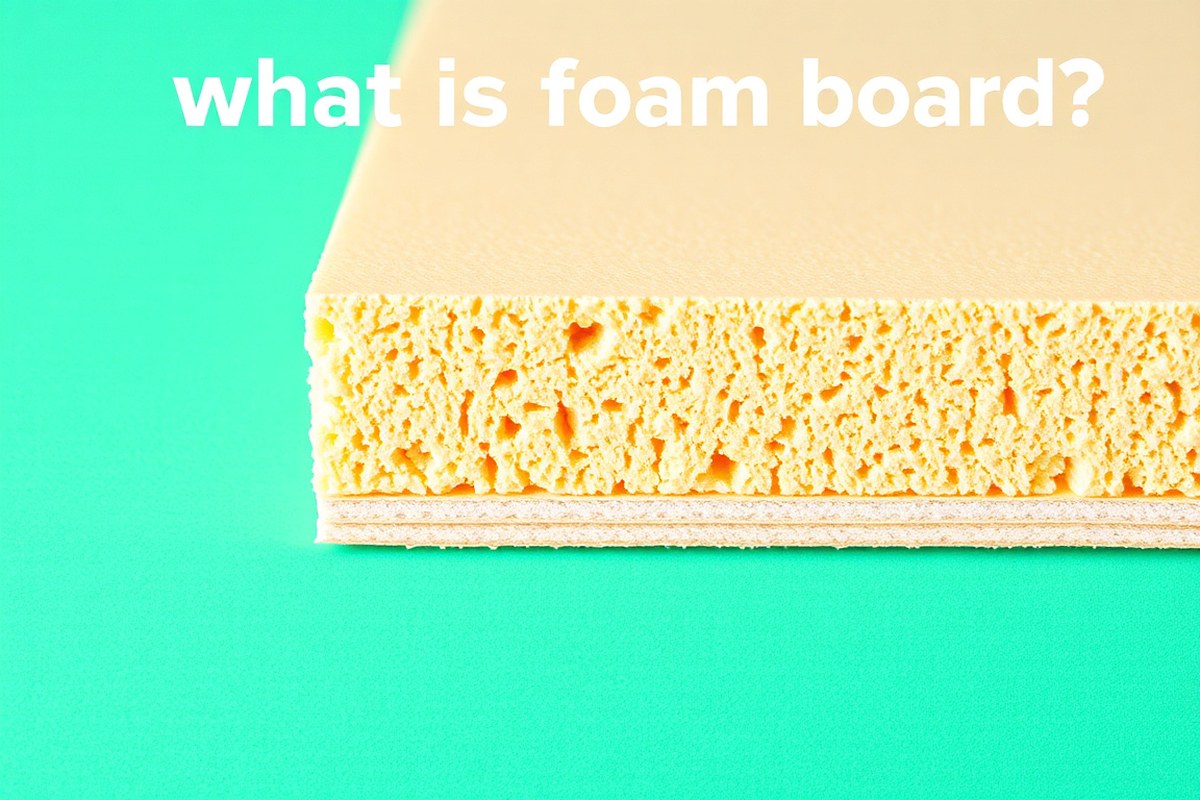
Foam board consists of a lightweight foam core sandwiched between two outer facing layers. The core is typically made from expanded polystyrene (EPS), polyethylene, or polypropylene foam. These materials provide the board with rigidity and insulation properties while keeping the overall weight low. The foam core is strong enough to maintain shape but remains easy to cut and handle, making it popular for crafts, displays, and construction applications.
The outer layers, or facings, are bonded firmly to the foam core using adhesives or heat lamination during manufacturing. Common facing materials include white clay-coated paper, cotton-based archival paper, or brown Kraft paper. These surface facings add strength and a smooth texture to the board, allowing it to accept printing, mounting, or framing finishes. Paper layers are typically acid-free, which helps protect art or photos mounted on the foam board from deterioration over time.
Some foam boards feature a self-adhesive surface on one side, with a peel-and-stick backing. This is especially useful in retail displays or photo mounting where a fast, clean bond is needed. Self-adhesive foam boards usually have a polymer film or paper release liner to protect the sticky side before use. Other types require external adhesives like glue, tape, or photo corners for mounting purposes, allowing more flexibility in application but needing extra supplies and time.
For structural or insulation uses, foam board may use more durable facings or coatings to improve moisture resistance and durability. For example, PVC foam board has a polystyrene foam core with PVC outer layers, making it rigid and weather-resistant, suitable for outdoor signage or construction panels. Insulation foam boards also come with varying thicknesses and facings tailored to thermal resistance needs, such as foil-faced or fiber-reinforced layers that improve energy efficiency. The layered construction ensures foam board is versatile, balancing rigidity, weight, surface quality, and ease of use across different projects.
What Types of Foam Board Exist and How Do They Differ?

Foam board comes in several main types, each with unique features that affect strength, moisture resistance, and insulation. Expanded Polystyrene (EPS) and Extruded Polystyrene (XPS) are the most common for insulation due to their thermal properties and durability. Foam core and specialty boards serve mainly crafting and display needs, with different compositions and vulnerabilities.
Expanded Polystyrene (EPS)
Expanded Polystyrene foam board is made by expanding small polystyrene beads that fuse into a lightweight material with an open-cell structure filled with trapped air. This gives EPS good insulation, usually around an R-value of 3.6 to 4.0 per inch. It is lower in density and compressive strength compared to other foam boards, which means it can be less durable under heavy loads or impact.
Its lower cost makes EPS a popular choice for above-grade insulation projects and packaging. However, EPS has lower moisture resistance. Prolonged exposure to damp conditions or water can reduce its insulating performance and lead to damage from mold or mildew. This limits its use in below-grade or high-moisture environments.
EPS is economical for indoor insulation but avoid it for applications exposed to water, like foundations or roofing.
Extruded Polystyrene (XPS)
Extruded Polystyrene foam board is produced through an extrusion process, resulting in a uniform closed-cell structure. This process produces a denser, stronger foam with higher compressive strength and a more stable R-value, typically around 5 per inch. XPS resists moisture better than EPS, making it an excellent choice for areas subject to dampness.
XPS foam board’s high compressive strength and moisture resistance make it suitable for foundation insulation, below-grade walls, and roofing. Its durability allows it to withstand structural loads and exposure to harsh environmental conditions better than EPS. The tradeoff is a higher price point, often 20 to 30 percent more expensive than EPS.
Choose XPS for applications where moisture resistance and strength matter, such as roofing or foundation insulation.
Foam Core and Specialty Boards
Foam core boards are crafted by bonding a foam center, often polystyrene or urethane, between two paper or plastic sheets. This composition is lightweight and rigid but offers limited insulating value and low moisture resistance. Foam core boards are commonly used for crafts, photography backdrops, architectural models, and signage, where smooth surfaces and ease of cutting are more critical than durability or thermal performance.
Polyisocyanurate (PIR) and Polyurethane (PUR) foam boards are specialty insulation panels known for their higher R-values and fire-resistant facings, often used in construction where superior insulation is needed. These boards typically have closed-cell structures like XPS but provide even greater thermal resistances, around R-6 to R-6.5 per inch. However, they are more expensive and less common for small-scale DIY projects.
Avoid using foam core boards outdoors or in high-moisture areas, as they absorb water and degrade quickly.
What Thicknesses and Sizes Does Foam Board Come In?
Foam board is available in a range of thicknesses and sheet sizes tailored for different creative and construction needs. Thickness typically varies from ultra-thin 1mm sheets, useful for light mounting or small models, up to strong 20mm panels suitable for insulation or structural uses. Standard sheet dimensions commonly include 20×30 inches for art and presentation boards and 4×8 feet for thick foam insulation panels. Careful selection of foam board thickness and size improves the suitability for your project, balancing weight, rigidity, and ease of cutting.
Common Thicknesses from 1mm to 20mm
The thinnest foam boards are around 1mm (0.04 inches), ideal for delicate mounts, lightweight displays, or hanging with just staples. Slightly thicker sheets at 2mm (0.08 inches) offer a bit more stiffness while remaining easy to cut. Popular foam board thicknesses for model-making and framing projects include 3mm (1/8 inch) and 5mm (3/16 inch). These provide a good balance of rigidity and manageability, thick enough to support prints or photos without bending but thin enough for precise cutting and shaping.
For construction and insulation uses, foam board thickness extends to 20mm (about 3/4 inch) and beyond. Common rigid insulation panels often range from 1/4 inch (around 6mm) to 2 inches thick, depending on insulation needs. The thicker foam boards used in exhibition stands or theatre backdrops are typically around 5mm or more to ensure durability and impact resistance.
Standard Foam Board Sheet Sizes
Art and craft foam boards usually come in sheets around 20 by 30 inches, a convenient size for framing and presentation boards. Profile Australia, for example, offers custom-cut 5mm foam boards in this size and options both with plain and self-adhesive surfaces, making it easy to fit your project’s requirements without excessive trims.
For larger scale or construction applications, foam board sheets often come in 4×8 feet sections. Insulation foam boards use this size to cover wall or ceiling areas efficiently. The larger size helps reduce installation time and improve coverage but requires more support and careful cutting due to its weight and thickness.
Choosing Thickness According to Application
Selecting the right foam board thickness depends on your project’s demands. Thin boards (1 to 2mm) work well for mounting lightweight prints or photos that will be hung with staples or light adhesive. These thin sheets keep the finished project light and simple to hang but offer limited protection against bending or impacts.
Medium thickness boards (3 to 5mm) suit framing, signage, exhibition stands, and architectural models. These provide sufficient stiffness to hold their shape under moderate handling and accommodate glue or paint without warping. The 5mm size is often the best all-around choice, balancing ease of cutting with structural support.
Thicker foam boards, 10mm and above, are mostly used for insulation or heavy-duty displays that require strength and durability. These thicker sheets resist denting and can insulate against heat or sound, but are heavier and tougher to cut. Choosing oversized sheets often demands specialized tools and more physical effort during installation.
How Is Foam Board Used Across Crafts, Displays, and Construction?
Foam board is widely used for mounting prints and photographs due to its lightweight and rigid properties. Photographers and artists often adhere their images to foam board within frames to provide a clean, professional look. For best results, use plain foam board combined with a repositionable spray adhesive on either the back of the print or the foam board surface to allow for adjustments before final placement. Thicknesses between 3mm and 10mm are common, with 10mm providing sturdy support without adding much weight. Thinner boards work well for smaller prints or temporary displays. Avoid foam boards with paper-based covers for projects that may encounter moisture, as they are not waterproof.
In signage and displays, foam board offers an economical and easy-to-handle solution primarily for indoor environments. You can custom-cut foam board with a sharp craft knife or a picture framing mat cutter to fit specific design needs. For large displays or trade show booths, thicker foam boards up to 20mm add durability while maintaining a manageable weight. Due to low weather resistance, foam board is best used indoors or in protected settings. For outdoor signage or longer-term displays, materials like Sintra or Gator board with greater durability and weather resistance are preferable despite higher costs. Printed adhesive vinyl can be applied directly to foam board for vibrant, custom graphics.
Architectural models benefit greatly from foam board’s ease of cutting and lightweight structure. Model makers often use foam boards ranging from 3mm to 6mm thick to build walls and base layers. The quick scoring and snapping process allows for precise shapes and clean edges. Foam board’s moderate durability supports complex structures without excessive weight, making it ideal for transporting or adjusting models. When assembling, use white glue or specific model adhesives that won’t warp the board. Avoid water-based adhesives on foam boards with paper surfaces to prevent soaking and deformation. For intricate detailing, combining foam board with other materials like balsa wood adds rigidity where needed.
In building insulation, foam board stands out for its thermal resistance and moisture resistance in specific forms. Rigid foam insulation products made from materials like polyisocyanurate (PIR) provide effective thermal barriers in exterior walls, roofs, and foundations. These foam boards are typically thicker, often exceeding 20mm, to achieve higher R-values important for energy efficiency. Their water-resistant properties help prevent moisture intrusion, maintaining insulation performance over time. Installation requires securing foam board directly to the building framing or sheathing with mechanical fasteners or adhesive, followed by covering with a protective facing such as drywall or house wrap. Attention to detail in sealing seams and joints is essential to avoid thermal bridging and air leaks that reduce insulation effectiveness.
How Does Foam Board Insulation Work and What Makes It Effective?
Foam board insulation works by reducing heat transfer through a construction wall or ceiling using its air-filled cells. These tiny pockets of trapped air act as a barrier that slows down conduction, which is the movement of heat through materials like wood or steel studs. With less heat passing through structural elements, your home stays warmer in winter and cooler in summer. The key measure of this insulation’s effectiveness is the R-value, which indicates how well a material resists heat flow. Higher R-values mean better insulation performance, so choosing foam boards with a higher R-value leads to greater energy savings and comfort.
The R-value of foam board typically ranges from around 3.6 to 5 per inch of thickness, depending on the specific type of foam used. This is higher than traditional fibreglass batt insulation, making foam board a strong option when space or moisture resistance is a concern. To install foam board insulation correctly, cut it to fit snugly between wall studs or over existing surfaces. You can use a sharp utility knife or saw to customize the size and shape. Securing the boards with adhesives, fasteners, or pressure fit helps maintain a continuous insulation layer, which is important for maximizing heat resistance. Gaps or compression can reduce the foam board’s effectiveness, so aim for a tight, even fit.
Different foam boards vary in density and moisture resistance, which affects their suitability for specific insulation needs. For example, denser foam boards tend to have higher R-values but also come with a higher price tag. If moisture is present or likely, a foam board with a moisture-resistant coating or closed-cell structure will protect against mold and water damage. Colors and finishes, like matte versus glossy, don’t influence insulation but can affect handling or aesthetic use. Foam boards offer ease of installation and durability, resisting warping better than materials like cardboard. However, shinier foam boards can show fingerprints and glare during application, so handle with care.
To get the best thermal performance, ensure foam board panels fit tightly in place and seal all edges with appropriate tape or sealant to prevent air leaks.
What Are the Advantages and Disadvantages of Foam Board Insulation?
Foam board insulation offers several advantages that make it a popular choice for DIY projects and construction. One key benefit is its high thermal resistance, which helps reduce heat transfer more effectively than many traditional insulation materials like fiberglass. This means you can maintain indoor temperatures with less energy use, potentially lowering heating and cooling costs. Foam board is also lightweight, making it easy to cut, handle, and install without requiring heavy tools or significant labor. Also, it tends to be cost-effective compared to other rigid insulation types, offering good value, especially for small to medium-sized projects.
Moisture resistance varies depending on the type of foam board you choose. Extruded polystyrene (XPS) boards typically absorb less water, which helps prevent mold and mildew growth in damp environments. This moisture resistance makes XPS suitable for foundations, basements, and other areas prone to humidity. Expanded polystyrene (EPS) foam board offers good insulation but absorbs more water than XPS, making it less ideal for wet conditions. Most foam boards are not designed for prolonged outdoor exposure, as ultraviolet (UV) radiation and continuous contact with water can degrade the material over time.
The durability of foam board insulation is another advantage; it resists compression better than fiberglass batts, so it maintains its insulating properties even when slightly compressed. Foam board also has better fire performance compared with many plastic foam insulations, which adds a safety benefit in construction applications. However, it can be susceptible to damage from sharp objects or rough handling during installation. Despite being easier to install, improper sealing of seams or joints can reduce foam board’s overall insulation effectiveness by allowing air leaks.
On the downside, foam board can be more expensive than fiberglass insulation when covering large areas, which could impact budget-minded projects. It also requires careful installation because gaps or improper backing may lead to moisture traps that encourage mold formation behind the board. Foam board is not recommended for areas where it would be exposed directly to sunlight or outdoor weather without protective coverings. Compared with fiberglass, foam board provides better rigidity, moisture resistance, and thermal resistance but lacks fiberglass’s flexibility and affordability for large-scale use.
To get good results with foam board insulation, select the right type based on the specific environment, XPS for wetter areas, EPS for drier, controlled spaces. Install the boards tightly with taped or sealed joints to prevent drafts. Avoid exposing foam board to direct weather unless you cover it with siding or protective coatings. Be mindful that thicker boards (at least 1 to 2 inches) often provide more consistent thermal resistance, and double-check local building codes for fire safety requirements before use. While foam board insulation performs well in many cases, weighing its benefits against its limitations will help you decide if it fits your project’s needs.
How to Choose the Right Foam Board for Your Project
Choosing the right foam board depends on what your project needs in terms of strength, surface finish, insulation, and ease of use. You’ll want to balance factors like type, thickness, and adhesive options based on whether you’re crafting, framing artwork, or insulating a space. Following a clear checklist helps ensure the foam board you pick matches your project’s technical and aesthetic requirements.
Assessing Your Project Requirements
Start by defining what the foam board must do. For precise crafting or mounting artwork, surface smoothness and ease of cutting matter most. Insulation tasks require a board that delivers high thermal resistance along with durability. Consider whether the project faces moisture or temperature fluctuations, as that influences the type of foam used. The board’s size and shape should fit your workspace and the finished product’s dimensions without excessive trimming or waste.
Determine if you need the foam board to support weight or just serve as a backing. Projects demanding structural integrity benefit from thicker boards, ranging from ½ inch to 1 inch or more. Thin foam boards, such as 3/16 inch, suit light display work but won’t offer much insulation or rigidity. Your budget will also direct choices; for instance, expanded polystyrene (EPS) is more affordable than extruded polystyrene (XPS) but slightly less moisture resistant. Knowing these conditions upfront streamlines your selection.
Matching Foam Board Type and Thickness
Selecting the right foam board depends on what your project requires most. For insulation purposes, rigid foam boards such as EPS or XPS are ideal choices. EPS provides an R-value between 3.6 and 4 per inch and is budget-friendly, while XPS offers better resistance to moisture and greater durability. Craft projects needing a smooth, paint-ready surface generally use foam core board, which is coated with paper or plastic on both sides.
Thickness affects both insulation quality and handling ease. Thicker boards (around 1 inch) provide better insulation and support but are harder to cut precisely by hand. For foam core boards, a thickness from 3/16 to ¼ inch typically balances sturdiness with ease of cutting. Choosing a foam board about ½ inch thick helps prevent warping or bending, making it more stable for your project. Always match the thickness requirement to your desired level of durability and thermal performance to avoid overspending or underperformance.
Considering Surface and Adhesive Options
Surface finish plays a critical role in your project’s final look and functionality. Smooth surfaces work well for photos, prints, and artwork mounting, allowing clean gluing and sharp presentation. Some foam boards come with a textured or matte finish, which can hide fingerprints or improve paint adhesion but may not suit detailed graphic displays.
Adhesive foam boards simplify mounting tasks. Self-adhesive types let you attach items directly without extra glue or tape. This convenience reduces setup time and mess, especially for lightweight craft projects or temporary displays. For insulation, however, specialized adhesives designed for foam board insulation ensure strong, lasting bonds to walls or framing materials. Avoid using general-purpose glues, as they might not adhere well or could damage the foam.
Choose foam board surfaces and adhesives by considering how you’ll handle them, the look you want for the finished product, and what your installation needs are. Choosing the right combination prevents issues like peeling, warping, or weak insulation bonds and saves time during assembly or installation.
How to Cut, Handle, and Care for Foam Board Safely and Cleanly
Cutting foam board cleanly requires the right tools and technique. Use a sharp utility or craft knife paired with a metal ruler to guide straight cuts, applying firm, steady pressure. Score the surface first lightly, then deepen the cut gradually to prevent tearing or rough edges. For thicker foam board, cutting through several times may be necessary rather than trying to cut through in one pass. A mat cutter also works well for precision. Avoid dull blades, which can crush the foam core and ruin the edge quality. Circular saws with masonry blades are an option for large sheets but use caution to minimize dust and avoid overheating the board.
Mounting prints or photos onto foam board starts with choosing the right adhesive. Acid-free spray adhesives and photo-safe glue sticks provide good bonding without damaging your prints. Place the foam board on a flat surface and carefully position the print before pressing. Use a clean roller or soft cloth to smooth out air bubbles, moving from the centre outward. This keeps the print flat and prevents wrinkles or lifting. Allow the adhesive to dry fully as noted on the glue directions, usually 15 to 30 minutes, to secure the bond.
To keep foam board in good condition, store it flat in a cool, dry place away from direct sunlight or heat sources. Heat can warp the foam, causing curling or bowing, while moisture can weaken the core or cause delamination. Avoid stacking heavy items on top to prevent dents and creases. If long-term storage is needed, place the board between rigid sheets to maintain its shape. Protect edges with cardboard corner guards if shipping or moving the board.
Common mistakes include pushing too hard with the knife, which can cause uneven cuts or crushing of the foam core, and using the wrong glue that bleeds through or wrinkles the print. Inadequate drying time after mounting can weaken the adhesive bond, causing prints to lift or shift. Cutting without a ruler or guide leads to crooked edges and an unprofessional look. For mounting, handling foam board roughly can dent or break the foam interior, spoiling your presentation.
Always use a fresh blade when cutting foam board, and score the surface multiple times with firm, even pressure to avoid jagged edges and crushed foam.
Step-by-Step Action Plan for Using Foam Board Effectively
Start your project with a clear approach that matches the foam board to your needs and ensures clean, safe handling.
- Before you start: Choose the right type and thickness of foam board based on your project’s purpose, such as thicker boards for insulation or rigid backing, and thinner ones for crafts or displays.
- Day 1: Gather proper cutting tools like a sharp utility knife and a straight edge. Test cuts on scraps to ensure clean, precise edges without crushing the foam.
- Day 2: Cut your foam board on a flat, stable surface using slow, steady strokes. Confirm smooth cuts by checking edges for any fluffing or roughness.
- Day 3: Handle foam board carefully to avoid denting or bending. Store panels flat and protected from moisture or direct sunlight to retain shape and strength.
- Week 1: Apply adhesives or mounting methods recommended for your foam board type, avoiding solvents that can damage the foam core. Test bond strength on small areas first.
- After 2 weeks: Check the foam board installations or craft components for any signs of weakening or warping, especially in insulation applications.
- Ongoing: Maintain your foam board items by cleaning with dry or slightly damp cloths, avoiding harsh chemicals that may degrade surfaces.
Frequently Asked Questions
Who Invented Foam Board and When Was It First Made?
Foam board was first manufactured by Monsanto in 1957 and sold under the brand name Fome-Core®. This innovation made foam board popular primarily for picture framing applications.
What Makes Self-Adhesive Foam Board Different from Regular Foam Board?
Self-adhesive foam board has a peel-and-stick surface, making it easier to mount photos and create display boards without additional glue or tape. It saves time during assembly.
Can Foam Board Be Recycled or Is It Environmentally Friendly?
Foam board recycling varies by location due to mixed materials; it’s generally not biodegradable. Checking with local recycling facilities is recommended before disposal.
What Are Typical Uses for Thinner Foam Board Like 1mm or 2mm?
Thinner foam boards (1mm or 2mm) are easy to cut and typically used for lightweight displays or mounting that can be fixed with staples.
How Does Foam Board Thickness Affect Its Rigidity and Use?
Thicker foam boards like 5mm offer more rigidity and support, making them suitable for backing prints and photo mounting, while thinner options are easier to cut but less supportive.
Are There Foam Boards Designed Specifically for Archival or Acid-Free Purposes?
Yes, many foam boards are acid-free and made for archival-quality framing, helping to preserve photos and artwork without yellowing over time.
Before You Go
Foam board offers a flexible and lightweight solution across many projects, from crafts to insulation. Picking the right kind and handling it with care helps you get clean results and lasting performance. Start by selecting the proper foam board type for your task, then follow careful cutting and storage steps to protect your investment and achieve professional-quality outcomes.